Developer Guide
SoConnect is a desktop app for SoC students to manage contacts of Professors and Teaching Assistants, as well as to keep track of noteworthy events, optimized for use via a Command Line Interface (CLI) while still having the benefits of a Graphical User Interface (GUI).
This developer guide is targeted at current and potential developers and testers of the SoConnect project. The purpose of this guide is to outline the architecture and some implementation details of SoConnect, so that developers and testers are aware of how to navigate this project.
- How to use the Developer Guide
- Acknowledgements
- Setting up, getting started
- Design
- Implementation
- Documentation, logging, testing, configuration, dev-ops
- Appendix: Requirements
- Appendix: Instructions for manual testing
How to use the Developer Guide
- You can click on the titles in the Table of Contents to jump the section that you are interested in.
- You will find these icons in this developer guide:
-
 Tip provides additional information that might be useful to you.
 -
 Note provides supplementary information that helps you to understand this Developer Guide.
 -
 Caution cautions you against certain actions that will lead to undesirable consequences.
-
- You can find explanations of italicized words in the Glossary.
Acknowledgements
- The Calendar UI is inspired by another team project - AY2122S1 CS2103T-F13-3. However, the implementation of the calendar UI is largely our own, other than a few instances of code reuse from the CalendarFX Quick Start page.
Setting up, getting started
Refer to the guide Setting up and getting started.
Design
.puml files used to create diagrams in this document can be found in the diagrams folder. Refer to the PlantUML Tutorial at se-edu/guides to learn how to create and edit diagrams.
This section will cover the design considerations and implementations of the various components of SoConnect, and how each component is related to other components.
Architecture
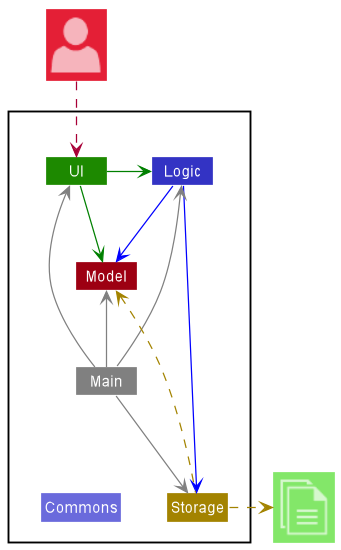
The Architecture Diagram given above explains the high-level design of the SoConnect App.
Given below is a quick overview of main components and how they interact with each other.
Main components of the architecture
Main has two classes called Main and MainApp. It is responsible for,
- At app launch: Initializes the components in the correct sequence, and connects them up with each other.
- At shut down: Shuts down the components and invokes cleanup methods where necessary.
Commons represents a collection of classes used by multiple other components.
The rest of the App consists of four components.
-
UI: The UI of the SoConnect app. -
Logic: The command executor. -
Model: Holds the data of the app in memory. -
Storage: Reads data from, and writes data to, the hard disk.
How the architecture components interact with each other
The Sequence Diagram below shows how the components interact with each other for the scenario where the user issues the command edelete 1.
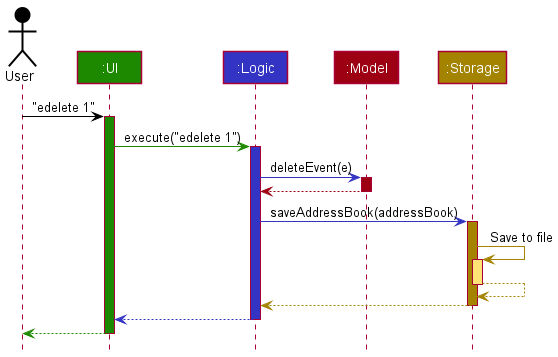
Each of the four main components (also shown in the diagram above),
- defines its API in an interface with the same name as the Component.
- implements its functionality using a concrete
{Component Name}Managerclass (which follows the corresponding API interface mentioned in the previous point).
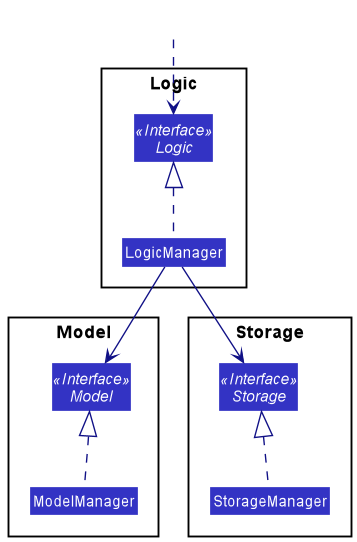
For example, the Logic component defines its API in the Logic.java interface and implements its functionality using the LogicManager.java class which follows the Logic interface. Other components interact with a given component through its interface rather than the concrete class (reason: to prevent outside component’s being coupled to the implementation of a component), as illustrated in the (partial) class diagram below.
The sections below give more details of each component.
UI component
The API of this component is specified in Ui.java
Here’s a (partial) class diagram of the UI component:
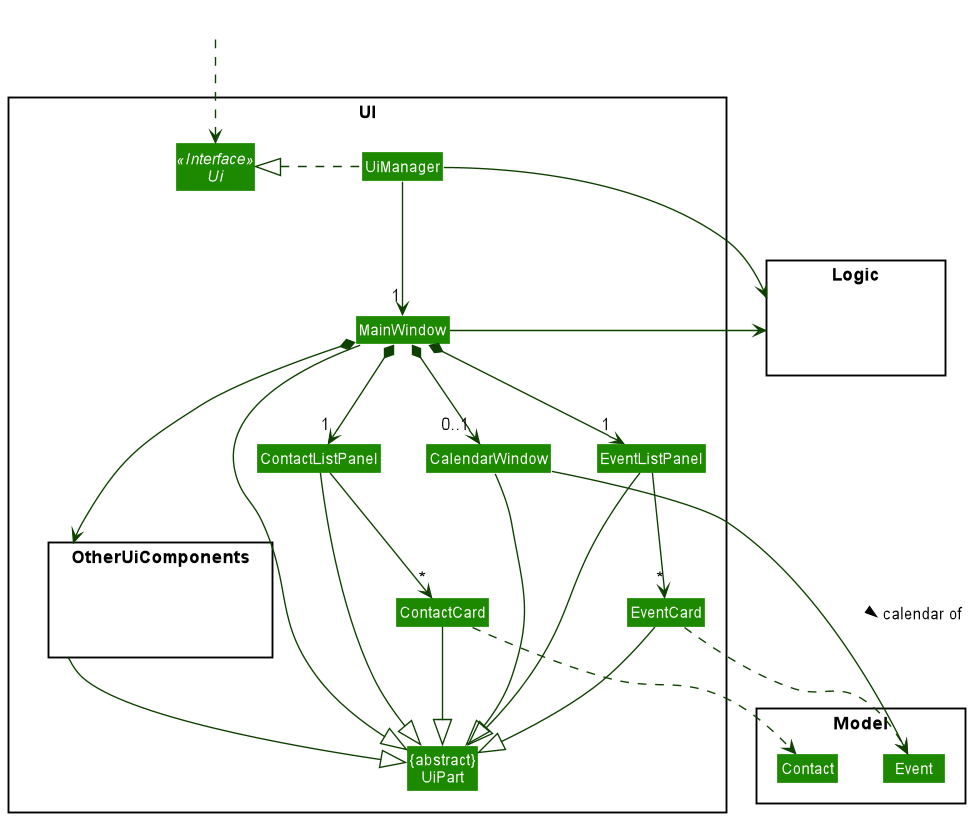
The UI consists of a MainWindow that is made up of several UiPart components, such as ContactListPanel, EventListPanel, CalendarWindow and the different components within Other UI components. The Other UI components contain the following classes: HelpWindow, CommandBox, StatusBarFooter and ResultDisplay. These classes are not drawn in the diagram for brevity.
The UI component uses the JavaFx UI framework. Only the CalendarWindow component uses the CalendarFX dependency. The layout of these UI parts are defined in matching .fxml files that are in the src/main/resources/view folder. For example, the layout of the MainWindow is specified in MainWindow.fxml
The UI component,
- passes the user commands to the
Logiccomponent to be executed. - listens for changes to
Modeldata so that the UI can be updated with the modified data. - keeps a reference to the
Logiccomponent, because theUIrelies on theLogicto execute commands. - depends on some classes in the
Modelcomponent, as it displaysContactandEventobjects residing in theModel.
Logic component
The API of this component is specified in Logic.java
Here’s a (partial) class diagram of the Logic component:
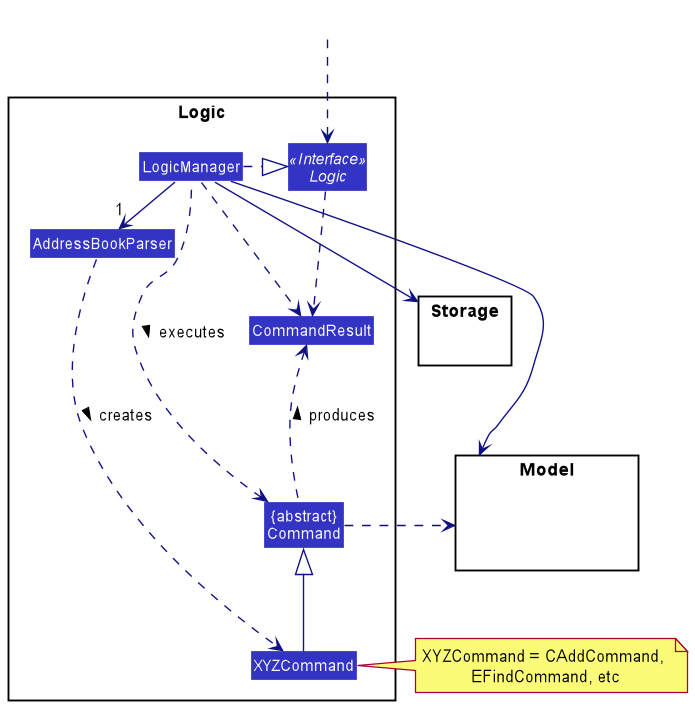
How the Logic component works:
- When
Logicis called upon to execute a command, it uses theAddressBookParserclass to parse the user command. - This results in a
Commandobject (more precisely, an object of one of its subclasses e.g.,CAddCommand) which is executed by theLogicManager. - The command can communicate with the
Modelwhen it is executed (e.g. to add a contact). - The result of the command execution is encapsulated as a
CommandResultobject which is returned fromLogic.
The Sequence Diagram below illustrates the interactions within the Logic component for the execute("edelete 1-3") API call.
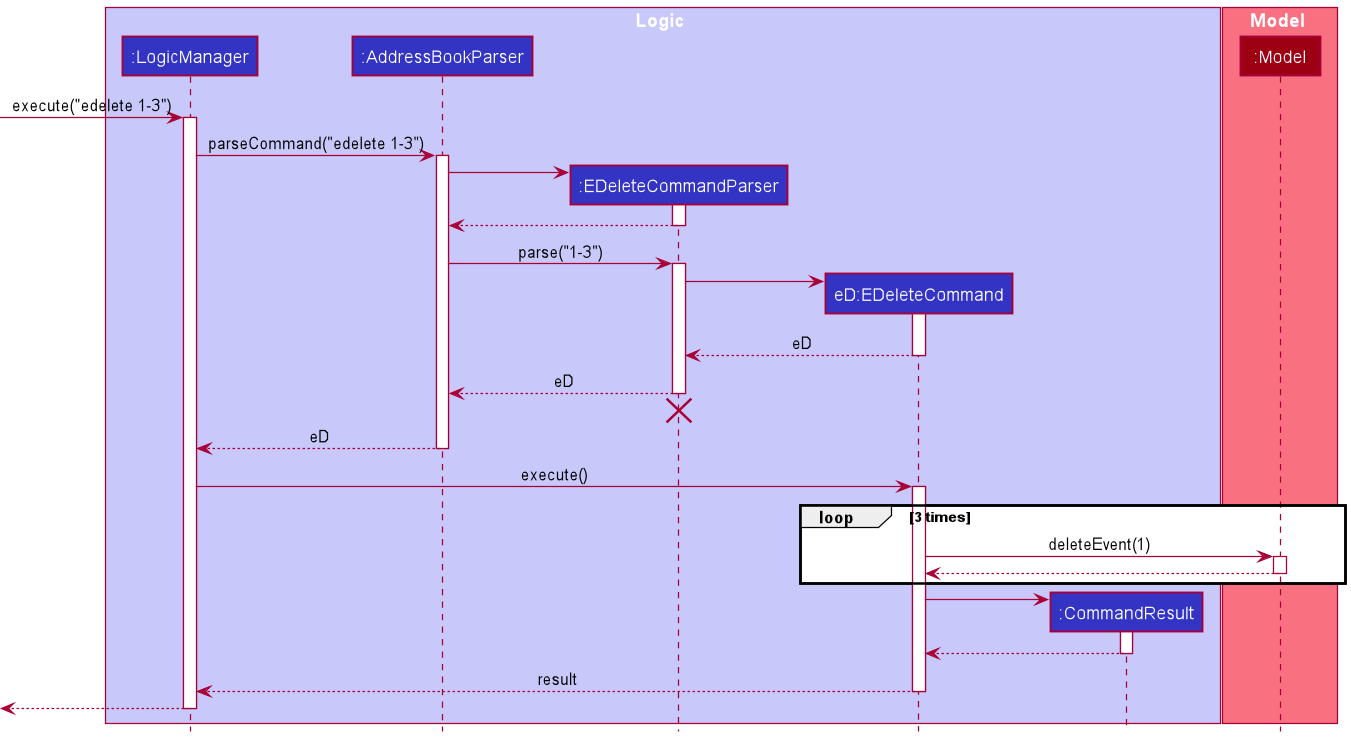
EDeleteCommandParser should end at the destroy marker (X) but due to a limitation of PlantUML, the lifeline reaches the end of diagram.
Here are the other classes in Logic (omitted from the class diagram above) that are used for parsing a user command:
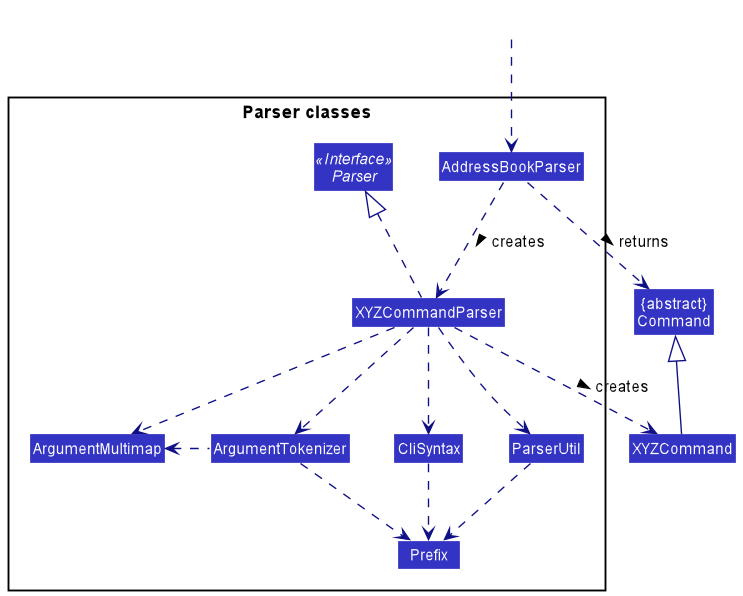
How the parsing works:
- When called upon to parse a user command, the
AddressBookParserclass creates anXYZCommandParser(XYZis a placeholder for the specific command name e.g.,CAddCommandParser) which uses the other classes shown above to parse the user command and create aXYZCommandobject (e.g.,CAddCommand) which theAddressBookParserreturns back as aCommandobject. - All
XYZCommandParserclasses (e.g.,CAddCommandParser,EDeleteCommandParser, …) inherit from theParserinterface so that they can be treated similarly where possible e.g, during testing.
Model component
The API of this component is specified in Model.java
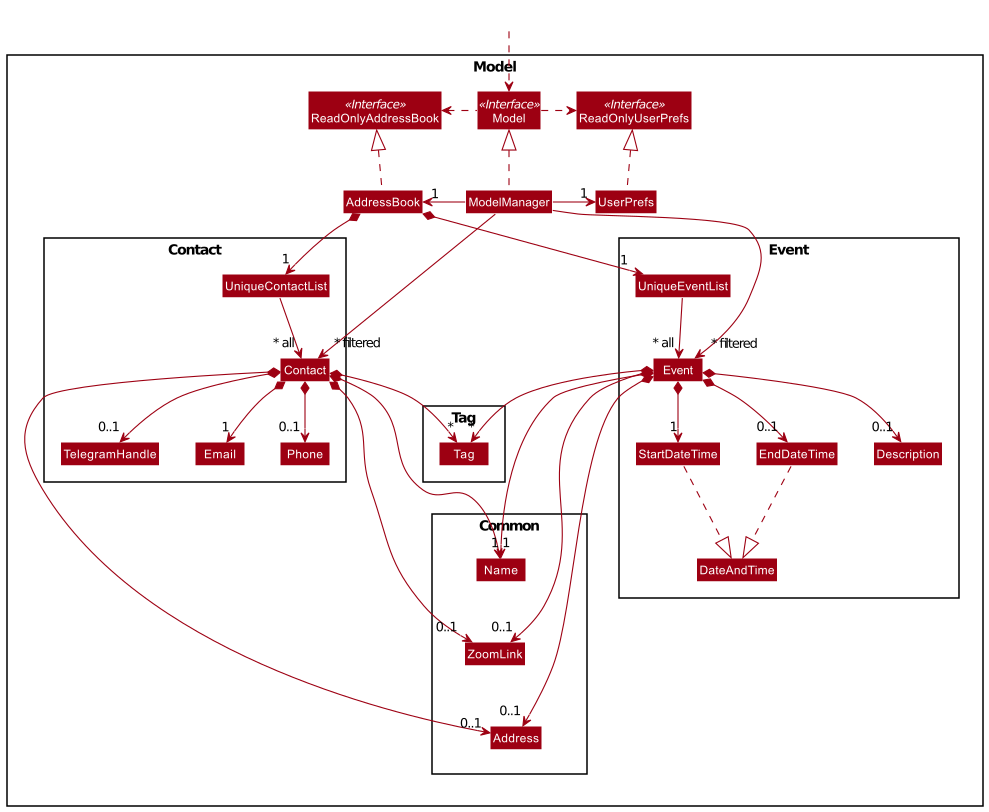
The Model component,
- stores the SoConnect data i.e., all
Contactobjects (which are contained in aUniqueContactListobject) and allEventobjects (which are contained in aUniqueEventListobject). - stores the currently ‘selected’
ContactandEventobjects (e.g., results of a search query) as a separate filtered list which is exposed to outsiders as an unmodifiableObservableList<Contact>andObservableList<Event>that can be ‘observed’ e.g. the UI can be bound to this list so that the UI automatically updates when the data in the lists change. - stores a
ModelDisplaySettingobject (not shown in the diagram) which will affect how the contacts and events will be displayed to the user. - stores a
UserPrefobject that represents the user’s preferences. This is exposed to the outside as aReadOnlyUserPrefobjects. - stores a
ModelHistoryobject (not shown in the diagram) which keeps track of all history instances of SoConnect. This is to facilitate theundoandredofeatures. - does not depend on any of the other three components (as the
Modelrepresents data entities of the domain, they should make sense on their own without depending on other components).
Tag list in the AddressBook, which Contact and Event references.
This allows AddressBook to only require one Tag object per unique tag,
instead of each Contact or Event needing their own Tag objects.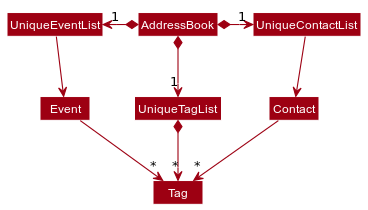
Storage component
The API of this component is specified in Storage.java

The Storage component,
- saves both address book data and user preference data in json format, and reads them back into corresponding objects.
- inherits from both
AddressBookStorageandUserPrefStorage, which means it can be treated as either one (if only the functionality of only one is needed). - depends on some classes in the
Modelcomponent (because theStoragecomponent’s job is to save/retrieve objects that belong to theModel).
Common classes
Classes used by multiple components are in the seedu.addressbook.commons package. For example, the Range class, specified in Range.java encapsulates a range of indexes that are used by the EDeleteCommand and CDeleteCommand classes in logic.
Implementation
This section describes some noteworthy details on how certain features are implemented.
Mark Contacts feature
This section details how the cmark command is implemented. This command allows the user to mark frequently used contacts, with the added feature of allowing the user to specify more than one contacts to mark. The marked contacts will appear at the top of the contact list and in reverse order in which their corresponding indexes are specified.
Implementation
Both CMarkCommandParser and CMarkCommand classes are involved in the execution of the cmark command.
The parse method inside the CMarkCommandParser receives the user input, extracts the required index(es). It then creates a new List of Index(es) objects that will encapsulate the indexes of the contacts to be marked.
CMarkCommandParser#parse will throw a ParseException if the argument is empty, not an integer or is outside of the contact index range.
CMarkCommandParser#parse method will then return an CMarkCommand with the given List of Index object.
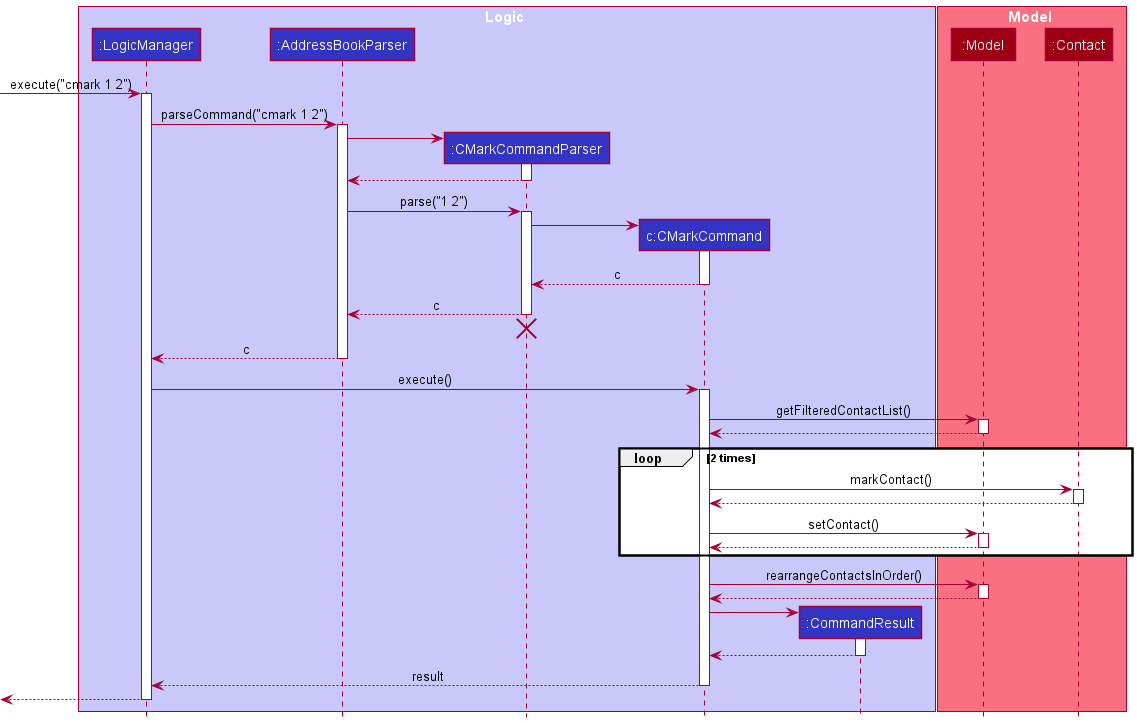
Given below is one example usage scenario and explains how the cmark feature behaves at each step. You may also refer to the sequence diagram below.
Step 1. The user enters cmark 1 2 to mark the first and second contact displayed in the contact list. The arguments 1 2 are passed to the CMarkCommandParser through the parse method call.
Step 2. The user input 1 2 will be subjected to checks by String#trim to ensure that argument provided is not empty. Parserutil#parseMarkIndexes will check for invalid arguments and create a list of Index object(s).
Step 3. From this example, the List of Indexes created will contain two elements, both of which are Indexes and contain the integer value 1 and 2 respectively.
Step 4. A new CMarkCommand object is returned to the LogicManager.
Step 5. During the execution of the command, the CMarkCommand object gets the filteredContactList in the Model and gets the relevant contacts using the object created in step 3. For each contact identified, the command will check if the contact is originally marked, if so it will generate a message saying the particular contact is already marked. Otherwise, a new marked Contact containing the same details as the original contact is created and replaces the original contact in the Model. Thereafter, the list of contact in the model is rearranged using Model#rearrangeContactsInOrder, which will cause newly marked contacts to be placed at the top of the contact list.
Step 6. A CommandResult with all newly marked contacts is returned and will be displayed to the user.
Sequence Diagram
The following sequence diagram shows how the cmark feature works for the example above:
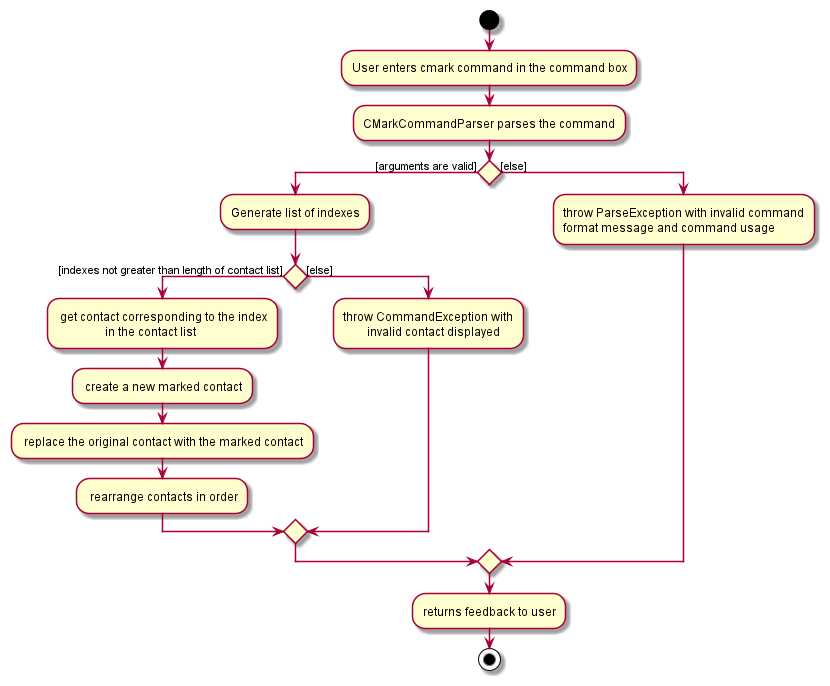
Activity Diagram
The following activity diagram summarizes what happens when the cmark feature is triggered:
Design Considerations
Aspect: Marking of contacts:
-
Alternative implementation 1: CMarkCommand that does not place newly marked contacts at the top of the list.
- Pros: Easier to implement as there is no need to keep track of which contacts are marked and the order in which they are marked.
- Cons: Users still have to scroll through the entire contact list to find the marked contact(s).
-
Alternative implementation 2 (current choice): CMmark replaces newly marked contacts at the top of the contact list.
- Pros: Easier for the users to differentiate the marked portion of the contact list from the unmarked portion.
- Cons: Harder to implement as there is a need to keep track of the order in which the contacts is marked and rearrange the contact list after each
cmarkcommand.
Aspect: Allowing users to specify more than one index:
-
Alternative implementation 1: Not allowing users to specify more than one index.
- Pros: Easier to implement as there is no need to keep track of the order in which the indexes are specified.
- Cons: User may have to scroll through or use
cmarkcommand to mark multiple contact(s).
-
Alternative implementation 2 (current choice): Allowing users to specify more than one index.
- Pros: Command is more efficient as users can mark more than one contact at the same time.
- Cons: Harder to implement as more code is needed to facilitate the marking of multiple contacts in the correct order.
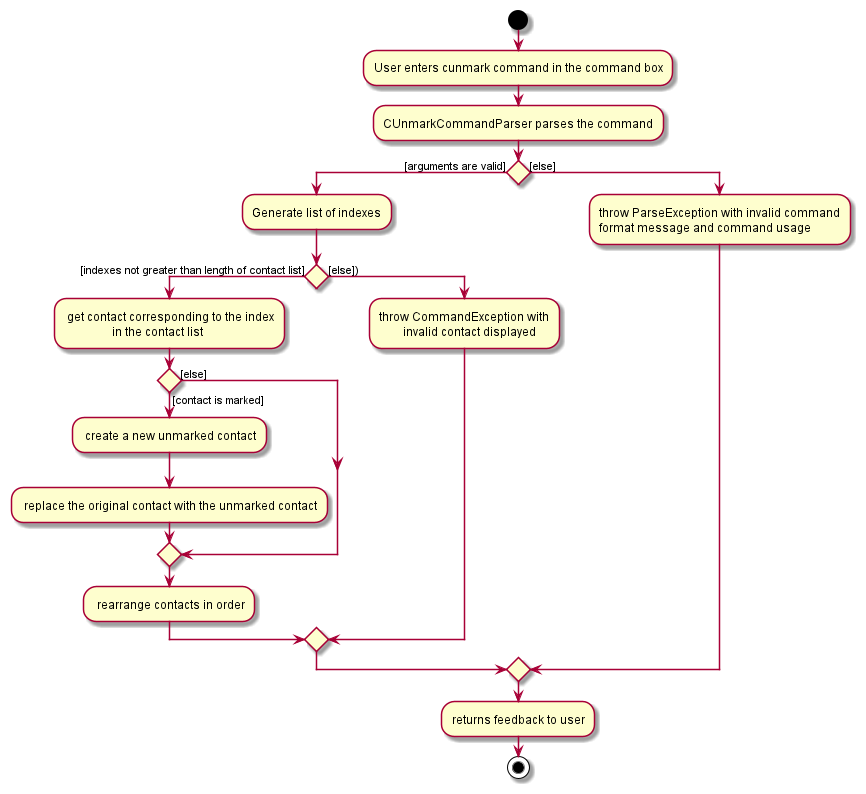
Unmark Contacts feature
This section details how the cunmark command is implemented. This command allows the user to unmark marked contacts, with the added feature of allowing the user to specify more than one contacts to unmark. The marked contacts will appear after all marked contacts and in order in which their corresponding indexes are specified.
Implementation
Both CUnmarkCommandParser and CUnmarkCommand classes are involved in the execution of the cunmark command.
The parse method inside the CUnmarkCommandParser receives the user input, extracts the required index(es). It then creates a new List of Index(es) objects that will encapsulate the indexes of the marked contacts to be unmarked.
CUnmarkCommandParser#parse will throw a ParseException if the argument is empty, contains invalid values or the contact at the specifed index is not initially marked.
CUnmarkCommandParser#parse method will then return an CUnmarkCommand with the given List of Index object.
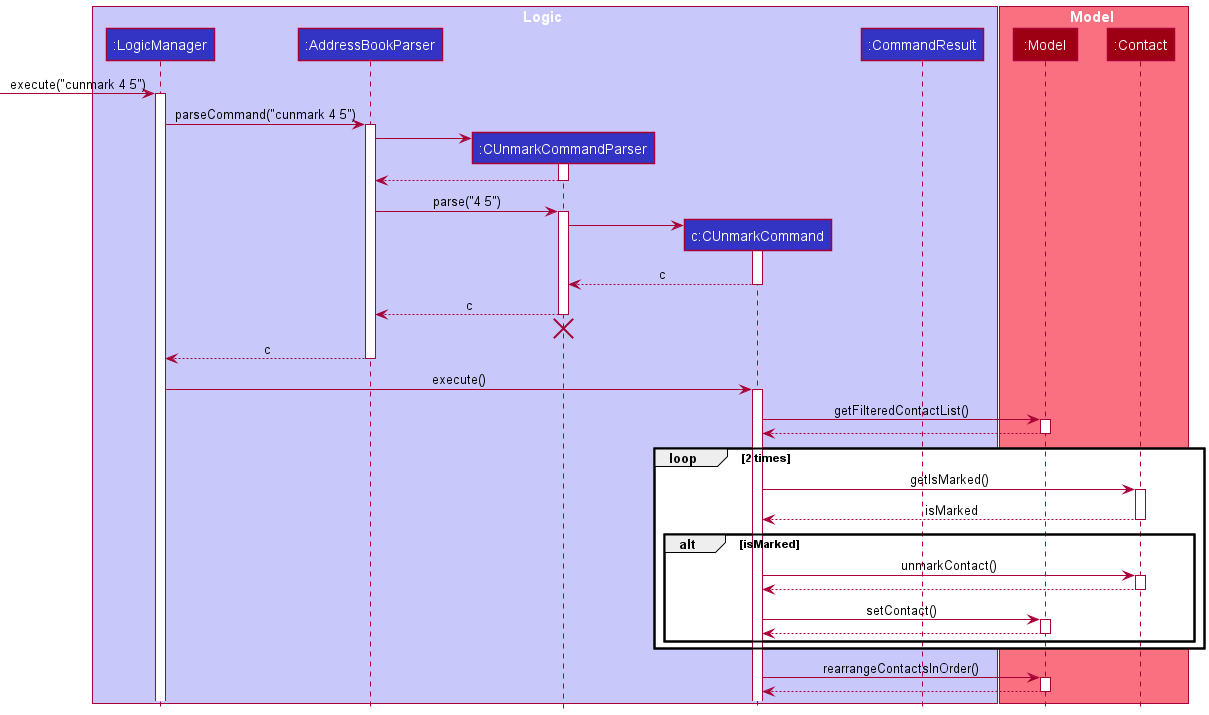
Given below is one example usage scenario and explains how the cunmark feature behaves at each step. You may also refer to the sequence diagram below.
Step 1. The user enters cunmark 4 5 to unmark the fourth and fifth marked contact displayed in the contact list. The arguments 4 5 are passed to the CUnmarkCommandParser through the parse method call.
Step 2. The user input 4 5 will be subjected to checks by String#trim to ensure that argument provided is not empty. Parserutil#parseMarkIndexes will check for invalid argument and create a list of Index from the argument.
Step 3. From this example, the List of Indexes created will contain two elements both of which are Indexes and contains the integer value 4 and 5 respectively.
Step 4. A new CUnmarkCommand object is returned to the LogicManager.
Step 5. During the execution of the command, the CUnmarkCommand object retrieves the filteredContactList in the Model and get the relevant contacts using the object created in step 3. For each contact identified, the command will check if the contact is not marked, if so a message saying the contact is not marked will be generated. Otherwise, a new unmarked Contact object containing the same details as the original contact is created and replaces the original contact in Model. Thereafter, the list of contact in the model is rearranged using Model#rearrangeContactsInOrder, which will cause newly unmarked contacts to be placed below all marked contacts in the contact list.
Step 6. A CommandResult with all newly unmarked contacts is returned and will be displayed to the user.
Sequence Diagram
The following sequence diagram shows how the cunmark feature works for the example above:
Activity Diagram
The following activity diagram summarizes what happens when the cunmark feature is triggered:
Design Considerations
Aspect: Unmarking of contacts:
-
Alternative implementation 1: CUnmarkCommand that does not replace newly unmarked contacts after all marked contacts.
- Pros: Easier to implement as there is no need to keep track of which the newly unmarked contacts.
- Cons: The marked contacts will no longer be at the top of the contact list, users would still have to scroll through the entire list of unmark and marked contacts to find a specific marked contact(s).
-
Alternative implementation 2 (current choice): CUnmark replaces newly unmarked contacts below marked contacts.
- Pros: Easier for the users to differentiate the marked portion of the contact list from the unmarked portion.
- Cons: Harder to implement as there is a need to keep track of the order in which the contacts is unmarked and rearrange the contact list after each
cunmarkcommand.
Aspect: Whether to allow users to specify more than one index:
-
Alternative implementation 1: Only allow users to specify one
Index.- Pros: Easy to implement as the newly unmarked contacts is simply removed and added after all marked contacts.
- Cons: The user may want to unmark multiple contacts, which result in having to call
cunmarkcommand multiple times.
-
Alternative implementation 2 (current choice): Allow users to specify one or more
Index(es).- Pros: This command is more efficient, users can now unmark more than one contacts at the same time, saving time from having to call
cunmarkrepeatedly. - Cons: More code will have to be written in order to facilitate unmarking multiple contacts and ensuring they are rearranged in the correct order.
- Pros: This command is more efficient, users can now unmark more than one contacts at the same time, saving time from having to call
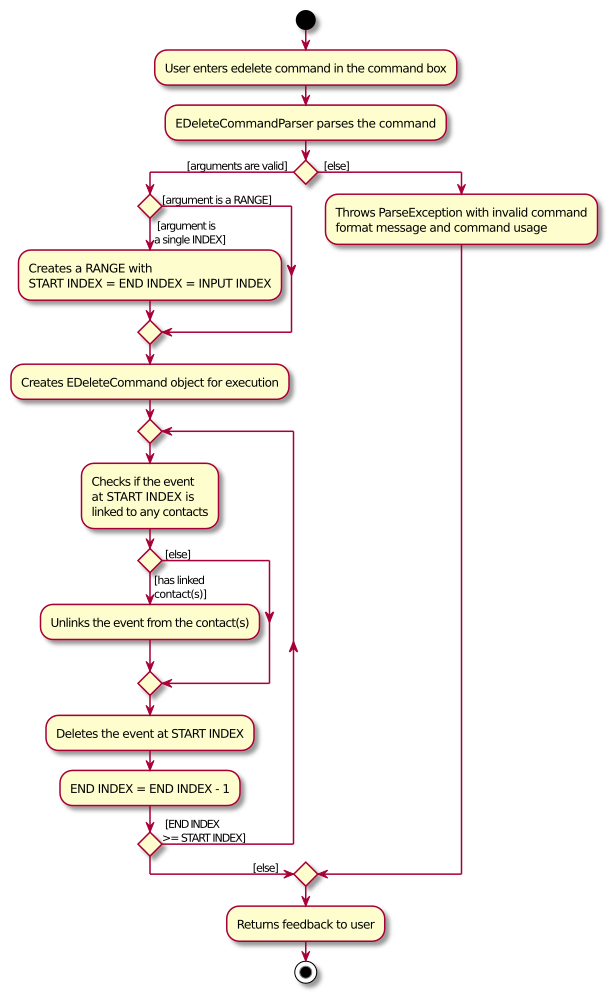
Delete Events feature
This section details how an Event or multiple Event objects are deleted using the edelete command.
The edelete command allows users to delete a single or an inclusive range of consecutive events from the current event list shown on SoConnect. The user needs to specify either an Index or a Range of event(s) to be deleted. Such event(s) would be removed from the EventListPanel in the GUI.
Implementation
We will use an example command: edelete 1-3.
Given below is the usage scenario of the above example and explains how the edelete feature behaves at each step.
Step 1: The user enters the command edelete 1-3 to delete the events at indexes 1, 2 and 3.
Step 2: The user input argument is passed to the EDeleteCommandParser object, which parses the input arguments and creates a Range object for the range .
Range object will only be created if the input arguments pass the checks of ArgumentMultimap and ParserUtil methods.
Step 3: This Range object is used to construct a new EDeleteCommand object. EDeleteCommand object is then returned to LogicManager to be executed.
Step 4: During the execution, the EDeleteCommand object repeatedly deletes each event from the most updated event list through the Model#deleteEvent method.
Model#deleteEvent method would then check if the event to be deleted is linked to any contacts.
If the event has linked contacts, Model#deleteEvent would first unlink the event and the linked contacts through Model#unlinkContactsFromEvent before deleting the event.
At the same time, a new list of EventChanger objects containing all the events to be deleted will be created.
The Calendar UI implementation will discuss the use of this list.
Index for edelete, a Range object is created with the same start and end Index.
Sequence Diagram
The sequence diagram below shows how the execution of the example command flows:
EDeleteCommandParser should end at the destroy marker (X) but due to a limitation of PlantUML, the lifeline reaches the end of diagram.
Activity Diagram
The activity diagram below shows how the execution of the edelete command flows:
Design considerations
Aspect: Type of user inputs:
-
Alternative 1 (current choice): Either a single Index or a Range can be specified.
- Pros: Easy to implement.
- Cons: Unable to delete multiple ranges of events or events that are not ordered consecutively in the event list.
-
Alternative 2: Allow a mixture of multiple single indexes and multiple ranges
- Pros: Able to delete events more efficiently.
- Cons: We must ensure that the order of delete of the events is correct. It is more complex to keep track of the events to be deleted.
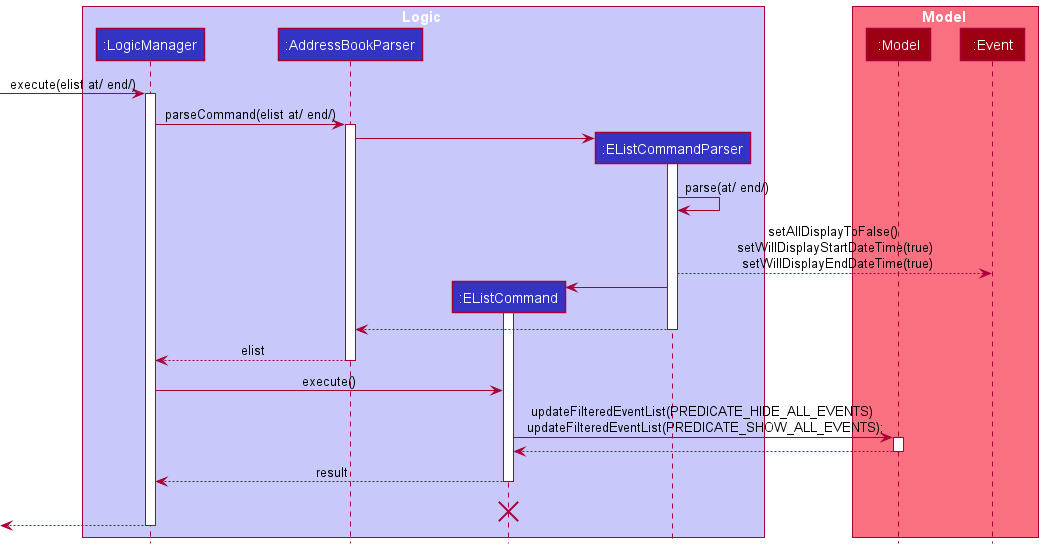
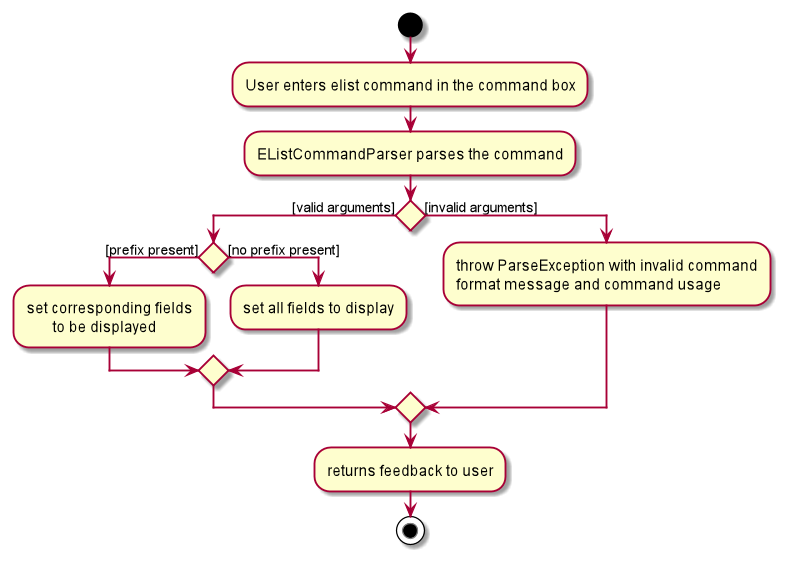
List Events feature
This section details how the elist command is implemented. This command allows the user to view all events, with the added feature of allowing the user to specify which field to display. By default, all fields will be displayed.
Implementation
As outlined in the Logic component section, both EListCommandParser and EListCommand classes are involved in the execution of the elist command.
The parse method inside the EListCommandParser receives the user input, extracts the required prefix(es). It then creates a new immutable EventDisplaySetting object that will encapsulate the visibility of the various fields for all events in the GUI.
- If no prefix is provided, the
parsemethod will set all fields of theEventclass to be displayed. This is the default setting. - If one or more prefix(es) is / are provided,
parsewill set the corresponding field(s) to be displayed, sets the rest of the fields to be hidden.
EListCommandParser#parse throws a ParseException.
EListCommandParser#parse method will then return an EListCommand with the given EventDisplaySetting object.
Given below is one example usage scenario and explains how the elist feature behaves at each step. You may also refer to the sequence diagram below.
Step 1. The user enters elist at/ end/ to display only the start and end timings of events. The arguments at/ end/ are passed to the EListCommandParser through the parse method call.
Step 2. The user input at/ end/ will be subjected to checks by methods from ArgumentMultimap to ensure that there are no incorrect arguments in the command. Examples of incorrect arguments include 1 or at/3.
Step 3. A EventDisplaySetting object is created based on the input arguments.
- If there are no inputs, then the default
EventDisplaySetting.DEFAULT_SETTINGobject is created. - Since there are inputs for this example, an
EventDisplaySettingwith thewillDisplayfields forstartDateTimeandendDateTimeset to true. All other fields will be set to false (hidden from the user).isViewingFullwill be set to false, since this is not aviewcommand.
Step 4. A new EListCommand object is returned to the LogicManager.
Step 5. During the execution of the command, the EListCommand object will set update the EventDisplaySetting of the Model to the object created in step 3. Thereafter, the event cards are re-rendered, which will cause the EventListPanel in the UI component to update all the EventCard elements to display the events based on the new display settings.
Step 6. A CommandResult with all events listed is returned and will be displayed to the user.
Sequence Diagram
The following sequence diagram shows how the elist feature works for the example:
Activity Diagram
The following activity diagram summarizes what happens when the elist feature is triggered:
Design Considerations
Aspect: Whether to allow hiding of specific fields:
-
Alternative implementation 1: EListCommand displays all fields.
- Pros: No need to check for valid prefixes.
- Cons: User may be interested in one field, but has to look through all the fields.
-
Alternative implementation 2 (current choice): EListCommand allows users to choose which fields to display.
- Pros: User can choose to hide long details about the event and focus on the details important to them.
- Cons: There is more room for mistakes, since it is more difficult to parse the user input correctly.
Aspect: Changing the display settings of events:
-
Alternative implementation 1: Keep the settings directly in static fields in the
Eventclass.- Pros: Easy to implement and it is possible to change the settings even in the parser.
- Cons: It is difficult to test static variables since other tests may interfere with the state of the variables. Moreover, it will be impossible to implement a feature such as undo if the static fields are changed. This is unlike having a separate object like
EventDisplaySetting, which is immutable and can be stored in history. In general, manipulating global static variables is a bad idea.
-
Alternative implementation 2 (current choice): Encapsulate the settings in a
EventDisplaySettingclass and update it in theModelManager.- Pros: The settings are immutable so the implementation is less prone to errors.
- Cons: More code will have to be written in order to facilitate the change in display settings.
Link Event feature
This section details how an Event object is linked to one or more Contact objects using the elink command.
The elink command allows users to link an event to one or more contacts from the current event list and contact list shown in SoConnect.
The user needs to specify the Index of the event as well as the Index of the contacts to link. Index of the event must
come first, followed by that of contacts. To differentiate the Index of contact and event, the user needs to specify the
prefix c/ right before every Index of the contact to be linked to the event.
Implementation
The following operations are the main operations for elink.
-
ELinkCommandParser#parse- Parse the user inputs and create aELinkCommandobject to return. -
ELinkCommand#execute- Links the event to the target contacts.
We will use an example command elink 1 c/1 c/2 c/3, together with a sequence diagram, to explain how the elink feature works.
Sequence Diagram
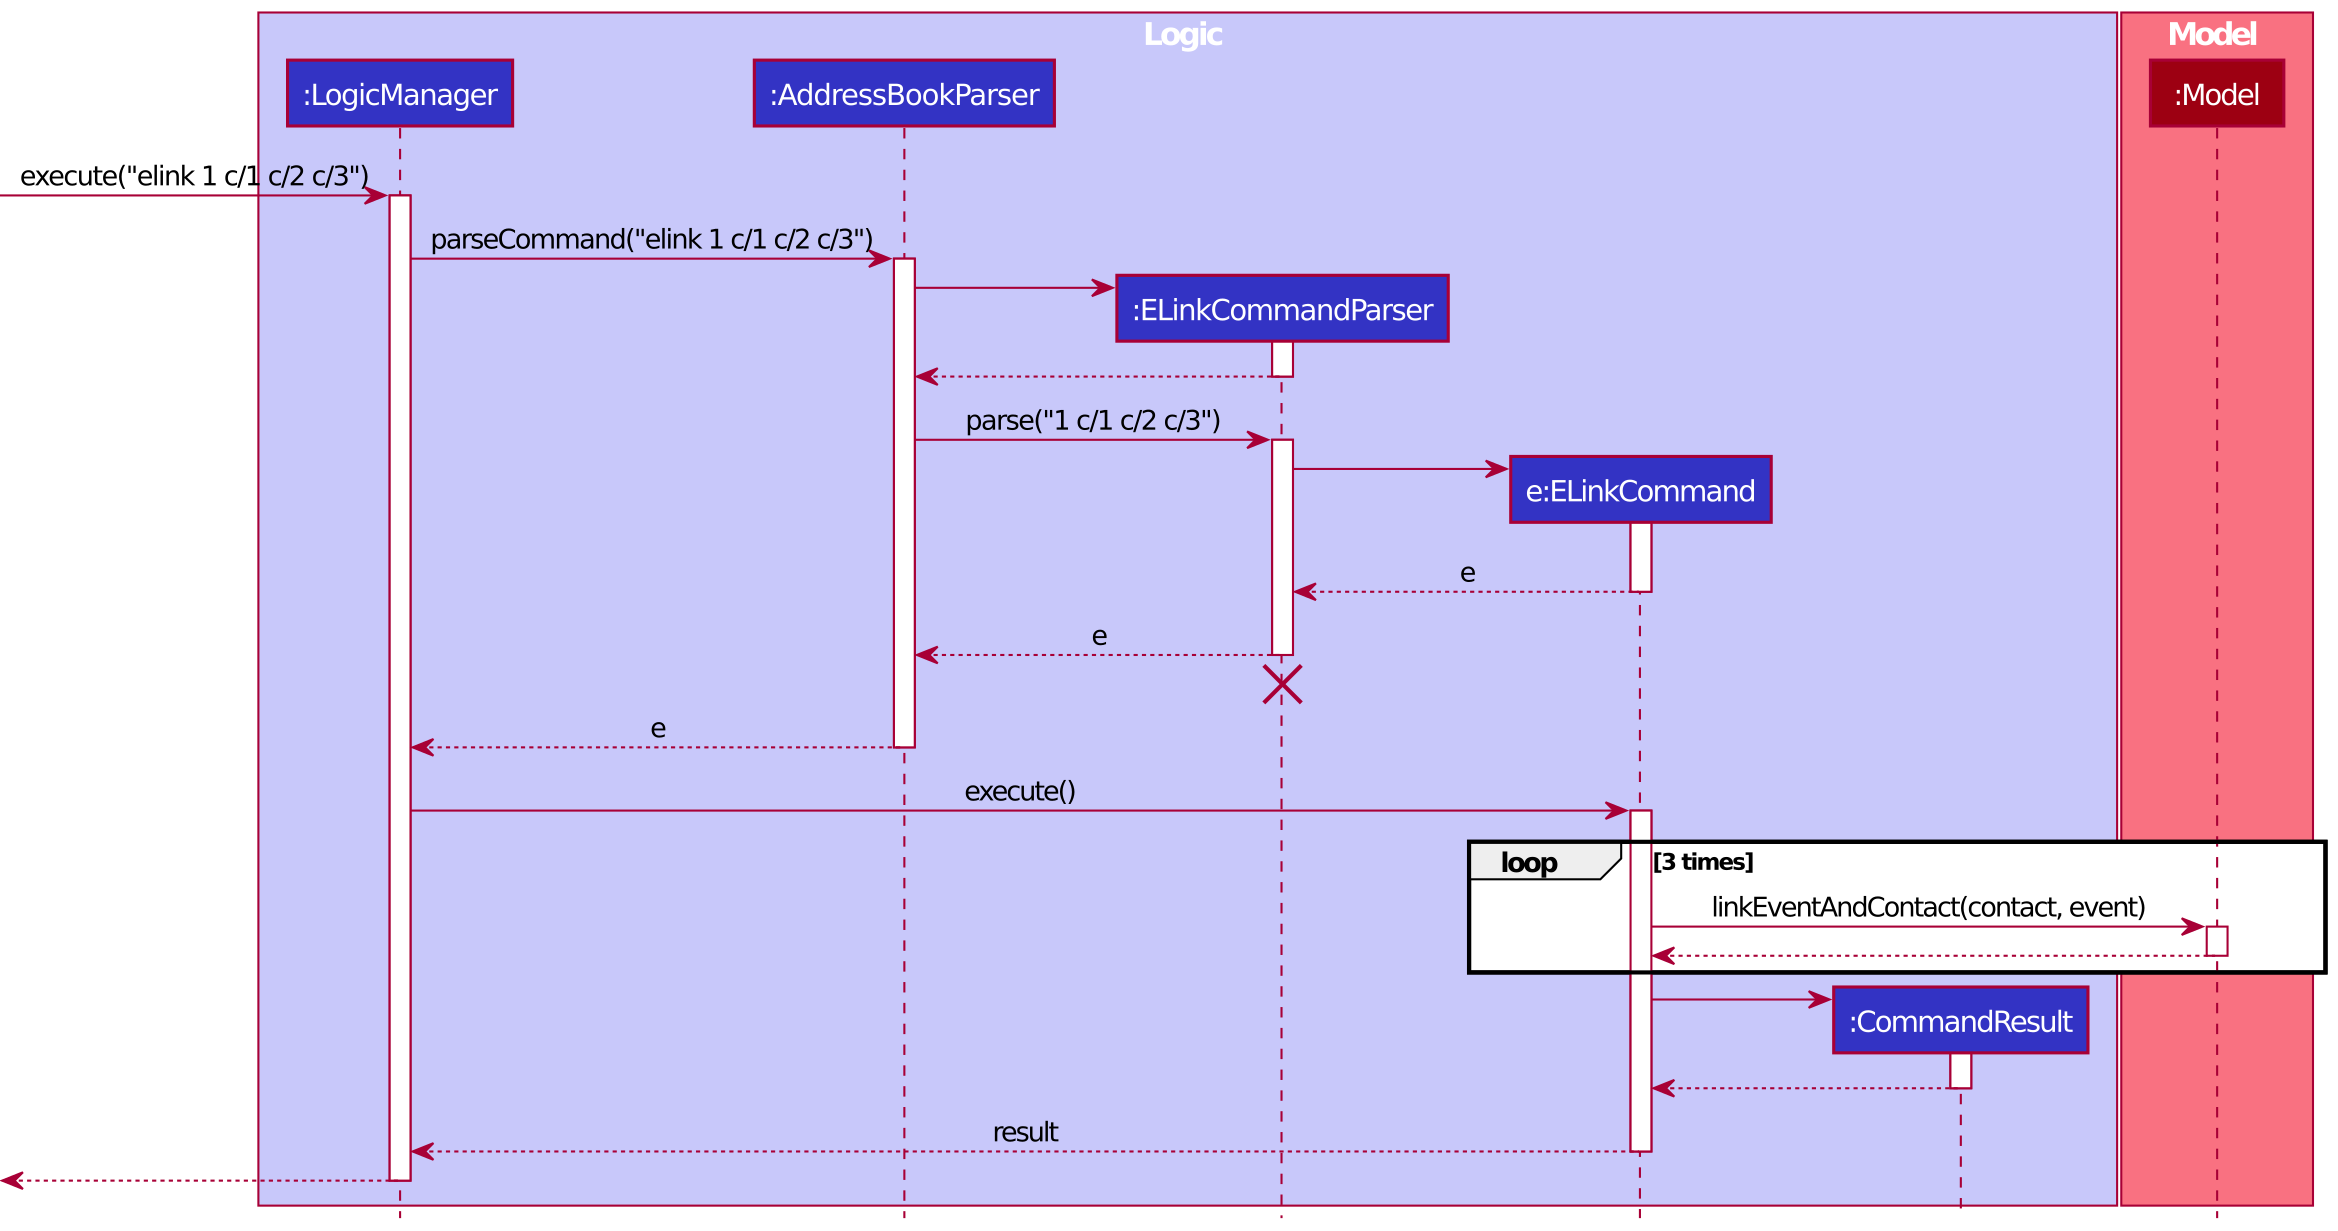
ELinkCommandParser should end at the destroy marker (X) but due to a limitation of PlantUML, the lifeline reaches the end of diagram.
Given below is the usage scenario from the example command elink 1 c/1 c/2 c/3, and explains how the elink feature behaves at each step.
Step 1: The user enters elink 1 c/1 c/2 c/3 to link the event at index 1 to the contacts at indexes 1, 2 and 3.
The argument 1 c/1 c/2 c/3 are passed to the ELinkCommandParser through the parse method call.
Step 2: The argument 1 c/1 c/2 c/3 will be subjected to checks by methods from ArgumentMultimap and ParserUtil to ensure that there are no
incorrect arguments in the command. Examples of incorrect arguments include 1 or c/2 1.
Step 3: A HashSet of type Index
containing the indexes of contact is created. The index of event and the HashSet(https://docs.oracle.com/en/java/javase/11/docs/api/java.base/java/util/HashSet.html) is passed as arguments to construct an
linkCommand object. ELinkCommand object is then returned to LogicManager to be executed.
Step 4: During the execution of the command, the ELinkCommand object links the event at index 1 to each of the contacts
through the Model#linkEventAndContact method call, by looping through the HashSet(https://docs.oracle.com/en/java/javase/11/docs/api/java.base/java/util/HashSet.html) containing the indexes of the contacts.
Step 5. A CommandResult containing information about each link status will be displayed to the user.
CommandResult to let user know instead of throwing a CommandException.
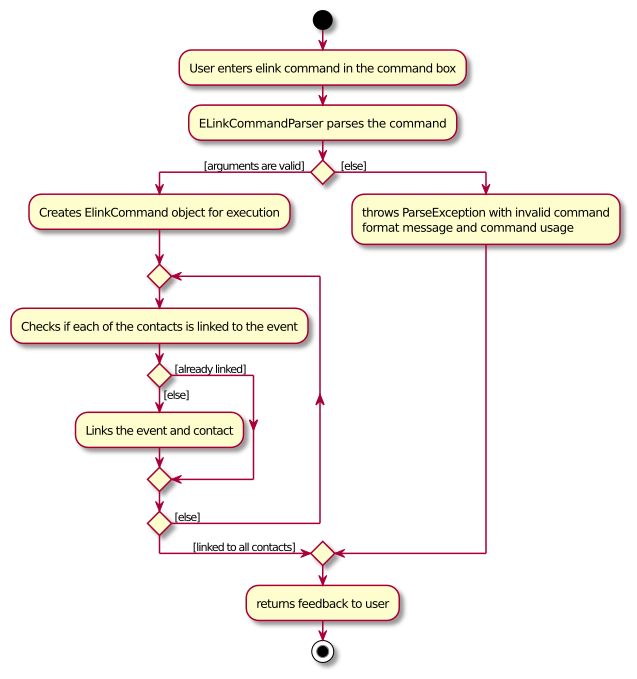
Activity Diagram
The following activity diagram summarizes what happens when the elink feature is triggered:
Design Considerations
Aspect: The relationship of the link:
-
Alternative implementation 1: The event has a reference to contacts that are linked to it but not the other way.
- Pros: Easy to implement. We only need to manage the relationship of the link in
Eventobject. - Cons: It is less efficient if we want to make changes to the contacts through other commands because we have to go through all events to find out which events have links to the contact.
- Pros: Easy to implement. We only need to manage the relationship of the link in
-
Alternative implementation 2 (current choice): Both event and contact have reference to each other if they are linked.
- Pros: More efficient.
- Cons: Have to enforce the bidirectional relationship strictly which is hard to implement and bug-prone.
Aspect: Whether to update the existing contact/event objects to show the link:
-
Alternative implementation 1: Update the contact/event to have information about their linked events/contacts.
- Pros: Easy to implement.
- Cons:
ContactandEventobjects are no longer immutable. Increase in difficulty of testing.
-
Alternative implementation 2 (current choice): Creates new
ContactandEventobjects with link to each other and making them immutable.- Pros: Less likely to have bugs. Works well with other commands like
undoandredobecause any changes in the link will create new objects ofContactandEvent, hence making it easier to store history of the contacts and events. - Cons: May have performance issues in terms of memory usage because other commands like
EDeleteCommandandCEditCommandmay result in change in link relationship, resulting in the creation of newContactorEventobjects.
- Pros: Less likely to have bugs. Works well with other commands like
Undo/redo feature
This section explains how undo and redo features are implemented. These features allow users to reverse the effect of
their previous command by using undo, and restore the previously undone action by using redo.
Implementation
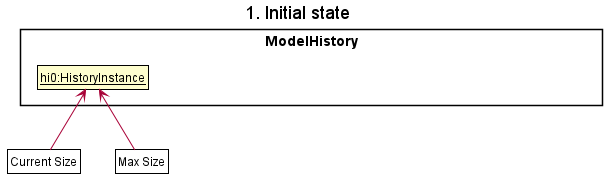
The undo/redo mechanism is facilitated by ModelHistory, stored internally as allHistory, an ArrayList of all HistoryInstance of addressBook.
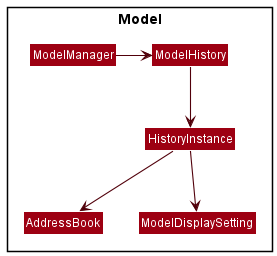
-
HistoryInstanceis a nested class insideModelHistorywhich keeps track of the current state ofAddressBookand itsModelDisplaySetting. -
allHistoryis managed by two pointerscurrentSizeandmaxSize.currentSizeindicates the current point in history, whilemaxSizeindicates the last point of history. Both of these pointers will be initialized to 0 when the modelHistory is first created. -
Model Historyimplements the following operations:-
commit()— Saves the current history instance in the history. -
undo()— Restores the previous history instance book state from its history. -
redo()— Restores a previously undone history instance from its history.
-
These operations are exposed in the Model interface as Model#commitHistory(), Model#undoHistory() and Model#redoHistory() respectively.
Given below is an example usage scenario and how the undo/redo mechanism behaves at each step.
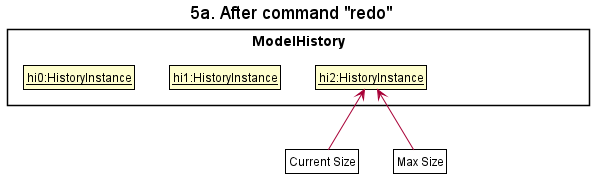
Step 1. The user launches the application for the first time. A new model history will be initialized. The first version of AddressBook and ModelDisplaySetting will also create the first history instance in the history. Both current and maximum size of history will increment by one.
Step 2. The user executes edelete 5 command to delete the 5th event in the event list. The edelete command calls Model#commitHistory(), causing the modified state of the address book after the edelete 5 command executes to be saved in allHistory as a new history instance. Both currentSize and maxSize are incremented by 1, pointing to the newly inserted history instance.
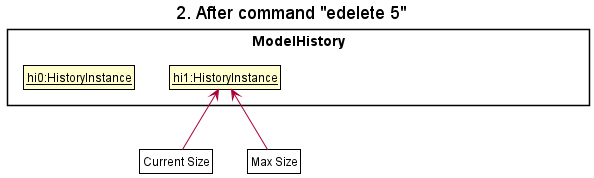
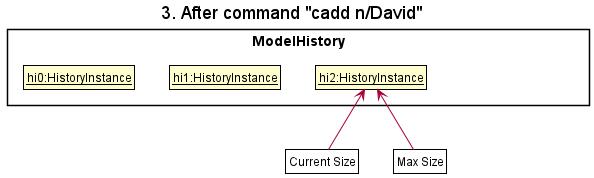
Step 3. The user executes cadd n/David … to add a new contact. The cadd command also calls Model#commitHistory(), causing another modified state to be saved into allHistory.
![]() Tip:
Tip:
- If a command fails its execution, it will not call
Model#commitHistory(), so the address book state will not be saved intoallHistory. - For general commands (help, exit, calendar, undo, redo),
Model#commitHistory()will not be called as they do not cause any changes to addressBook.
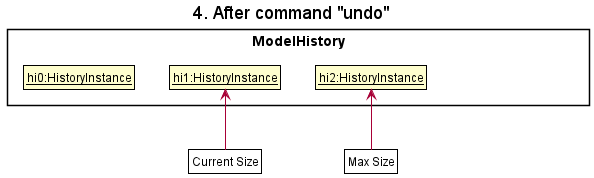
Step 4. The user now decides that adding the contact was a mistake, and decides to undo that action by executing the undo command. The undo command will call Model#undoHistory(), which will shift the currentSize once to the left, pointing it to the previous history instance, and restores the address book and its displaySetting to that state. Pointer maxSize will not shift and will stay at the end point of the history.
currentSize is at index 0 or 1, it is pointing to an empty history or the initial HistoryInstance. Thus, there are no previous history instances to restore. The undo command uses Model#isUndoable() to check if this is the case. If so, it will return an error to the user rather than attempting to perform the undo action.
Undo sequence diagram
The following sequence diagram shows how the undo operation works:
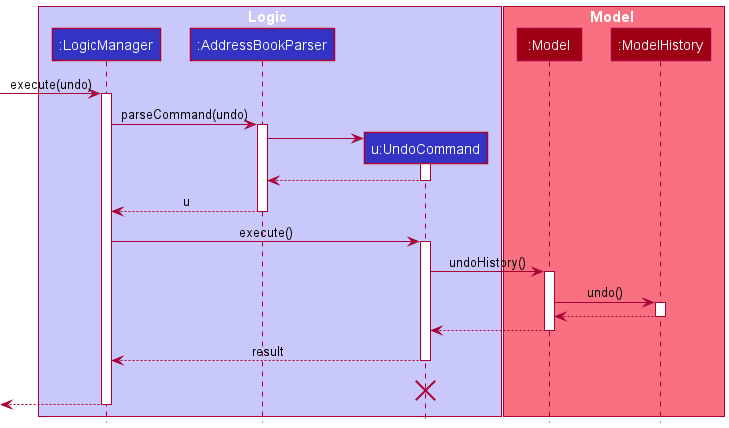
UndoCommand should end at the destroy marker (X) but due to a limitation of PlantUML, the lifeline reaches the end of diagram.
The redo command does the opposite — it calls Model#redoHistory(), which shifts the currentSize once to the right, pointing to the previously undone state, and restores the address book and its display setting to that state.
currentSize is at the same point as maxSize, pointing to the latest history instance, then there are no undone AddressBook states to restore. The redo command uses Model#isRedoable() to check if this is the case. If so, it will return an error to the user rather than attempting to perform the redo.
Step 5.
- If the user decides to
redothe previousundocommand, the pointercurrentSizewill again be shifted forward by one, pointing to the last history instance. The previously undone addressBook state is restored.
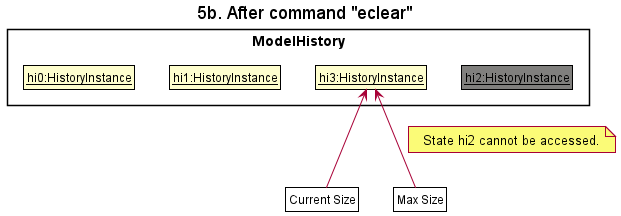
- If the user instead executes another command such as
eclear, this will callModel#commitHistory(). This will create a new history instance right after the current instance. BothcurrentSizeandmaxSizewill be reset to point to this new instance. Any history instance following after will be ignored. Reason: It no longer makes sense to redo thecadd n/David …command. This is the behavior that most modern desktop applications follow.
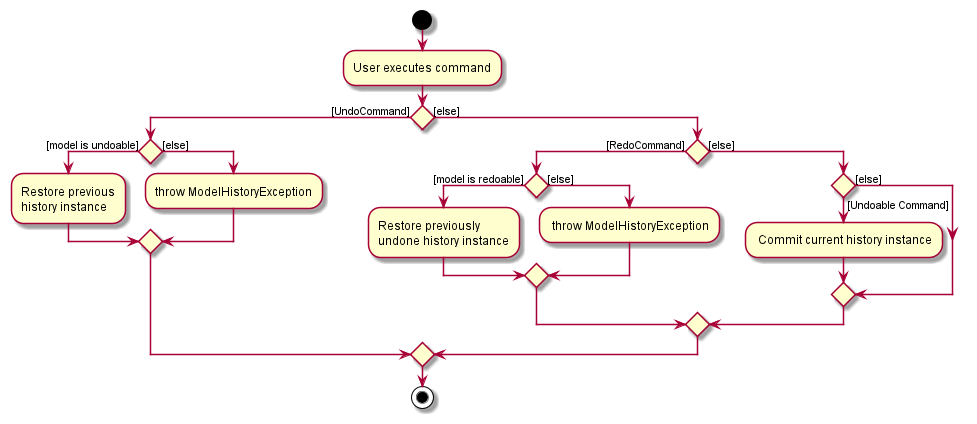
Activity diagram
The following activity diagram summarizes what happens when a user executes a new command:
Design considerations
Aspect: How undo & redo executes:
-
Alternative 1 (current choice): Saves the entire address book and its display setting.
- Pros: Easy to implement.
- Cons: May have performance issues in terms of memory usage.
-
Alternative 2: Individual command knows how to undo/redo by
itself.
- Pros: Will use less memory (e.g. for
cdelete, just save the contact being deleted). - Cons: We must ensure that the implementation of each individual command are correct.
- Pros: Will use less memory (e.g. for
Calendar UI feature
The calendar UI is implemented using the CalendarFX framework. It can be opened using either the shortcut key F2, the file dropdown menu, or the command calendar. This feature is mainly facilitated by the CalendarWindow class. The CalendarCommand class handles the calendar command that the user may type and the MainWindow class handles the shortcut key and the dropdown menu option for showing the calendar.
Design of CalendarWindow
The CalendarWindow class extends from UiPart, just like the other UI components including the help window. The CalendarWindow class instance contains a table of events and the respective entries in the Calendar object. There are also final instances of Calendar and CalendarView objects in a CalendarWindow object. See the CalendarFX manual for more information on Calendar and CalendarView classes.
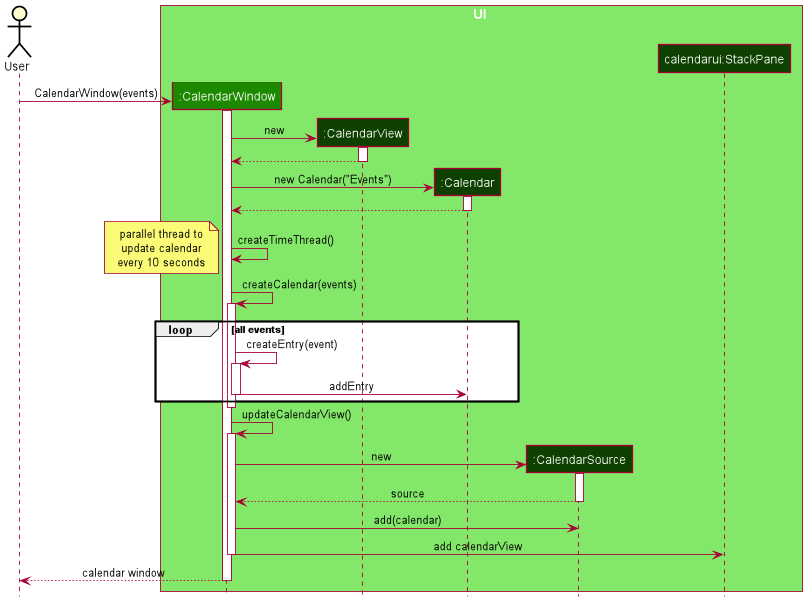
The sequence of how a calendar window is generated is shown in the UML sequence diagram above. The following are the textual descriptions of the diagram:
- The user intends to open the calendar. The
MainWindowobject captures this intention and calls the constructor ofCalendarWindowand passes the list of events into it. - The
CalendarandCalendarViewobjects are created and stored. A hashmap ofEventobjects toEntryobjects is created. (Not shown) - A time thread is created to constantly update the current time of the calendar every 10 seconds.
- The
Calendarobject is populated with the entries of events from Step 1. The hashmap is also concurrently being updated with the events and the associated entries. (Not shown) - The
CalendarViewobject is updated to include theCalendarobject, and also to change some configurations to simplify the user interface and prevent edits directly on the calendar. - The
StackPane(seeCalendarWindow.fxml) is updated to include the newCalendarViewuser interface. TheCalendarWindowobject is now created and returned toMainWindow.
Design considerations
The user may leave the calendar window open and type in a new command to add, delete, edit or clear the events. In that case, there is a need to constantly update the calendar to reflect the new changes the user has made. This section discusses the implementation of the update and how the updates are optimized.
Aspect: How the calendar is updated constantly:
-
Alternative 1 (current choice): Only updates the event(s) changed by the event commands.
- Pros: More optimized and faster update for large number of events.
- Cons: Harder to implement and prone to errors.
EventChanger class from Model since the implementation of the update feature depends heavily on this class.
The EventChanger class contains references to up to 2 Event objects - an oldEvent and a newEvent. It also contains a boolean that is true if the user intends to clear all events. Creating the EventChanger object to be passed to the CalendarWindow to update the entries is simple, as it can be easily constructed using one of the factory methods: addEventChanger, clearEventChanger, deleteEventChanger and editEventChanger. See the class diagram below for a summary of the EventChanger class.
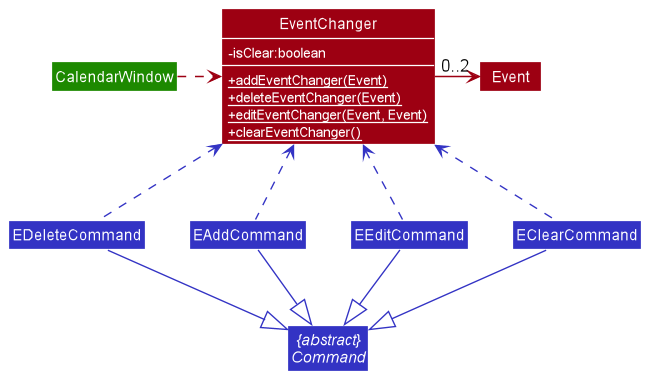
Upon the execution of any command, the list of event changers is returned in the CommandResult. The list is usually empty, except for the 4 types of commands listed above. The updateCalendar method of CalendarWindow is then called, which will update the Calendar object to remove the oldEvent and add the newEvent entries. The Calendar is cleared if the EventChanger is the clearEventChanger. This is when the hashmap becomes useful, since the Entry objects in the calendar are unique and having the same Event associated to the Entry does not make the Entry objects equal. This will allow deletion of the Entry from the calendar.
-
Alternative 2: Create a new Calendar with all the events for each command executed.
- Pros: Easy to implement, less code is needed.
- Cons: Performance can be slowed down if there are many events, even if the user does not make any large change to the events.
This alternative implementation will cause the MainWindow class to constantly query the event list in the AddressBook through the Logic manager every time a command is executed. The queried list is then used to create a new Calendar which will be used by the CalendarWindow object to display the calendar to the user. However, the performance cost is not feasible if there are many events stored in the AddressBook.
Documentation, logging, testing, configuration, dev-ops
Appendix: Requirements
Product scope
Target user: School of Computing (SoC) students who:
- Need to manage large number of contacts and events
- Prefer desktop apps over other types
- Can type fast and prefer typing to mouse interactions
- Are reasonably comfortable using CLI apps
Value proposition: Manage contacts of peers, Profs and events such as classes and Co-Curricular Activities in a single system faster than a typical mouse/GUI driven app while maintaining user-friendliness
User stories
Priorities: High (must have) - * * *, Medium (nice to have) - * *, Low (unlikely to have) - *
Contacts
| Priority | As a … | I want to … | So that I can… |
|---|---|---|---|
* * * |
hardworking student | add contact of my TA/Profs | save their contacts and ask them questions on my modules. |
* * * |
careless student | edit the contact of my TA/Profs | correct mistakes while adding contacts or update my TA contact details |
* * * |
senior SoC student | delete the contact of my TA/Profs | remove contact of my TA after I have completed the module |
* * * |
SoC student | view the contact of my TA/Profs | |
* * * |
year 4 SoC student with many contacts | search for contact of my TA/Profs | contact them when necessary |
* * * |
CS2103T student | list all the telegram handles of my CS2103T project mates | add them to the project group |
* * |
year 4 SoC student with many contacts | sort the contacts of my TA | view the contacts based on the sorting settings |
* * |
careless student | undo my last action(s) | recover contacts I accidentally deleted/changed |
* * |
organized SoC student | categorize the contacts of students/TA/Profs by tags | view them separately |
* * |
SoC student who frequently contacts a TA | mark a contact as favorite and pin them to the top | view them easily when I start the app |
* * |
student with many contacts | add the profile picture of TA/Profs | more easily differentiate my contacts and remember their faces |
* |
first time user | import existing contacts from my phone | easily access all my past contacts using SoConnect |
* |
long term user | archive some contacts | still save old contacts without cluttering my current screen |
Events
| Priority | As a … | I want to … | So that I can… |
|---|---|---|---|
* * * |
SoC student | add details of event | keep track of the CCA dates and time |
* * * |
SoC student | delete details of event | remove events that have finished or are cancelled |
* * * |
SoC student | edit details of event | update event details |
* * * |
SoC student | view all CCA/events | have a rough overview of my schedule |
* * * |
SoC student | search for an event based on event name | easily refer to the event details |
* * * |
year 1 SoC student | list addresses of all lectures, tutorials and labs | |
* * |
SoC student | sort the events by time | prepare for upcoming events |
* * |
SoC student with busy schedule | check if the new event clashes with any of my current events | better plan my timetable and avoid event clashes |
* * |
SoC student with busy schedule | see a weekly calendar | easily visualize my schedule for the week |
* * |
SoC student with many different events to manage | categorize my events with different tags like classes and CCAs | search related events |
* * |
SoC student with an important event coming up | mark an event as favorite and pin them to the top | easily see the most important events first when I start the app |
* * |
SoC student with many events and contacts to manage | link some contacts to some events | view the details of the participants/TAs in my events or lessons. |
* |
SoC student who uses other calendars | import and export my events to other calendars like Google Calendar | synchronize my events across my calendars |
* |
long term user | archive some events that have ended | still save details of past events without cluttering my main screen |
* |
SoC student with many commitments | have a reminder of upcoming events |
Personalisation and Others
| Priority | As a … | I want to … | So that I can… |
|---|---|---|---|
* * * |
first time user | have a help message I can refer to | understand and start using basic features |
* |
first time user | set up my background | personalize the screen to my liking |
Use cases
(For all use cases below, the System is the SoConnect Application System (SAS) and the Actor is the user, unless specified otherwise)
1. Use case: UC1 - Add contact details
Guarantees: The contact will be stored in the system if and only if the user enters the correct inputs.
MSS
-
User chooses to add contact information.
-
SAS stores the contact and notifies the user that the contact has been successfully added.
Use case ends.
Extensions
-
1a. SAS detects an error in the inputs.
-
1a1. SAS requests for correct inputs.
-
1a2. User enters new inputs.
Steps 1a1 to 1a2 are repeated until the inputs entered are correct.
Use case resumes from step 2.
-
-
1b. SAS detects a duplicate contact with the same name.
-
1b1. SAS gives the user the option of adding the contact anyway.
-
1b2. User proceeds to add the contact.
Use case resumes from step 2.
-
-
*a. At any time. user chooses not to add the contact.
Use case ends.
2. Use case: UC2 - Edit events
Preconditions: There is at least one event in the event list.
Guarantees: The event will be updated accordingly if and only if the user enters the correct inputs.
MSS
-
User wants to view the list of events.
-
User decides on an event to edit.
-
User edits the event.
-
SAS updates the event accordingly and notifies user that the event has been successfully edited.
Use case ends.
Extensions
-
3a. SAS detects an error in the inputs.
-
3a1. SAS requests for correct inputs.
-
3a2. User enters new inputs.
Steps 3a1 to 3a2 are repeated until inputs entered are correct.
Use case resumes from step 4.
-
-
*a. User chooses not to edit the event.
Use case ends.
3. Use case: UC3 - Delete contacts
Preconditions: There is at least one contact in the contact list.
Guarantees: The contact list will be updated according to which contact(s) are deleted if and only if the user enters the correct inputs.
MSS
-
User wants to view the list of contacts.
-
User decides on the contact(s) to delete.
-
User deletes the contact(s).
-
SAS deletes the specified contact(s), updates the contact list accordingly, and notifies user that the contact(s) has been successfully deleted.
Use case ends.
Extensions
-
3a. SAS detects an error in the inputs.
-
3a1. SAS requests for correct inputs.
-
3a2. User enters new inputs.
Steps 3a1 to 3a2 are repeated until inputs entered are correct.
Use case resumes from step 4.
-
-
*a. User chooses not to delete the contact(s).
Use case ends.
4. Use case: UC4 - Find contact details
Guarantees: A filtered list of contacts that match the user keywords will be shown, if and only if the user enters the correct inputs.
MSS
-
User decides on the keyword(s) to find.
-
User enters specified keyword(s).
-
SAS shows the matched contacts accordingly and notifies user of search success.
Use case ends.
Extensions
-
2a. SAS fails to find any matched contacts.
-
2a1. SAS outputs 0 matched contacts.
-
2a2. User enters new keyword(s).
Steps 2a1 to 2a2 are repeated until the user finds the contacts of interest.
Use case resumes from step 3.
-
-
*a. User chooses not to find contact(s).
Use case ends.
5. Use case: UC5 - Sort events
Preconditions: List of events to be sorted is displayed.
Guarantees: The displayed list of events is sorted lexicographically according to the specified field, if the given field is valid.
MSS
-
User decides on a field to sort by.
-
User inputs the specific field.
-
SAS sorts the list of events by the specified field provided in step 2.
-
SAS displays the sorted list of events.
Use case ends
Extensions
-
2a. SAS detects that the input is an invalid field.
-
2a1. SAS requests for a correct input.
-
2a2. User enters a new input.
Steps 2a1-2a2 are repeated until user enters a valid field.
Use case resumes from step 3.
-
-
2b. SAS detects that the input contains more than one field.
- 2b1. SAS sorts the list by the first field entered.
Use case resumes from step 4.
-
*a. User chooses not to sort the list.
Use case ends.
6. Use case: UC6 - Delete events
Preconditions: There is at least one event in the event list.
Guarantees: The event list will be updated according to which event(s) are deleted if and only if the user enters the correct inputs.
MSS
-
User wants to view the list of events.
-
User decides on the event(s) to delete.
-
User deletes the event(s).
-
SAS deletes the specified event(s), updates the event list accordingly, and notifies user that the event(s) has been successfully deleted.
Use case ends.
Extensions
-
3a. SAS detects an error in the inputs.
-
3a1. SAS requests for correct inputs.
-
3a2. User enters new inputs.
Steps 3a1 to 3a2 are repeated until inputs entered are correct.
Use case resumes from step 4.
-
7. Use case: UC7 - List event fields
Preconditions: There is at least one event in the event list.
Guarantees: The displayed list only contains the field(s) of interest, if the given field(s) is / are valid.
MSS
-
User decides on a field(s) to be listed.
-
User inputs the specific field(s).
-
SAS displays the list of events with only the field(s) specified shown.
Use case ends
Extensions
-
2a. SAS detects that the input is an invalid field.
-
2a1. SAS requests for a correct input.
-
2a2. User enters a new input.
Steps 2a1-2a2 are repeated until user enters a valid field.
Use case resumes from step 3.
-
-
2b. SAS detects that the user did not provide a field.
- 2b1. SAS displays the default list containing all the fields of the events.
Use case ends.
-
*a. User chooses not to sort the list.
Use case ends.
8. Use case: UC8 - Link a specific event to multiple contacts
Preconditions: There is at least one event and one contact.
Guarantees: The chosen event is linked to those chosen contacts.
MSS
-
User decides on which event and contacts to link.
-
User inputs the event and contacts to link.
-
SAS links the chosen event to every chosen contacts and notifies user that the event is successfully linked to those contacts.
Use case ends.
Extensions
-
2a. SAS detects an error in the inputs.
-
2a1. SAS requests for correct inputs.
-
2a2. User enters new inputs.
Steps 2a1 to 2a2 are repeated until the inputs entered are correct.
Use case resumes from step 3.
-
-
*a. User chooses not to link event to contacts.
Use case ends.
9. Use case: UC9 - Undo a command
Guarantees: SoConnect will be restored to its previous state in its history.
MSS
-
User decides to undo a command.
-
SAS identifies the previous state of SoConnect and restore it. SAS notifies the user that the previous command is undone.
Use case ends.
Extensions
-
1a. SAS detects that SoConnect does not have a previous state in its history.
- 1a1. SAS notifies the user that SoConnect is already at its original state.
Use case ends.
10. Use case: UC10 - Redo a command
Guarantees: SoConnect will be restored to its previously undone state in its history.
MSS
-
User decides to undo the previous undo command.
-
SAS redoes the command and restores the previously undone state of SoConnect from its history.
Use case ends.
Extensions
-
1a. SAS detects that SoConnect is already at its most recent state.
- 1a1. SAS notifies the user that there is no previous undo command to redo.
Use case ends.
11. Use case: UC11 - Mark contacts
Guarantees: The chosen contacts will be marked with a bookmark icon  and moved to the start of the contact list.
MSS
-
User decides on the contacts to mark.
-
User inputs the indexes of the contacts to mark.
-
SAS marks the chosen contacts and move them to the top of the list.
Use case ends.
Extensions
-
2a. SAS detects an error in the inputs.
-
2a1. SAS requests for correct inputs.
-
2a2. User enters new inputs.
Steps 2a1 to 2a2 are repeated until the inputs entered are correct.
Use case resumes from step 3.
-
-
2b. SAS detects some contacts that have already been marked.
-
2b1. SAS informs the user the relevant contacts that have already been marked previously.
-
2b2. SAS proceeds to mark the other contacts and move them to the top of the list.
Use case ends.
-
-
*a. User chooses not to link event to contacts.
Use case ends.
Non-Functional Requirements
- Should work on any mainstream OS as long as it has Java
11or above installed. - Should be able to hold up to 1000 contacts without a noticeable sluggishness in performance for typical usage.
- A user with above average typing speed for regular English text (i.e. not code, not system admin commands) should be able to accomplish most of the tasks faster using commands than using the mouse.
- Should not depend on Internet connection.
- Only one user should be able to use the system at one time.
Glossary
-
Mainstream OS: Windows, Linux, Unix, OS-X.
-
Main Success Scenario (MSS): Describes the most straightforward interaction for a given use case, which assumes that nothing goes wrong.
-
Command Line Interface (CLI): Text-based user interface.
-
Graphical User Interface (GUI): Graphic-based user interface.
-
Interface: (For user interface) The place at which independent and often unrelated systems meet and act on or communicate with each other/ a way for the user to interact with the system. (For other use of interfaces such as
Model) See the Java Tutorials for more details on what an interface in Java means. -
Telegram handle: Username of a Telegram user.
-
Professor (Prof): A lecturer who teaches a module in NUS.
-
Teaching Assistant (TA): A student tutor employed to teach small group lessons in NUS.
-
Contact information: Name and email of the contact. Phone number, address, telegram handle, video conferencing meeting link, and tag(s) are optional.
-
Field: A particular detail of an event or contact. Examples of fields include the name of a contact, the description of an event or the tags of an event.
-
Hashmap: A data structure that stores a table of keys and their corresponding values. In the implementation of Calendar UI, a hashmap is used to store the
Eventobjects as keys and theEntryobject as values. -
Factory method: A method to create an object without specifying the exact class, based on the creational design pattern. In the context of
EventChanger, the factory methods create instances of subclasses ofEventChanger, as seen inEventChanger.java.
Appendix: Instructions for manual testing
Given below are instructions to test the app manually.
Launch and shutdown
-
Initial launch
-
Download the jar file and copy into an empty folder
-
Double-click the jar file
Expected: Shows the GUI with a set of sample contacts. The window size may not be optimum.
-
-
Saving window preferences
-
Resize the window to an optimum size. Move the window to a different location. Close the window.
-
Re-launch the app by double-clicking the jar file.
Expected: The most recent window size and location is retained.
-
Adding a contact
-
Test case:
cadd n/John Doe p/98765432 e/johnd@example.com a/John street, block 123, #01-01
Expected: A new contact named John Doe with the specified detail will be added to the end of the contact list. Success message displayed. -
Test case:
cadd n/Jane Doe p/1298701
Expected: No contact added. Error details shown in the status message. -
Test case:
cadd n/Alex Yeoh e/alexYeoh@gmail.com
Expected: No contact added. Error details shown in the status message. -
Other invalid
caddcommands:cadd n/,cadd n/John Doe e/,cadd n/* e/test@gmail.com
Expected: No contact added. Error details shown in the status message.
Finding a contact
-
Test case:
cfind Alex
Expected: A list of contacts with names that matchAlexwill be displayed. Success message displayed. -
Test case:
cfind alex
Expected: Similar to previous. -
Test case:
cfind e/bernice
Expected: A list of contacts with emails that matchbernicewill be displayed. Success message displayed. -
Test case:
cfind e/bernice a/geylang
Expected: A list of contacts with emails that matchberniceor with addresses that matchgeylangwill be displayed. Success message displayed. -
Test case:
cfind a/
Expected: No change in the displayed contact list. Error details displayed in the status message. -
Test case:
cfind
Expected: No change in the displayed contact list. Error details displayed in the status message. -
Other invalid
cfindcommands:cfind a/ e/,cfind a/alex e/
Expected: No change in the displayed contact list. Error details displayed in the status message.
Deleting an event
Deleting an event while all events are being shown
Prerequisites: List all events using the elist command. Multiple events in the list.
-
Test case:
edelete 1
Expected: First event is deleted from the list. Details of the deleted event shown in the status message. Timestamp in the status bar is updated. -
Test case:
edelete 0
Expected: No event is deleted. Error details shown in the status message. Status bar remains the same. -
Other incorrect delete commands to try:
edelete,edelete x(where x is larger than the list size),edelete a
Expected: Similar to previous. -
Test case:
edelete 1-2
Expected: First and second event are deleted from the list. Details of the deleted events shown in the status message. Timestamp in the status bar is updated. -
Test case:
edelete 2-1(invalid range)
Expected: No event is deleted. Error details shown in the status message. Status bar remains the same. -
Test case:
edelete 1-x(where x is larger than the list size)
Expected: Similar to previous.
Listing all events
Listing all event with certain fields shown.
Prerequisites: At least one event in the list.
-
Test case:
elist at/
Expected: All events listed with only address displayed. All events listed shown in the status message. -
Test case:
elist
Expected: All events listed with all fields displayed. All events listed shown in the status message. -
Other incorrect
elistcommands to try:elist 123,elist at/0000,elist xyz/(where xyz is not a valid prefix)
Expected: No change in display. Error details displayed in the status message.
Linking an event to one or more contacts
Prerequisites: There is at least one event and one contact in their respective list.
-
Test case:
elink 1 c/1
Expected: The event at index1is linked to the contact at index1. Success details shown in the status message. -
Test case:
elink 2 c/1 c/2 c/3
Expected: The event at index2is linked to each of the contacts at indexes1,2and3. -
Test case:
elink x c/1(where x is an index larger than the event list size)
Expected: No change in display. Error details displayed in the status message. -
Test case:
elink 1 c/x(where x is an index larger than the contact list size)
Expected: No change in display. Error details displayed in the status message. -
Other incorrect
elinkcommands to try:elink,elink 1,elink c/1
Expected: No change in display. Error details displayed in the status message.
Undoing/Redoing a command
-
Test case:
cadd n/Amy e/amy@mail.com p/1987911followed byundo
Expected: A new contact named Amy is added after the first command is then removed after theundocommand. Success messages displayed after each command. -
Test case:
cfind Alexfollowed byundo 12
Expected: A filtered list with contact name Alex Yeoh will be displayed after the first command. A full contact list will be displayed afterundocommand. Success messages displayed after each command. -
Test case:
cdelete 1followed byundoandredo
Expected: First contact in the contact list is removed from the displayed contact list after the first command. The contact is restored after theundocommand, and is removed again after theredocommand. Success messages displayed after each command. -
Test case:
undowithout any previous command
Expected: No change in display. Error details displayed in the status message. -
Test case:
redowithout any previousundocommand
Expected: No change in display. Error details displayed in the status message.
GUI
-
Test case: For any event with a linked contact, click on the linked contact (labeled in yellow)
Expected: Only linked contact(s) of the chosen event will be displayed in the contact list. Clicking on the same linked contact again will display the full contact list. -
Test case: Click on any field in the contact and event list (except for tag)
Expected: The chosen field will be copied to clipboard. Success details displayed in the status message. -
Test case: Click on any zoom or telegram link (underlined in blue)
Expected: The chosen link is opened in browser. Success details displayed in the status message.
Saving data
Dealing with missing/corrupted data files
Prerequisite: There should be a valid soconnect.json file saved in the data folder.
soconnect.jar, perform some changes to the default list of contacts or events (see User Guide). A folder data with a file soconnect.json should be created.
-
Test case: Edit the json file in order to corrupt it. For example, add an additional
{to create some syntax error. Then, startsoconnect.jar.
Expected: The event and contact list is empty. -
Test case: Delete the json file and start
soconnect.jar.
Expected: The default event and contact list is loaded (see User Guide for an example).