SoConnect User Guide
Made by School of Computing (SoC) students, for SoC students, SoConnect is a desktop app for SoC students to manage contacts of Professors and Teaching Assistants, and keep track of noteworthy events. As SoC students ourselves, we understand how packed your schedules can get and how busy you are. Hence we hope that with SoConnect, you can save your contacts and events in one location, link related contacts and events - all with just a simple typing of a command. You no longer have to waste time and effort looking for contacts and events from different apps.
SoConnect is made for students who love to type. If you can type fast, managing your contacts and events will be a breeze with SoConnect.
This user guide will help you to quickly familiarise yourself with your SoConnect and so that you can use the full range of features it offers.
Table of Contents
- How to use SoConnect User Guide
- Quick start
- Overview of SoConnect
-
Features
- Contact Management
-
Event Management
- Adding an event:
eadd - Deleting an event:
edelete - Editing an event:
eedit - Finding events:
efind - Listing all events:
elist - Clearing all events:
eclear - Marking an event:
emark - Unmarking an event:
eunmark - Viewing an event:
eview - Sorting events:
esort - Linking an event to contacts:
elink - Unlinking an event from contacts:
eunlink
- Adding an event:
- General
- SoConnect Saved Data
- Others
- List of Prefixes
- Command Summary
- Glossary
How to use SoConnect User Guide
Before we jump into learning the features, here is a quick overview on how to use this user guide.
- You can click on the titles in the Table of Contents to jump to the section that you are interested in.
- You may find these icons in this user guide useful when reading this user guide:
-
 Tip provides additional information that might be useful to you.
 -
 Note provides supplementary information that helps you better understand this User Guide.
 -
 Caution warns you against doing certain actions that will lead to undesirable consequences.
-
- You can find explanations of italicized words in the Glossary.
- You can refer to the Command Summary for a complete overview of all SoConnect features and commands.
How to read commands in SoConnect
Before you learn the different commands in features, let’s learn about what makes up a command.
You will see commands throughout this User Guide. Each command has its own command format.
Here you see an example of a command:
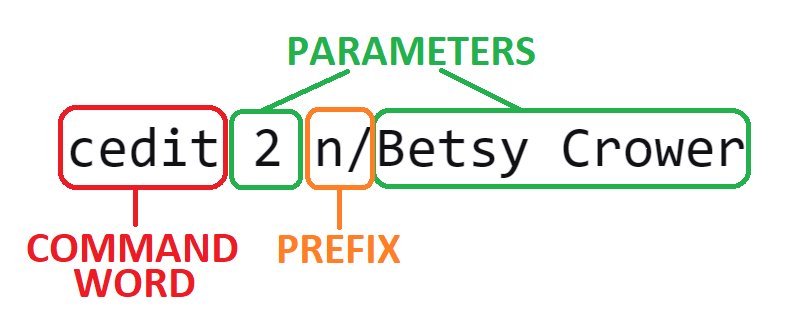
Take note of the three different parts that form a command:
-
COMMAND WORD
You need to specify the command word to tell SoConnect what action you want it to do.
For example, you can type
ceditto SoConnect to edit a contact for you. -
PARAMETER
In addition to the command word, you may need to provide supplementary information known as parameters.
Continuing on the same example, you can specify
2to tell SoConnect to edit information about the contact indexed at index 2 in the contact list (i.e. Bernice Yu). -
PREFIX
You use prefixes to specify the type of parameters that you provide.
Each prefix always ends with a slash
/. See the list of prefixes for all the prefixes that you can use in SoConnect.For example, if you want to specify a name parameter, you can type
n/. SoConnect will recognize that the information following this prefix should be a name.
![]() About the command format:
About the command format:
-
Words in
UPPER_CASEare the parameters that you should provide.
e.g. in following this command formatcadd n/NAME, you can typecadd n/John Doe(i.e. provideJohn Doeas theNAMEparameter). -
Optional fields are in square brackets.
e.g. Bothn/John Doe t/friendandn/John Doe(i.e. omitt/friend) are valid. -
Fields preceding ellipsis
…can be used any number of times or not at all.
e.g.[t/TAG]…means theTAGparameter can be omitted (used 0 times), ort/friend(used once), ort/friend t/family(used 3 times), etc. -
Each pair of prefixes and parameters can be in any order.
e.g. if the command format specifiesn/NAME [p/PHONE_NUMBER], you can either typen/NAME [p/PHONE_NUMBER]or[p/PHONE_NUMBER] n/NAME. -
If a parameter is expected only once in the command format, and if you specify it multiple times, only the last occurrence of the parameter will be taken (unless otherwise stated).
e.g. if you specifyp/12341234 p/56785678, onlyp/56785678will be taken. -
Extraneous parameters that you type for commands that do not take in parameters (such as
helpandexit) will be ignored.
e.g. if you typehelp 123, SoConnect will interpret it ashelp. -
Date and time that you specify must follow dd-MM-yyyy HH:mm format (day-month-year hours:minutes).
e.g. if you want to specify 1 May 2021 6.30pm, you should type01-05-2021 18:30.
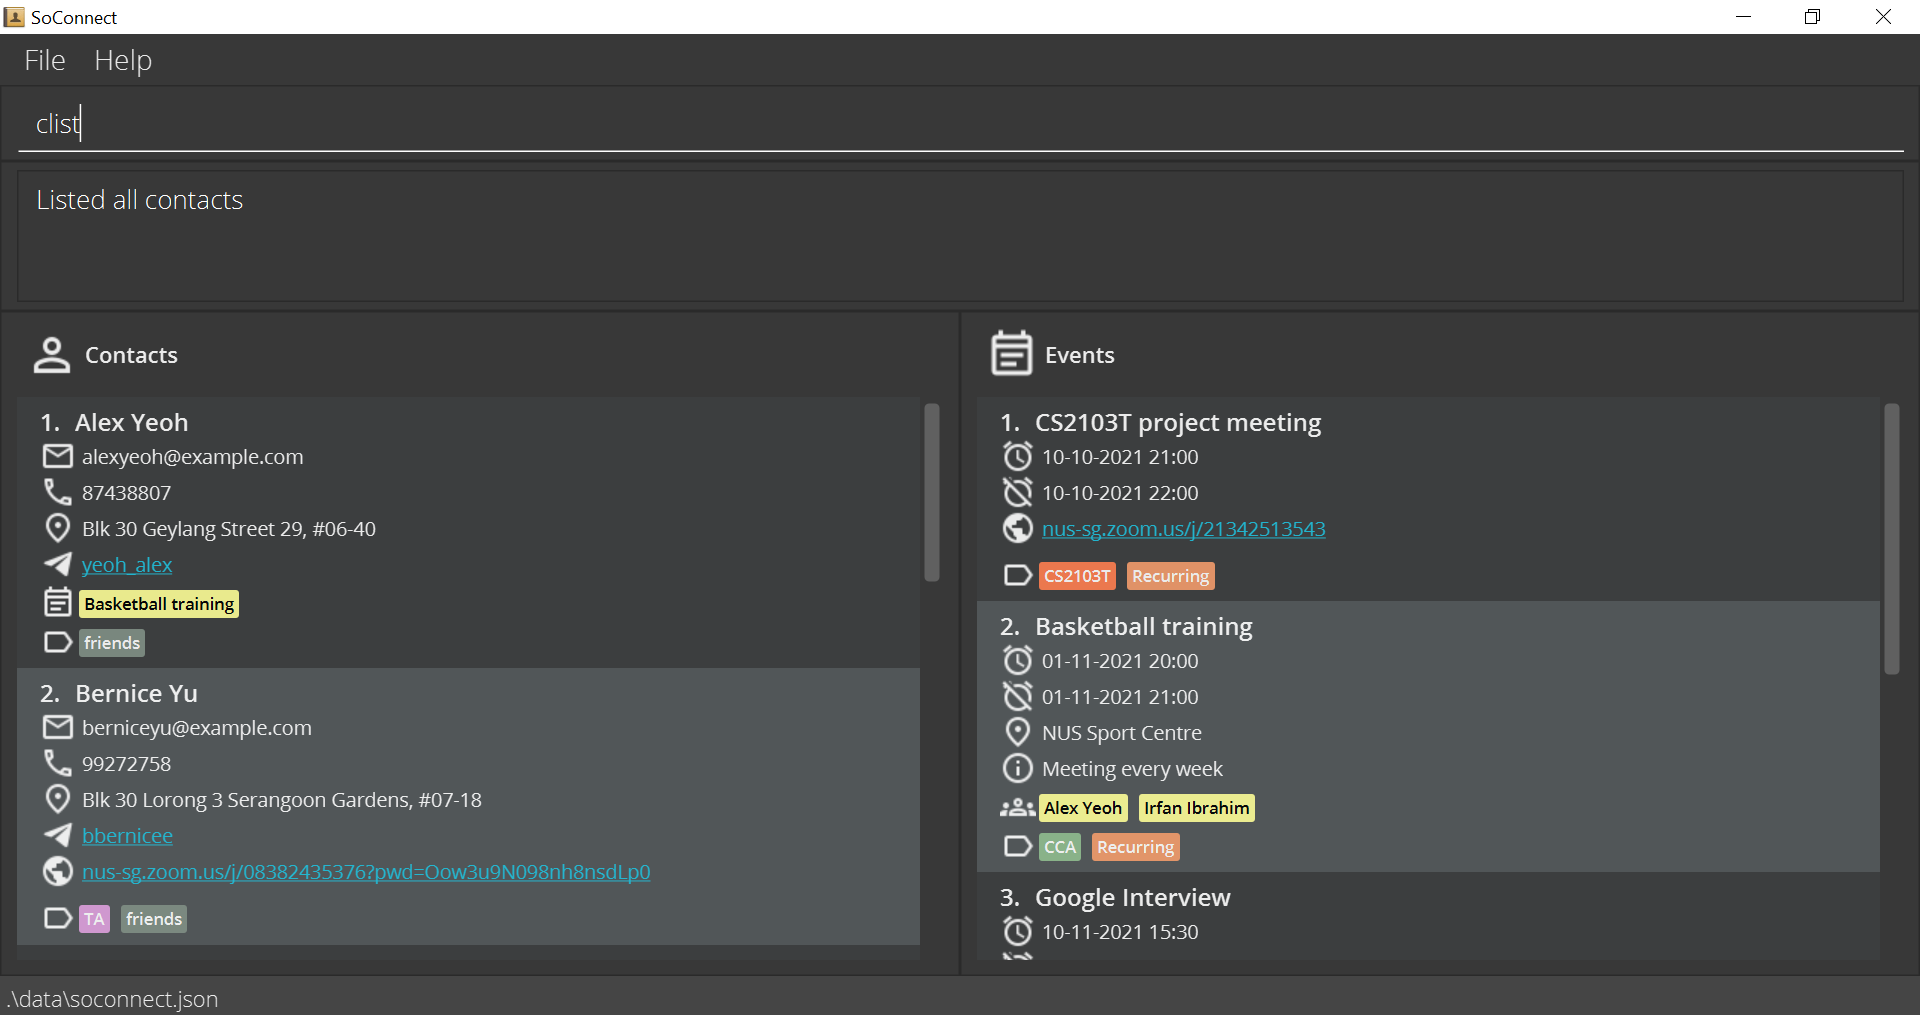
How do I know the command I entered is valid?
After you enter a valid command in SoConnect, you should see a success message displayed in the message box of SoConnect.
For example, after you enter clist, SoConnect will tell you that it has successfully listed all contacts.
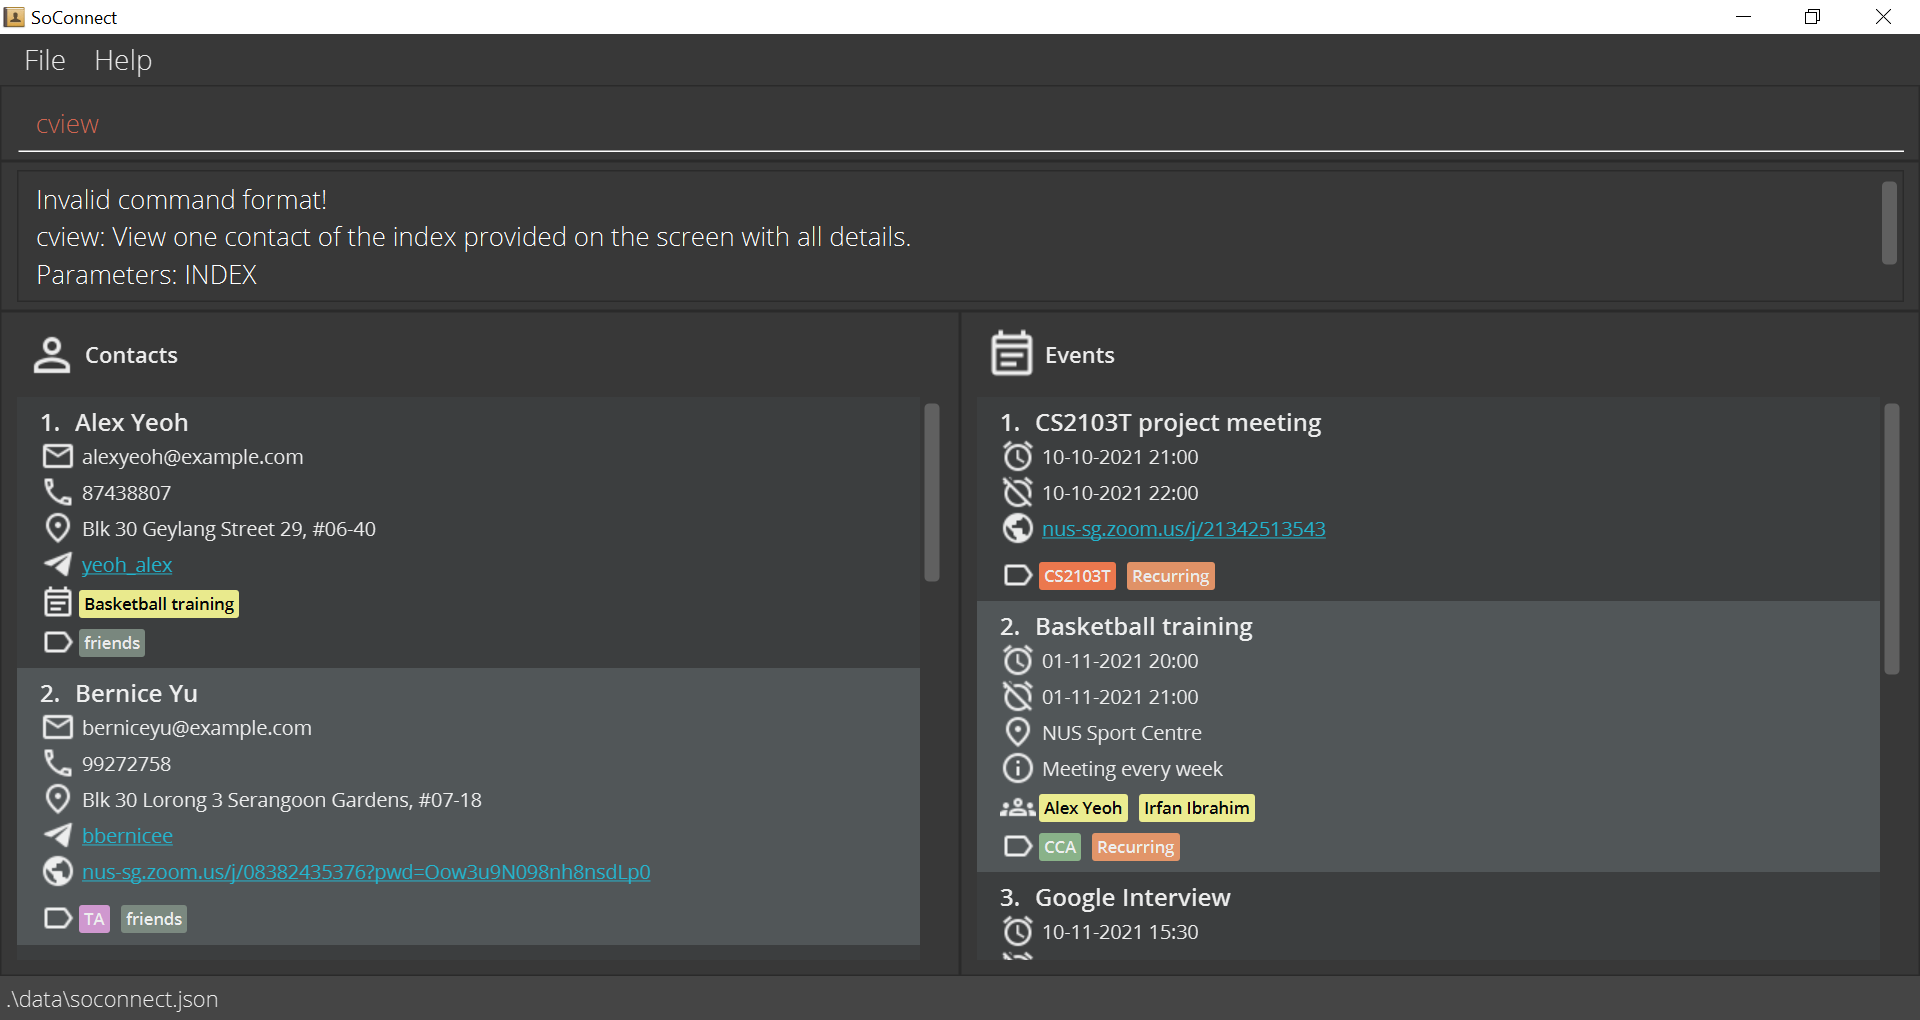
What happens if my command is invalid?
However, if the command you entered does not follow the command format specified in Features, you will see an error message in the message box instead. You can then correct the error in the command you entered and try again.
For example, if you enter cview without specifying which contact to view, SoConnect will tell you that the command format is invalid.
Quick start
Follow this simple 5-step instructions to set up SoConnect on your computer.
-
First, ensure you have Java 11 or above installed on your computer.
Tip:
Here is how you can check the Java Version installed on your computer.
-
Next, download the latest
soconnect.jarfile here. Tip:
What is a jar file? Click here to find out more
-
Then, copy the file to the folder you want to use as the home folder for your SoConnect.

-
Then, double-click the file to start SoConnect. You should see a similar display on your screen:
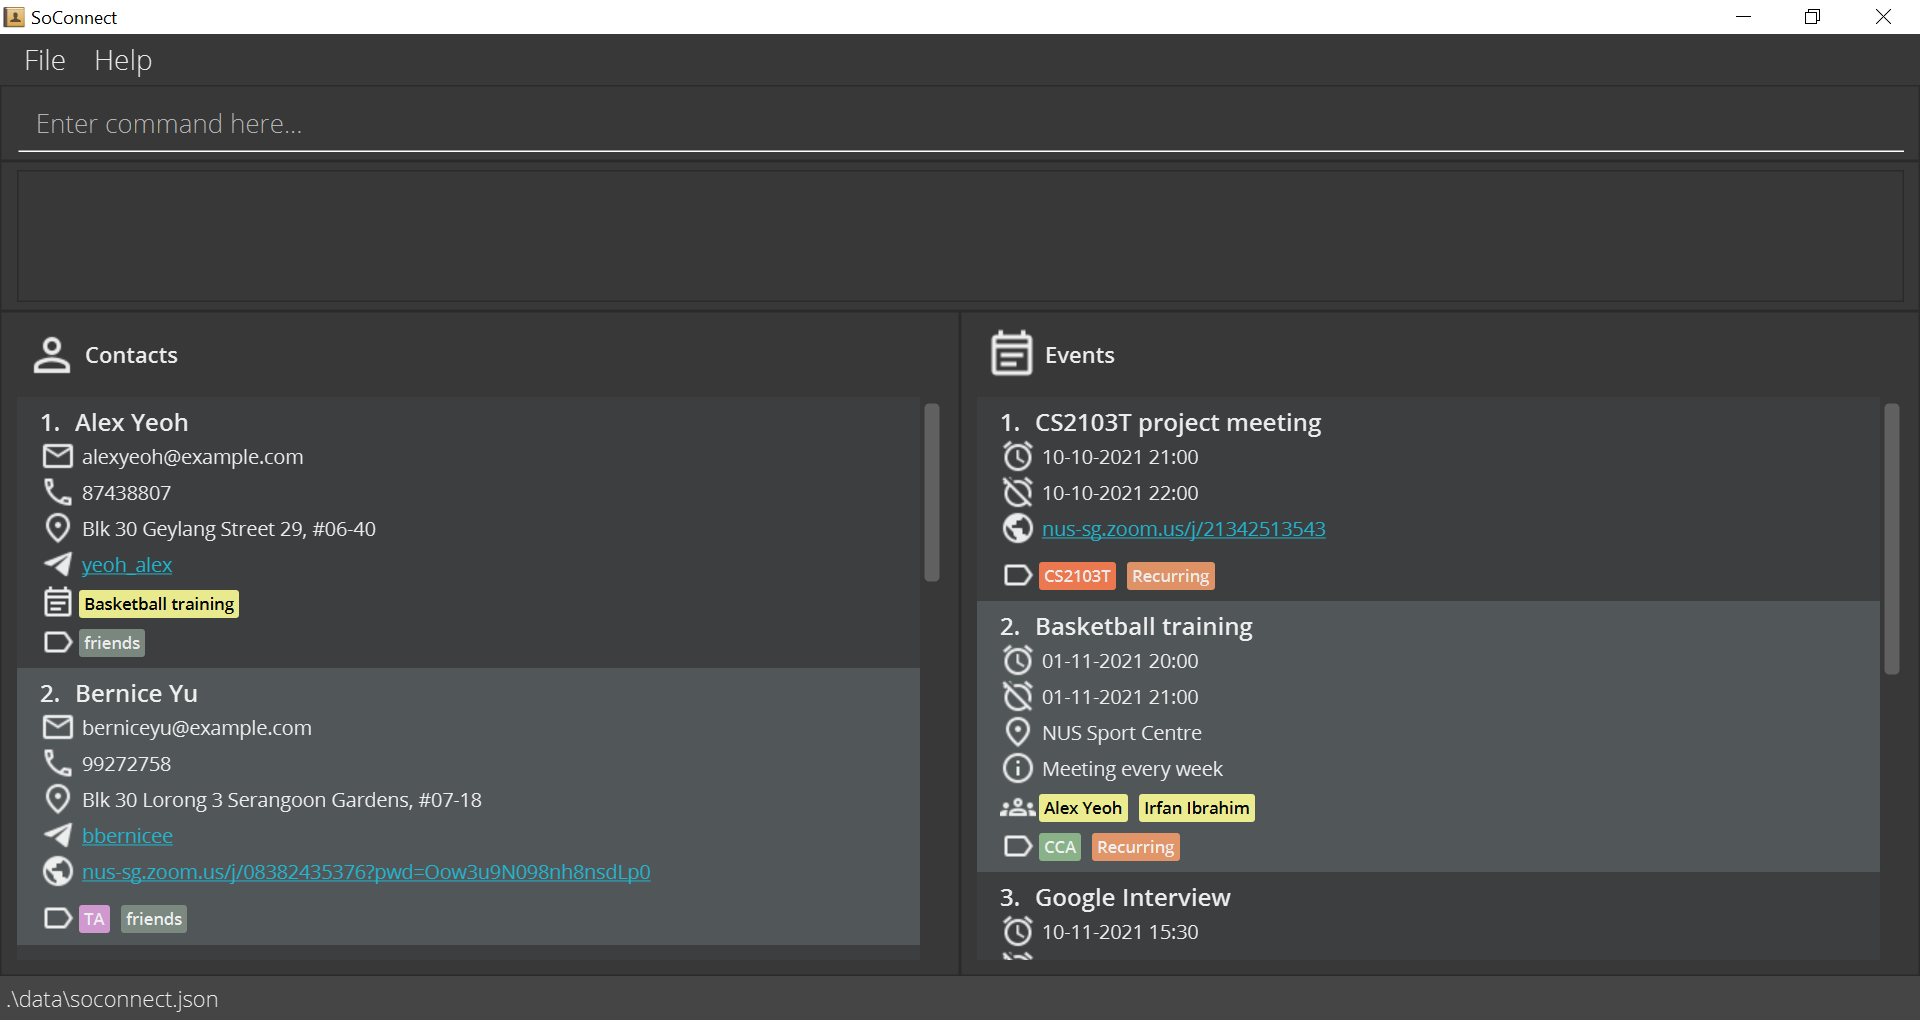 Note:
SoConnect comes with some sample contacts and events upon installation.
Tip:
If SoConnect does not start by double-clicking, you can try this
alternative way of starting SoConnect.
Note:
SoConnect comes with some sample contacts and events upon installation.
Tip:
If SoConnect does not start by double-clicking, you can try this
alternative way of starting SoConnect.
-
Lastly, type a command in the command box and press Enter to execute it.
Tip:
Unsure of where the command box is? Click here to check out the
overview of different components in SoConnect.
For example, you can type
helpand press Enter to open the help window.
Here are some example commands you can try:-
elist: Lists all events. -
cadd n/John Doe p/98765432 e/johnd@example.com a/John street, block 123, #01-01: Adds a contact namedJohn Doeto SoConnect. -
cdelete 2: Deletes the second contact (i.e. Bernice Yu) from the contact list. -
eclear: Clears all event entries in the event list. -
exit: Closes the SoConnect app.
-
See also: What happens if my command is invalid
With everything set up and working, let’s understand the SoConnect display.
Overview of SoConnect
Just before you learn the features of SoConnect, let’s look at what makes up the SoConnect display.
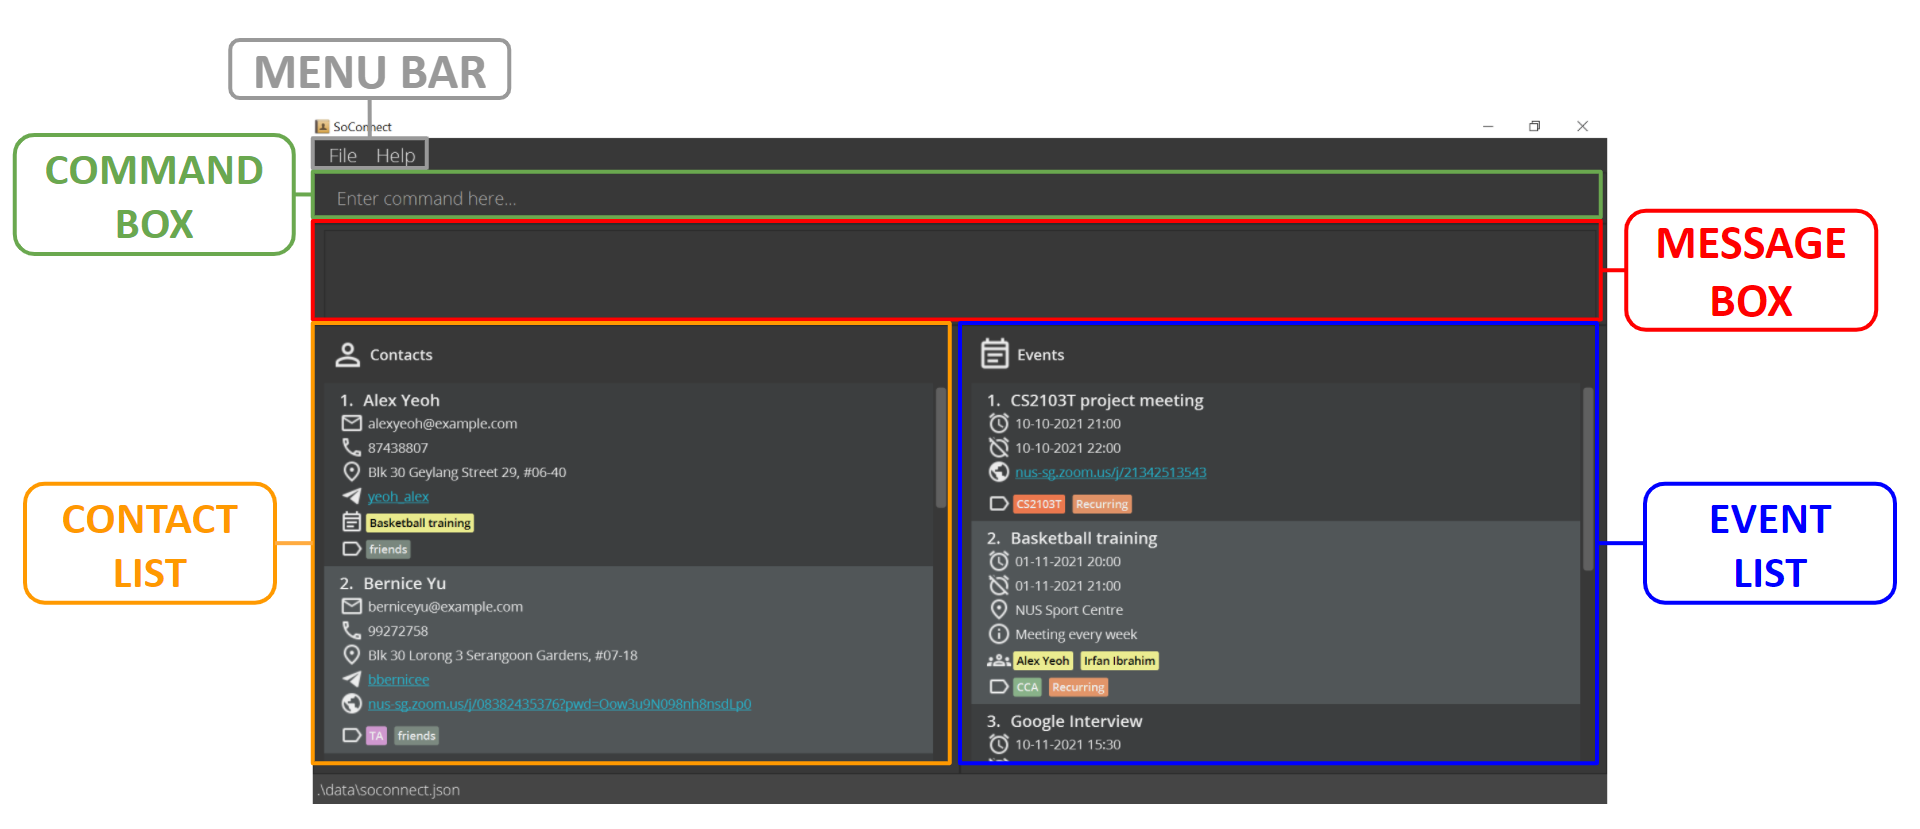
You should see a similar screen display when you open SoConnect!
-
Menu Bar
The Menu Bar consists of two tabs:
FileandHelp.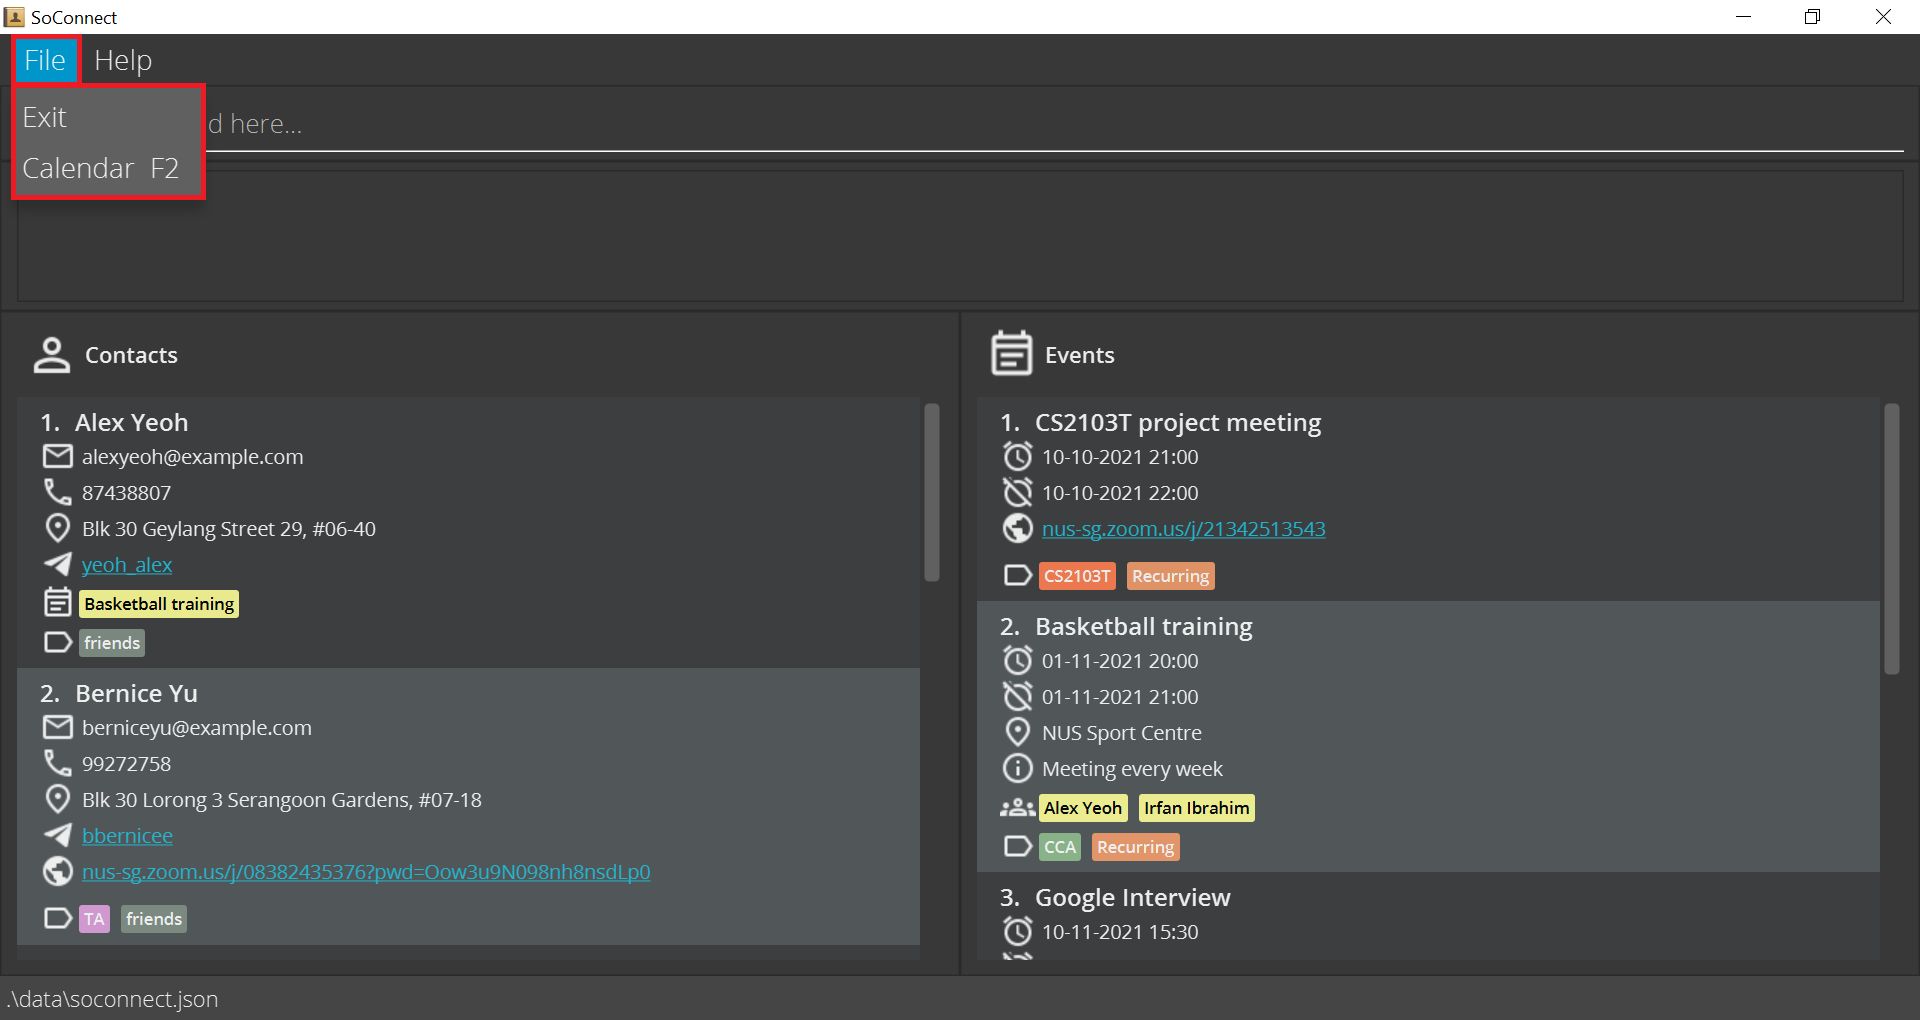
Upon clicking
File, you can choose to:- Exit SoConnect or
- Open Calendar of SoConnect
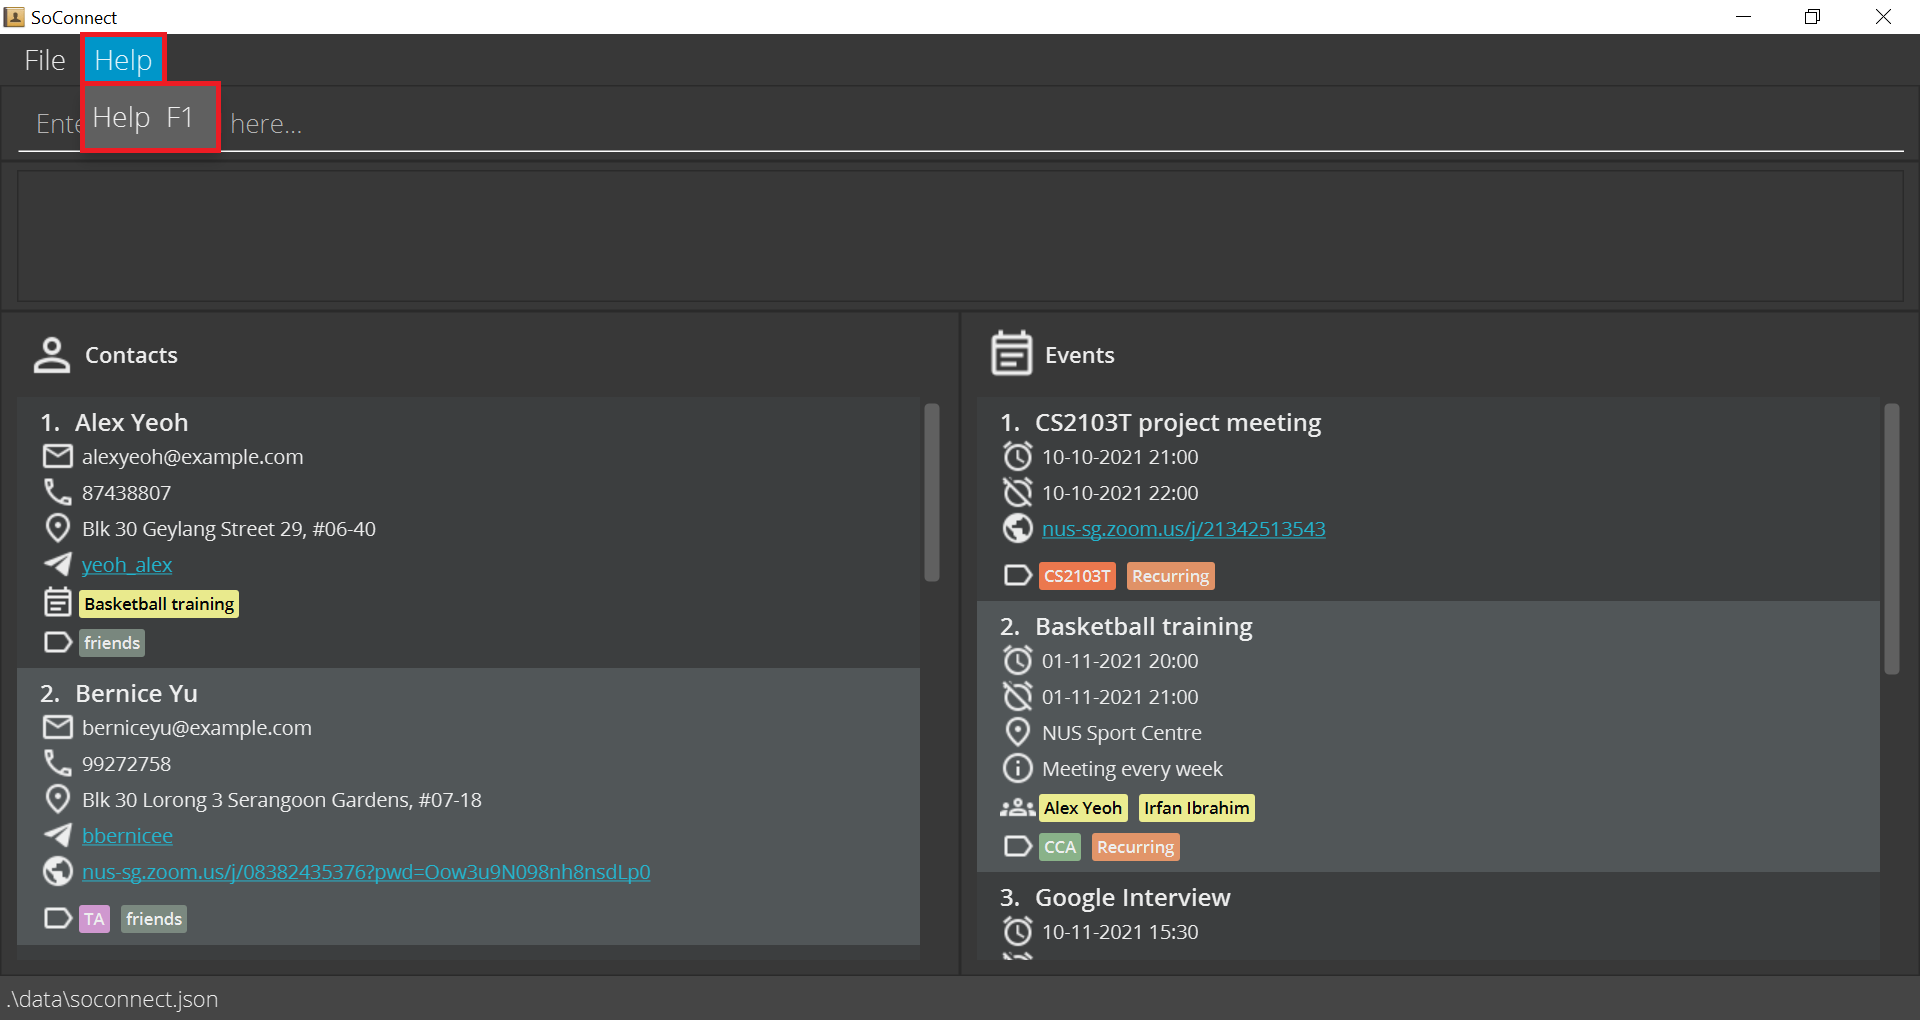
Upon clicking
Help, you can choose to open the Help Window of SoConnect. Tip:
Click the following links to see how to open the help window, exit SoConnect and open the calendar using commands.
-
Command Box
This is where you can type your commands to use the features of SoConnect.
-
Message Box
This is where the message from SoConnect is displayed after you have entered a command.
See Also: What happens if my command is invalid?
-
Contact List
Displays information of the contacts you saved in SoConnect.
Refer to Icons to learn about the different fields that each icon represents in contact list.
-
Event list
Displays information of the events you saved in SoConnect.
Refer to Icons to learn about the different fields that each icon represents in the event list.
Icons
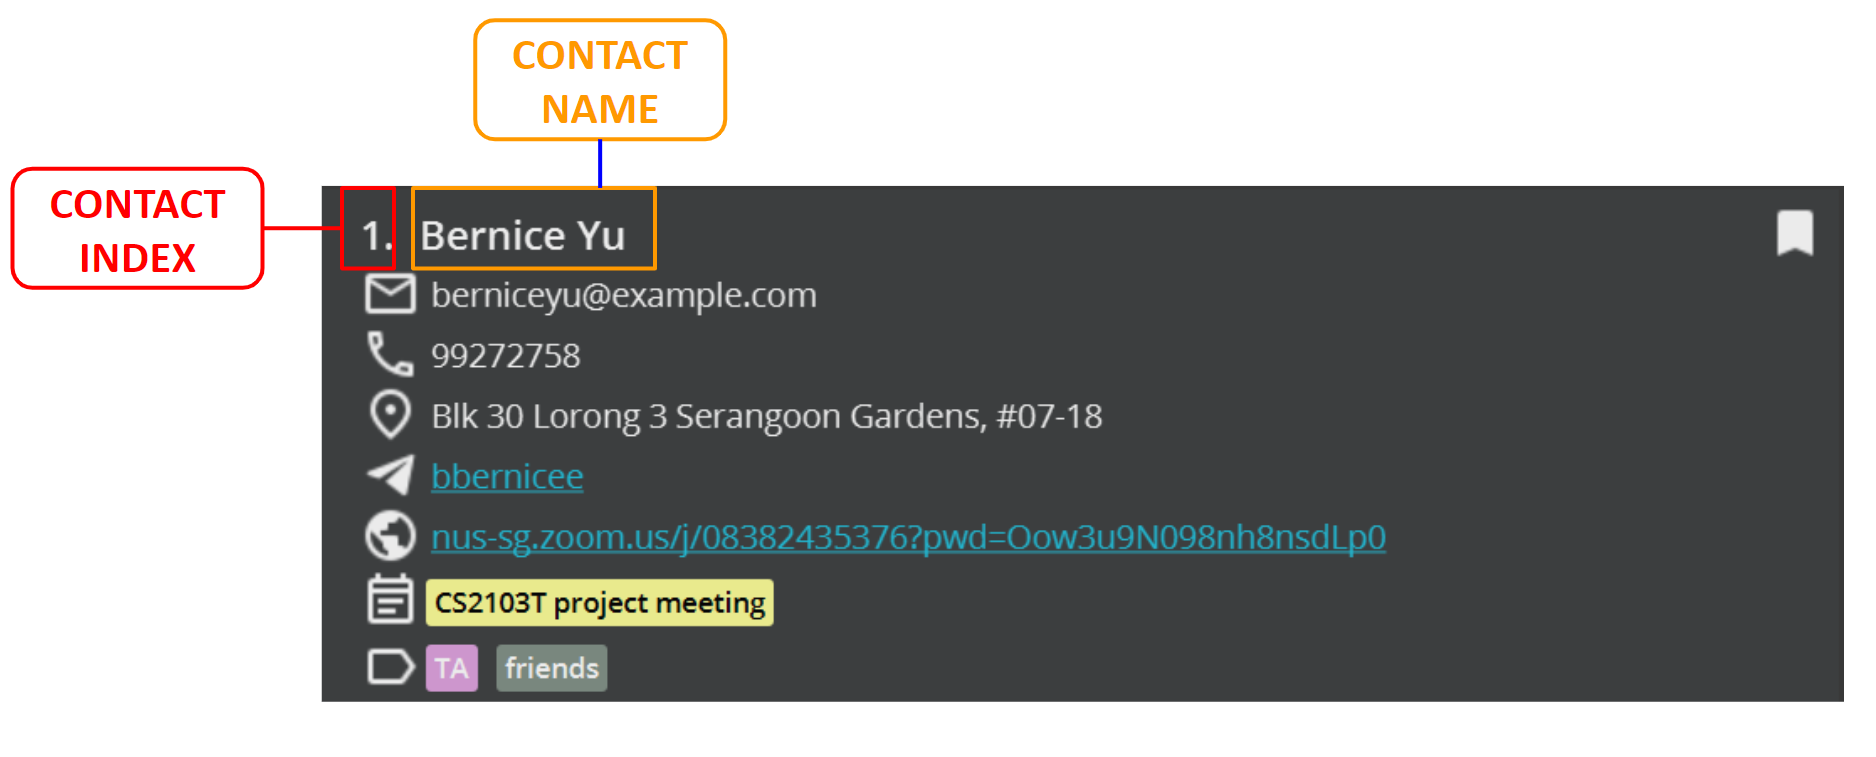
You will always find these two information of each contact displayed in the contact list:
- Contact Index
- Contact Name
Similarly, you will always find these two information of each event displayed in the event list:
- Event Index
- Event Name
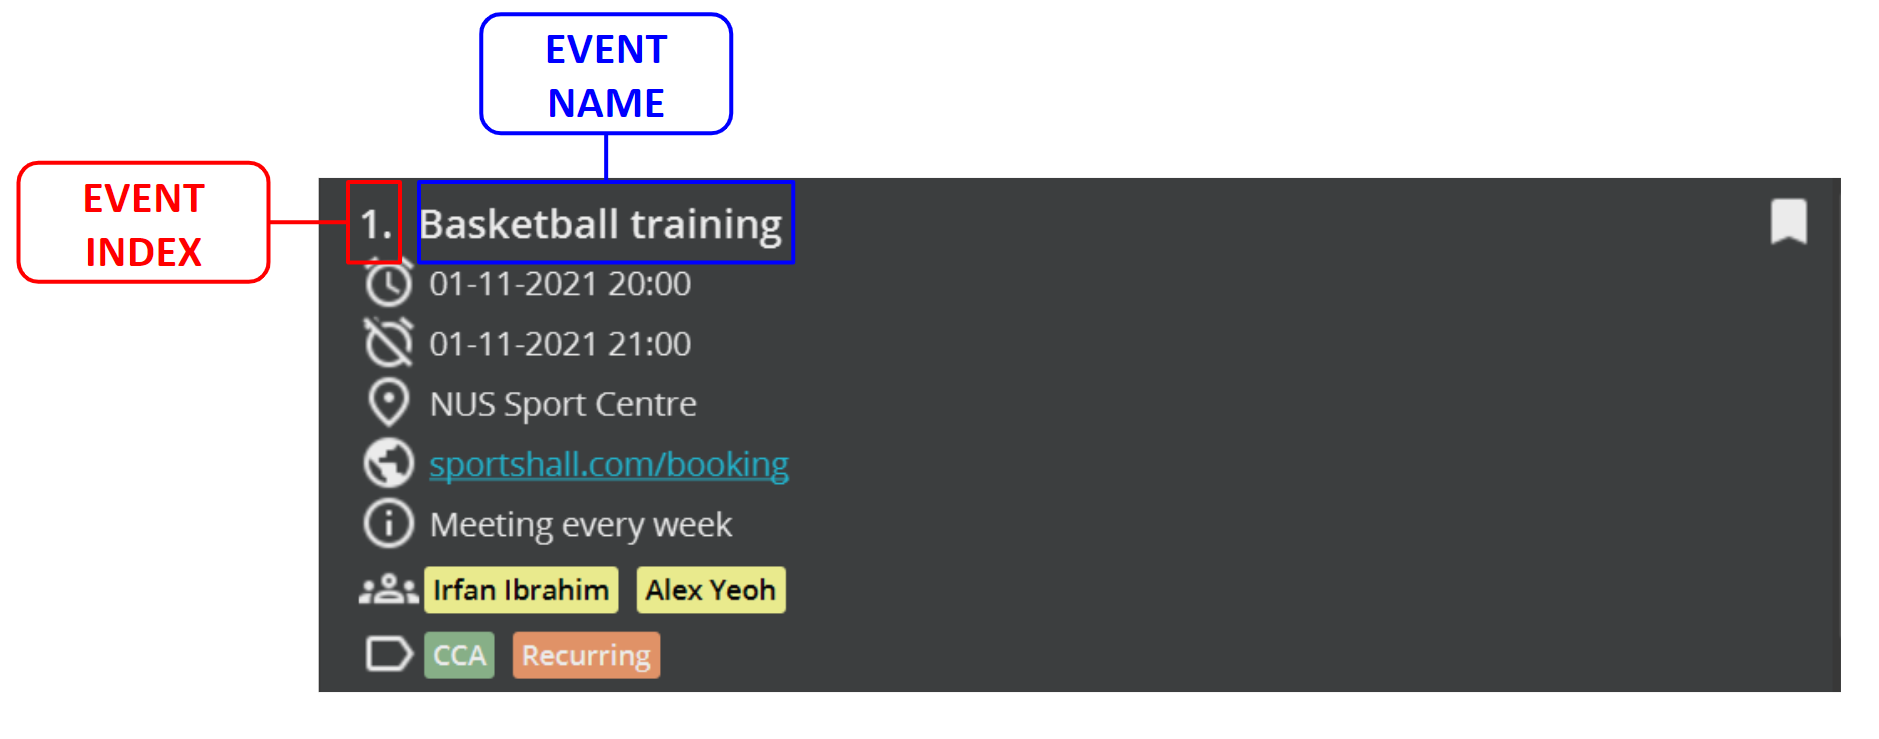
Here are the icons you might see in each contact or event:
| Contact icons | Event icons | ||
|---|---|---|---|
| Icon | Field | Icon | Field |
|
|
Bookmark* |
|
Bookmark* |
|
|
Email Address |
|
Start Time |
|
|
Phone Number |
|
End Time |
|
|
Address |
|
Address |
|
|
Telegram Handle |
|
Description |
|
|
Links/ Websites |
|
Links/ Websites |
|
|
Linked Events |
|
Linked Contacts |
|
|
Tag |
|
Tag |
*The bookmark icon is visible only if the contact or event has been marked. See also: Marking a contact and Marking an event
Features
Now, you are ready to learn some new commands.
There are three main sections to SoConnect Features: Contact Management, Event Management, and General.
For each feature, you are provided with:
- Function and Description of the feature
- Command Format of the feature
- Examples of some usages of the feature (All examples use the initial sample of contacts and events)
![]() Tip:
Tip:
If you are just starting off, we recommend that you learn the basic features in each section first.
If you are feeling adventurous, we welcome you to learn the more advanced features SoConnect has to offer.
Contact Management
This section details all the features and commands available in SoConnect that can help you manage your contacts:
Basic features:
Advanced features:
Adding a contact: cadd
You can use cadd to add the contacts of people such as your Professors and tutors.
Format: cadd n/NAME e/EMAIL [p/PHONE_NUMBER] [a/ADDRESS] [th/TELEGRAM_HANDLE] [z/ZOOM] [t/TAG]…
![]() Tip:
Tip:
- You can add a contact with any number of tags (including 0)
- You cannot add a contact with the same name as an existing contact.
- You can refer to the following list of prefixes to see which prefix to use.
Examples:
| Input 1 | cadd n/Alex Doe e/e0123456@u.nus.edu a/COM1 #99-99 th/johnDoe99 t/Professor |
| Expected Output 1 | You should see Alex Doe added at the end of your contact list. 
|
| Input 2 | cadd n/ Jon Cheng t/TA e/e7654321@u.nus.edu a/COM1-0201 p/87654321 t/Senior th/jonnyjohnny z/https://nus-sg.zoom.us/j/0123456789?pwd=ABCDEFGHIJKLMNOPDJFHISDFSDH |
| Expected Output 2 | You should see Jon Cheng added at the end of your contact list. 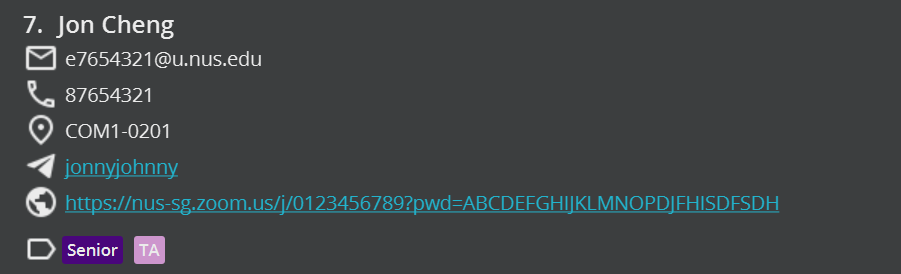
|
Deleting a contact: cdelete
You can use cdelete to delete a contact that you may have added mistakenly.
Format: cdelete INDEX1[-INDEX2]
- Deletes the contact(s):
- at the specified
INDEX1or - between the specified range from
INDEX1toINDEX2inclusively (if you provideINDEX2).
- at the specified
-
INDEX1andINDEX2refer to the index numbers shown in the displayed contact list.
![]() Tip:
Tip:
-
INDEX1andINDEX2must be positive integers. e.g. 1, 2, 3, … -
INDEX1andINDEX2must not be greater than the number of contacts in the contact list.
Examples:
| Input 1 |
clist followed by cdelete 2
|
| Expected Output 1 | Deletes the second contact in the contact list. 1. After entering clist, you should see the full list of contacts in the contact list.2. After entering cdelete2, you should not see Bernice Yu contact in the contact list after the operation. 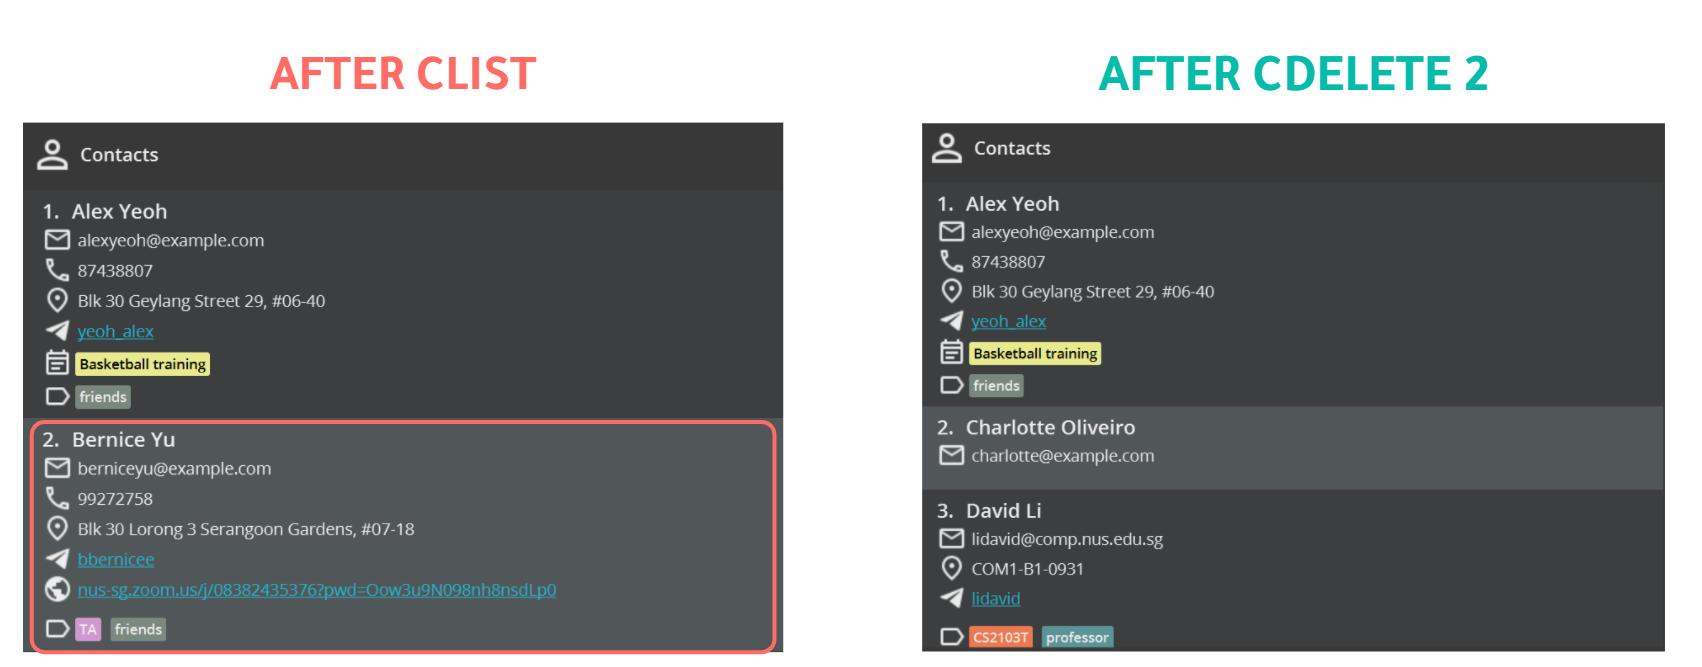
|
| Input 2 |
cfind Bernice followed by cdelete 1
|
| Expected Output 2 | Deletes the first contact from the results of the cfind command. 1. After entering cfind Bernice, you should see only contacts with names containing Bernice in the contact list.2. After entering cdelete 1, you should see the first contact in the new list removed. 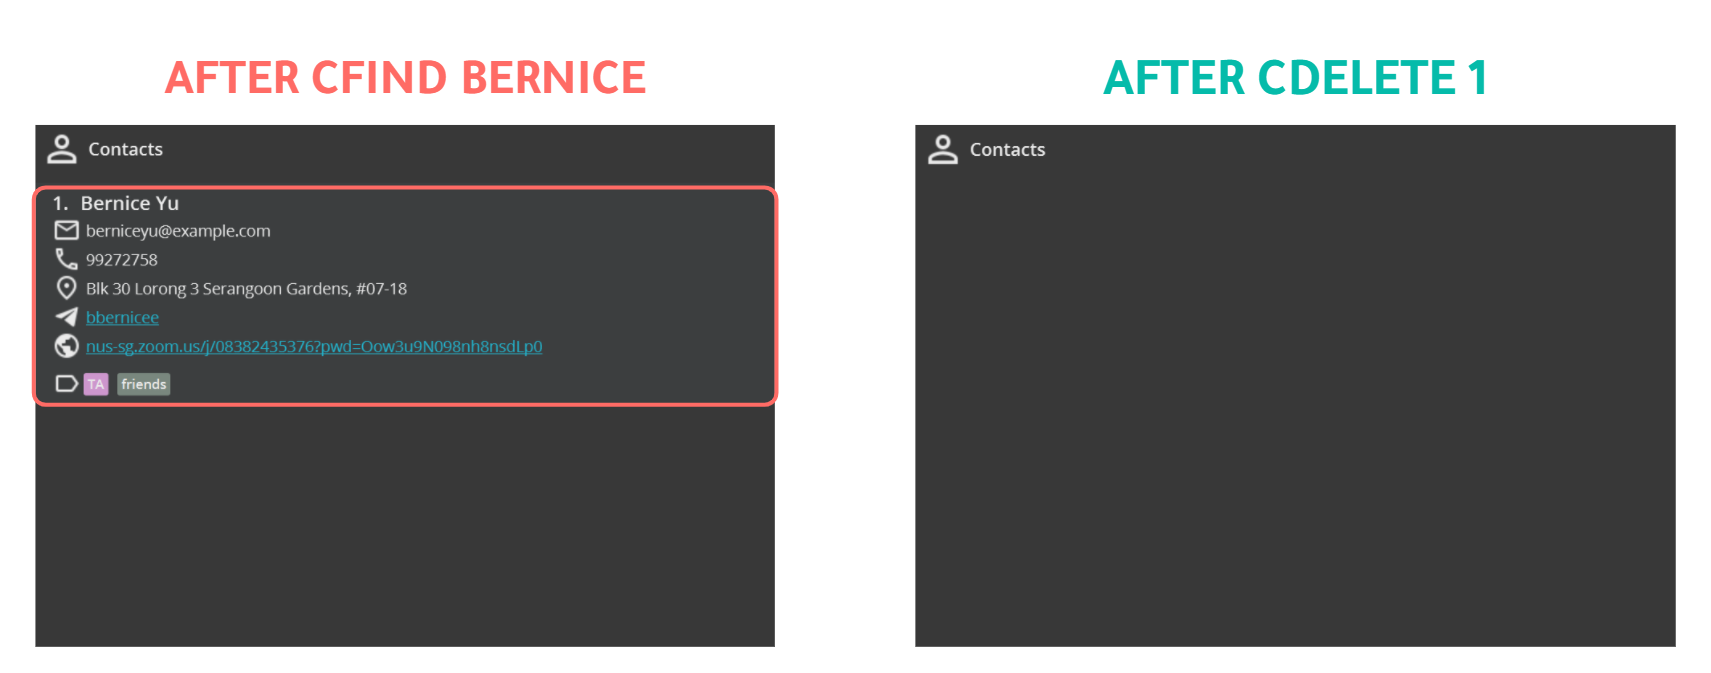
|
| Input 3 | cdelete 3-5 |
| Expected Output 3 | Deletes contacts from indexes 3 to 5 (inclusive) from the currently displayed contact list. You should see the third, fourth, and fifth contacts (i.e. Charlotte Oliveiro, David Li and Irfan Ibrahim) removed from the contact list. 
|
Editing a contact: cedit
You can use cedit to edit the information of your contacts that might have been changed or entered incorrectly.
Format: cedit INDEX [n/NAME] [e/EMAIL] [p/PHONE] [a/ADDRESS] [th/TELEGRAM_HANDLE] [z/ZOOM] [dt/TAG_DELETED]… [t/TAG_ADDED]…
- Edits the contact at the specified
INDEX. -
INDEXrefers to the index number shown in the displayed contact list. - The input values you provide will be used to update the existing fields.
- You can use
t/to add a tag. - You can remove an existing tag by typing
dt/followed by the name of the tag that you wish to remove. - You can remove all tags of a contact by typing
dt/*. - When editing tags, the tags to be deleted will be removed first, before new tags are added.
![]() Tip:
Tip:
-
INDEXmust be a positive integer. e.g. 1, 2, 3, … -
INDEXmust not be greater than the number of contacts in the contact list. - You cannot edit a contact to the same name as an existing contact.
- You can refer to the following list of prefixes to see which prefix to use.
Examples:
| Input 1 | cedit 2 p/91234567 e/agentX@thehightable.com |
| Expected Output 1 | Edits the phone number and email address of the second contact in the currently displayed contact list to be 91234567 and agentX@thehightable.com respectively. You should see the following changes: 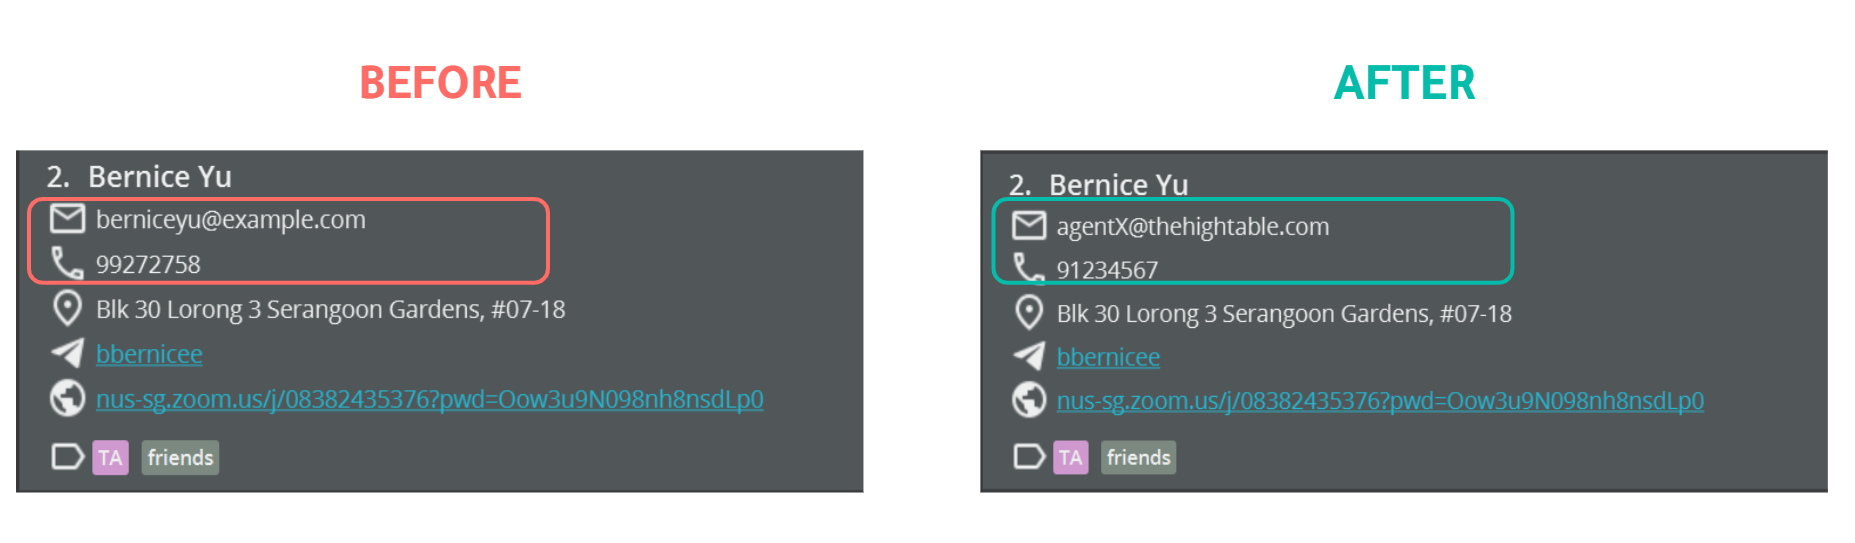
|
| Input 2 | cedit 1 n/Betsy Crower dt/* |
| Expected Output 2 | Edits the name of the first contact in the currently displayed contact list to be Betsy Crower and clears all existing tags. You should see the following changes: 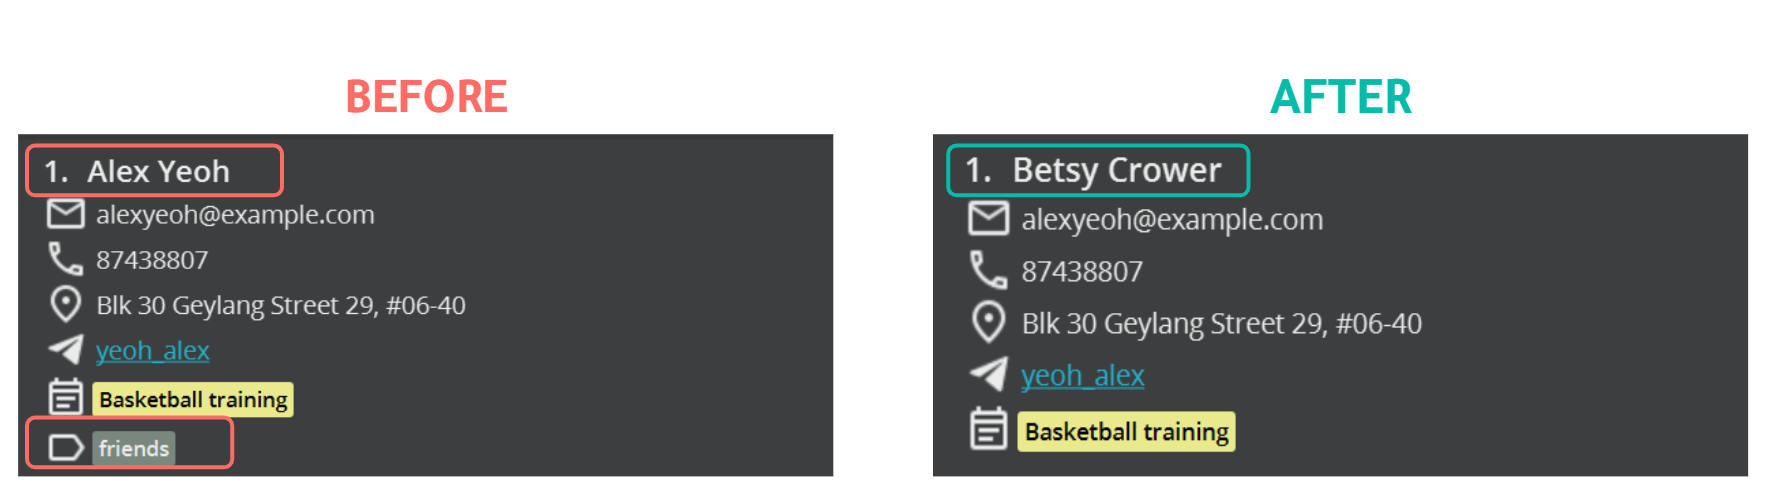
|
Finding contacts: cfind
You can use cfind to search for specific contact(s) by name or other fields.
Format: cfind [KEYWORD]… [e/KEYWORD…] [p/KEYWORD…] [a/KEYWORD…] [th/KEYWORD…] [z/KEYWORD…] [t/KEYWORD…]
![]() Tip:
Tip:
There are two types of contact searches you can do in SoConnect:
-
If you do not specify any prefix in front of the keywords you specify, e.g.
cfind KEYWORD1 KEYWORD2,SoConnect will only search the names of the contacts using the keywords you provide, by default.
-
If you specify any prefix before your keyword(s), e.g.
cfind e/KEYWORD1 p/KEYWORD2,SoConnect will search the emails and phone numbers of the contacts using
KEYWORD1andKEYWORD2respectively.
- You must provide at least one keyword.
- You can provide multiple keywords for each field e.g.
cfind John Davidorcfind a/Clementi 123. - You can only specify each optional field once.
- You can specify the keywords in any order. e.g. Both
Hans BoandBo Hanswill display the same result. - Partial words can be matched e.g.
Hanwill matchHans. - The contact(s) matching at least one keyword provided will be displayed.
e.g.
Hans Bowill returnHans GruberandBo Yang.
cfind is case-insensitive. e.g. hans will match Hans.
Example:
| Input 1 | cfind alex david |
| Expected Output 1 | Displays the contacts with names that contain alex and david. You should see only these two contacts in the contact list: 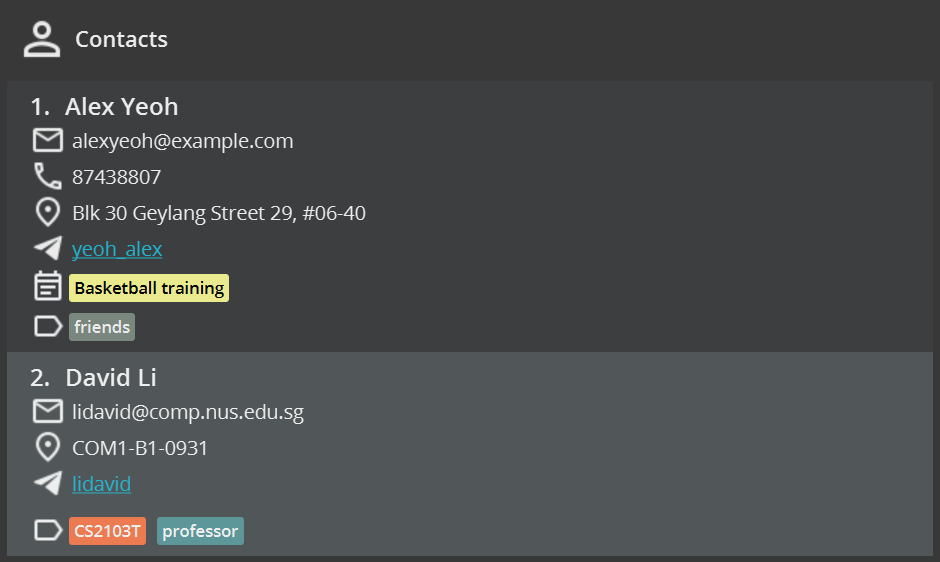
|
| Input 2 | cfind p/926 e/nus.edu |
| Expected Output 2 | Displays the contacts with phone numbers that contain 926 or with emails that contain nus.edu.You should see only these two contacts: 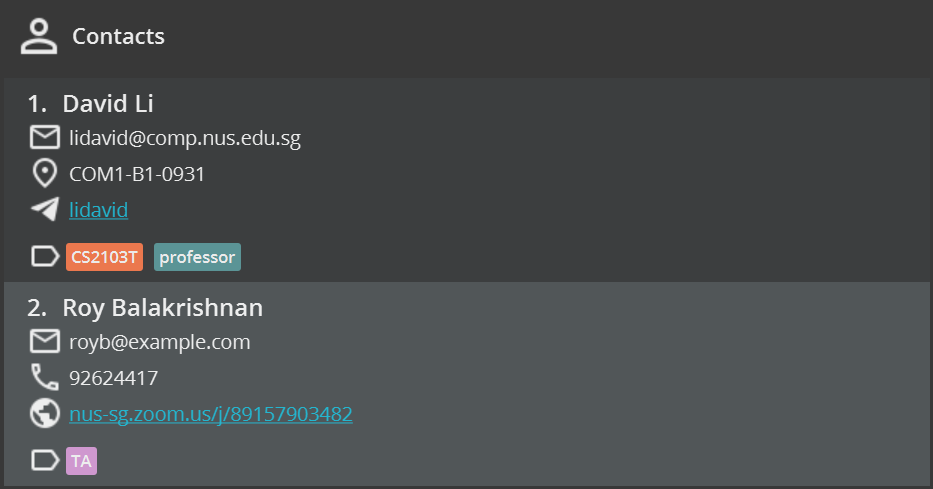
|
Listing all contacts: clist
You can use clist to view the list of all contacts.
Format: clist [e/] [p/] [a/] [th/] [z/] [t/]
- Names of contacts are always displayed.
- If you do not provide any optional prefixes, e.g
clist, all available details of each contact will be shown, by default. - If you provide optional prefixes, SoConnect will only show the names and the corresponding fields of those prefixes for each contact.
- You can provide more than one optional prefix.
- You can specify the optional prefix in any order. e.g. both
clist e/ p/andclist p/ e/will show only the names, email addresses and phone numbers of each contact. -
Fields of a contact that have no value will not appear e.g. if a contact does not have a zoom link, typing
clist z/will not display the zoom link of this contact. - You can refer to the following list of prefixes to see which prefix you can use.
Examples:
| Input 1 | clist |
| Expected Output 1 | Shows all available details of each contact in SoConnect. You should see all your contacts in the contact list. |
| Input 2 | clist e/ p/ |
| Expected Output 2 | Shows only the names, email addresses and phone numbers (if available) of each contact in SoConnect. You should see the contacts list displays only the specified fields: 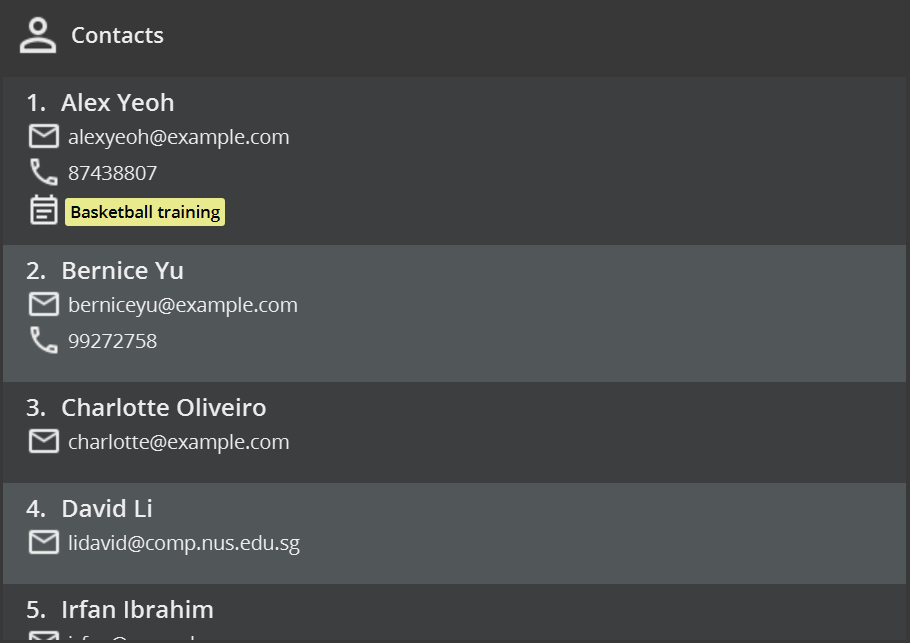
|
Clearing all contacts: cclear
You can use cclear to delete all contacts.
Format: cclear
Marking a contact: cmark
You can use cmark to mark your favorite contacts, such as Professors and tutors of the modules you are taking for the current semester.
Format: cmark INDEX [INDEX]...
- Marks the contact indexed at
INDEXand pins it at the top of the contact list. -
INDEXrefers to the index number shown in the currently displayed contact list. - You may mark more than one contact by specifying multiple indexes, e.g.
cmark 1 2. - Note that the marked contacts appear in reverse order to the order in which you specify their corresponding indexes. e.g.
cmark 1 2will result in the contact originally at index 2 pinned above the contact originally at index 1 (for an illustration, see example 2).
![]() Tip:
Tip:
-
INDEXmust be a positive integer, e.g. 1, 2, 3,… -
INDEXmust not be greater than the number of contacts in the contact list.
Examples:
| Input 1 | cmark 2 |
| Expected Output 1 | Marks the second contact of the currently displayed contact list in SoConnect. You should see Bernice Yu pinned to the top of your contact list with the Bookmark Icon: 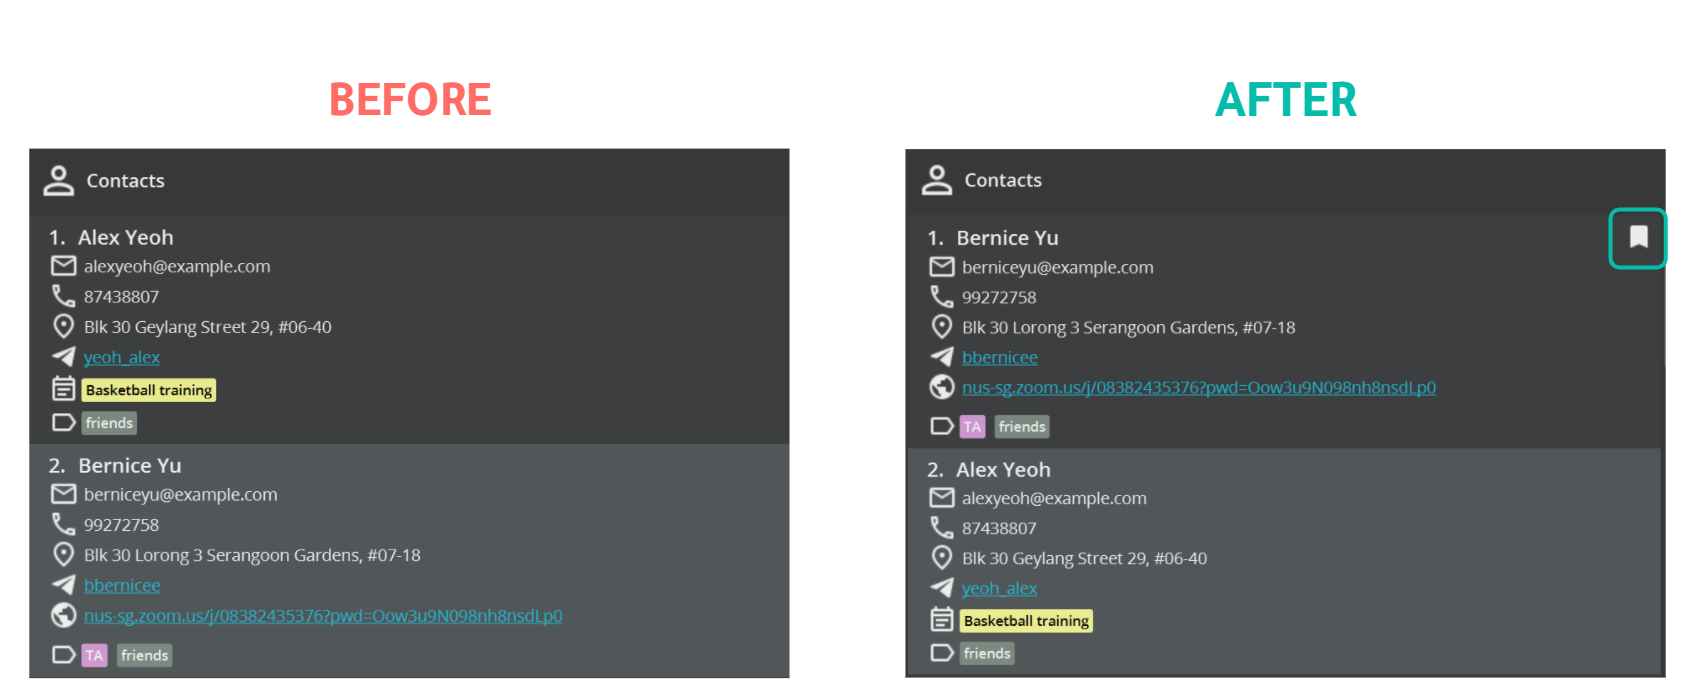
|
| Input 2 | cmark 4 5 |
| Expected Output 2 | Marks the fourth and fifth contacts of the currently displayed contact list in SoConnect. You should see Irfan Ibrahim and David Li pinned to the top of your contact list in that order with the Bookmark Icon: 
|
See also: Unmarking a contact
Unmarking a contact: cunmark
You can use cunmark to unmark marked contacts, such as Professors and tutors after you have completed the semester.
Format: cunmark INDEX [INDEX]...
- Unmarks the contact at the specified
INDEX. -
INDEXrefers to the index number shown in the displayed contact list. - You may unmark more than one contact at a time by specifying multiple indexes, e.g.
cunmark 1 2 - If more than one
INDEXis specified, the contacts will appear in the same order as the specified (for an illustration see example 2).
![]() Tip:
Tip:
-
INDEXmust be a positive integer, e.g. 1, 2, 3,… -
INDEXmust not be greater than the number of contacts in the contact list. - You must check that the contact indexed at
INDEXis initially marked.
Examples:
| Input 1 |
cmark 2 3 followed by cunmark 1
|
| Expected Output 1 | Unmarks the first contact of the currently displayed contact list in SoConnect. You should see Charlotte Oliveiro moved to the bottom of your marked contact list without the Bookmark Icon: 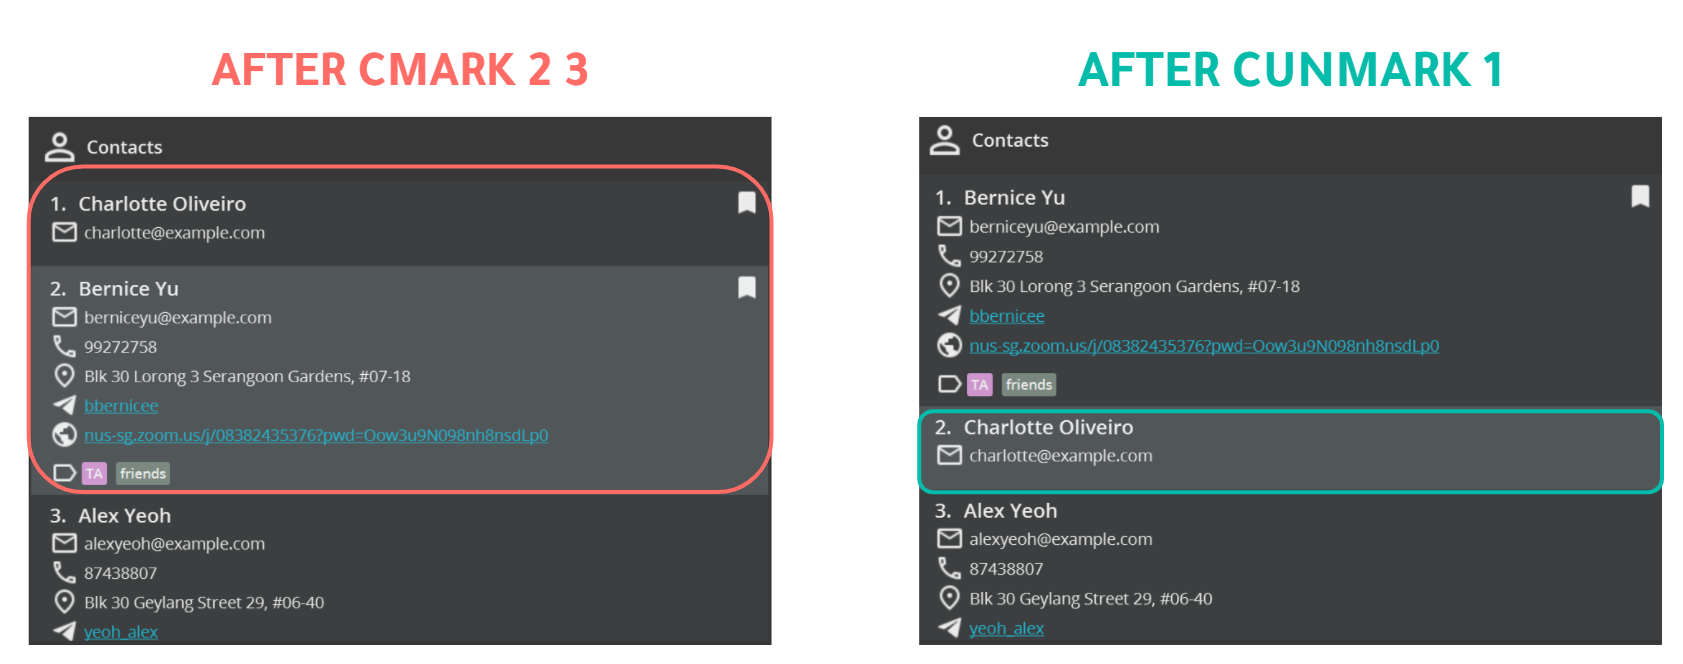
|
| Input 2 |
cmark 1 2 3 followed by cunmark 1 2
|
| Expected Output 2 | Unmarks the first and second contact of the currently displayed contact list in SoConnect. You should see Bernice Yu and Charlotte Oliveiro moved to the bottom of your marked contact list in that order without the Bookmark Icon: 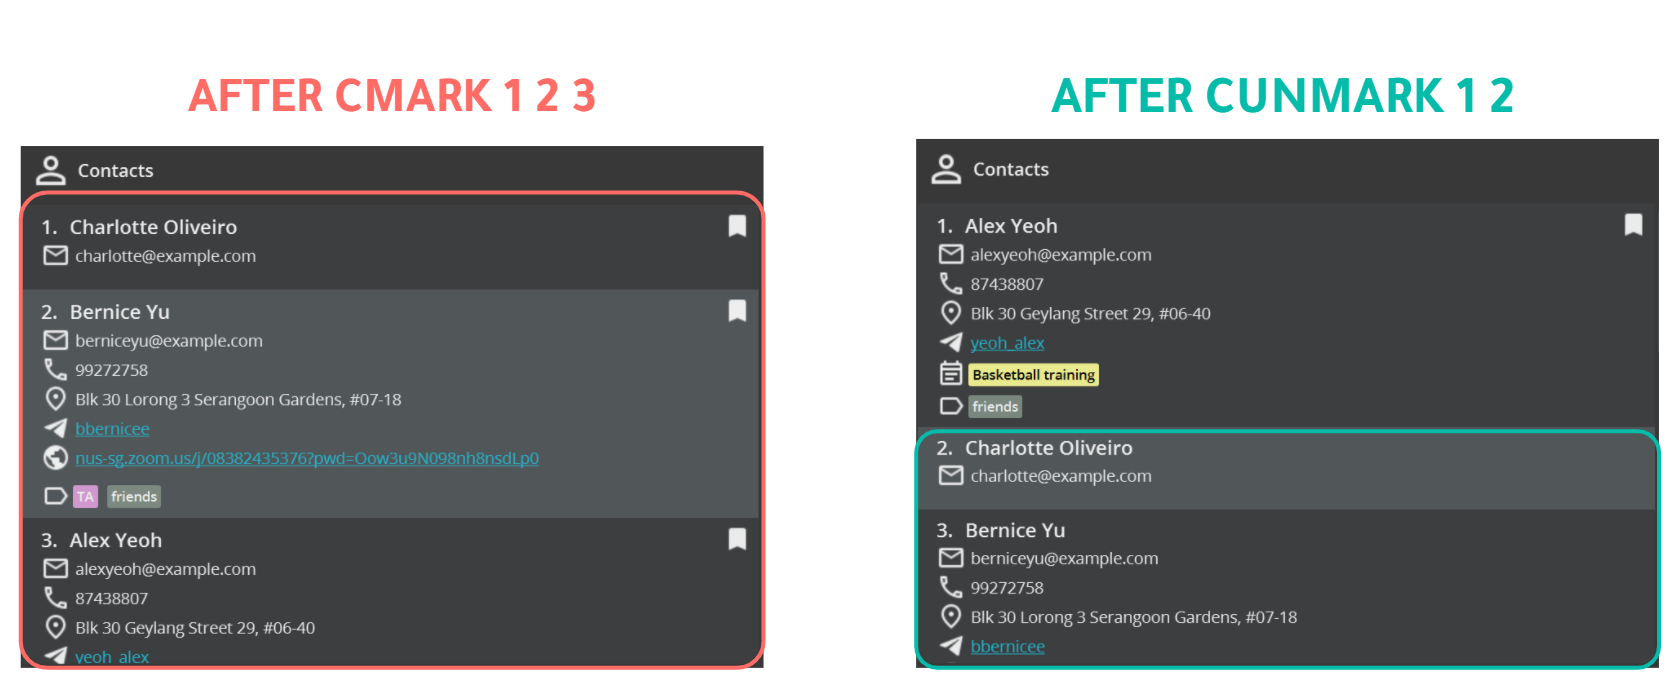
|
See also: Marking a contact
Viewing a contact: cview
cview is particularly useful if your contacts have very long fields, like long addresses or emails that are truncated.
Format: cview INDEX
- Displays only the contact at the specified
INDEX. - All truncated details of the contact you want to view will be expanded fully.
-
INDEXrefers to the index number shown in the displayed contact list.
![]() Tip:
Tip:
-
INDEXmust be a positive integer. e.g. 1, 2, 3, …
-
INDEXmust not be greater than the number of contacts in the contact list.
Examples:
| Input | cview 2 |
| Expected Output | Shows all details of the second contact of the currently displayed in SoConnect fully. You should see this change in your viewed contact: 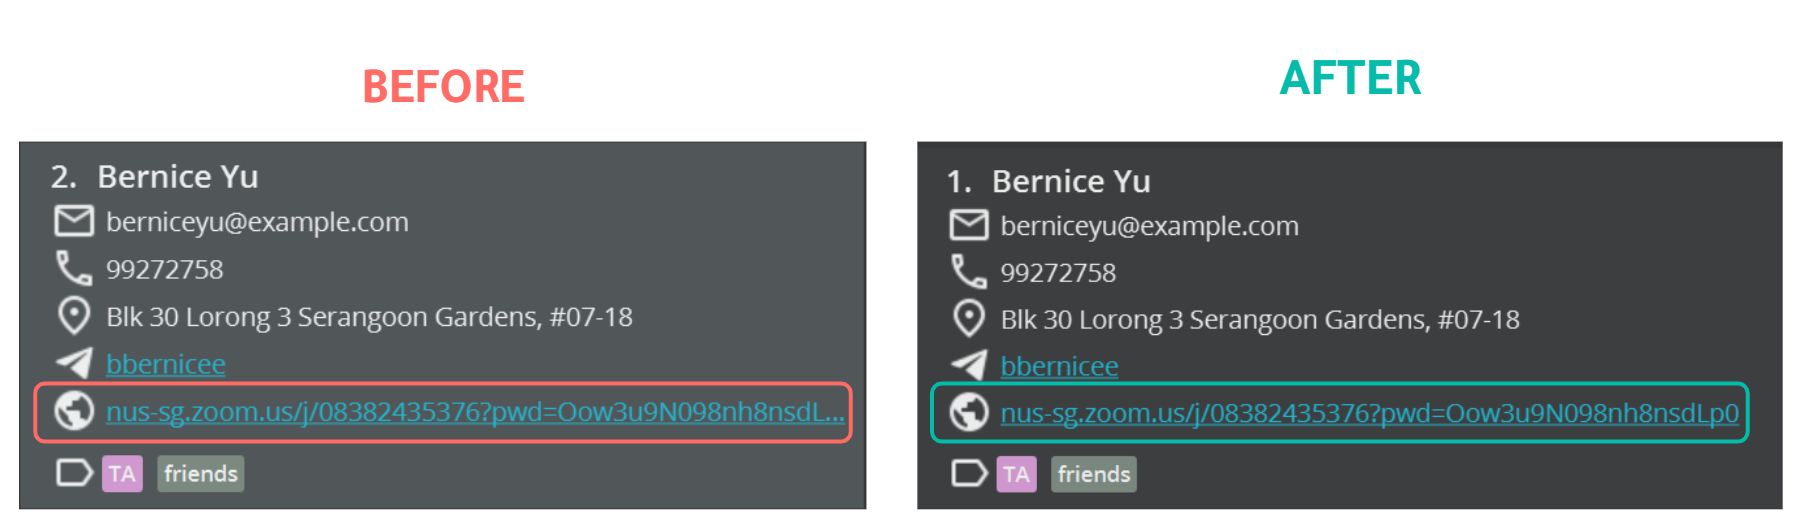
|
Event Management
This section details all the features and commands available in SoConnect that can help you with managing your events:
Basic features:
Advanced features:
- Clearing all event
- Marking an event
- Unmarking an event
- Viewing an event
- Sorting events
- Linking an event to contacts
- Unlinking an event from contacts
Adding an event: eadd
You can use eadd to add your events such as lectures and tutorials.
Format: eadd n/NAME at/START_TIME [end/END_TIME] [d/DESCRIPTION] [a/ADDRESS] [z/ZOOM] [t/TAG]…
![]() Tip:
Tip:
- The event you add can have any number of tags (including 0)
- You cannot add an event with the same name as an existing event.
- You can refer to the following list of prefixes to see which prefix to use.
![]() Note:
Note:
- Start time and End Time should be in the format dd-MM-yyyy HH:m (day-month-year hours:minutes).
- End Time should be chronologically after the Start Time.
Examples:
| Input | eadd n/Summer Party at/12-12-2021 15:12 a/123, Clementi Rd, 1234665 t/fun |
| Expected Output | A new event is added to the bottom of the event list. You should also see Summer Party at the end of your event list: 
|
Deleting an event: edelete
You can use edelete to delete events that are outdated or added mistakenly.
Format: edelete INDEX1[-INDEX2]
- Deletes the event(s):
- at the specified
INDEX1or - between the specified range from
INDEX1toINDEX2inclusively (if you provideINDEX2).
- at the specified
-
INDEX1andINDEX2refer to the index numbers shown in the displayed event list.
![]() Tip:
Tip:
-
INDEX1andINDEX2must be positive integers. e.g. 1, 2, 3, … -
INDEX1andINDEX2must not be greater than the number of events in the event list.
Examples:
| Input 1 |
elist followed by edelete 2
|
| Expected Output 1 | Deletes the second event from SoConnect. |
| Input 2 |
efind Class followed by edelete 1
|
| Expected Output 2 | Deletes the first event from the results of the efind command. |
| Input 3 | edelete 1-2 |
| Expected Output 3 | Deletes events from index 1 to 2 (inclusive) from the currently displayed event list. |
*The expected changes are similar to deleting a contact
Editing an event: eedit
You can use eedit to update the information of your events that might have been changed or entered incorrectly.
Format: eedit INDEX [n/NAME] [at/START_TIME] [end/END_TIME] [d/DESCRIPTION] [a/ADDRESS] [z/ZOOM] [dt/TAG_DELETED]… [t/TAG_ADDED]…
- Edits the event at the specified
INDEX. -
INDEXrefers to the index number shown in the displayed event list. - The values you provide will be used to update the existing fields.
- You can use
t/to add a tag. - You can remove an existing tag by typing
dt/followed by the name of the tag that you wish to remove. - You can remove all tags of an event by typing
dt/*. - When editing tags, the tags to be deleted will be removed first, before new tags are added.
![]() Tip:
Tip:
-
INDEXmust be a positive integer. e.g. 1, 2, 3, … - Start time and End Time should be in the format dd-MM-yyyy HH:mm (day-month-year hours:minutes).
- End Time should be chronologically after the Start Time.
- You cannot edit an event to the same name as an existing event.
- You can refer to the following list of prefixes to see which prefix to use.
Examples:
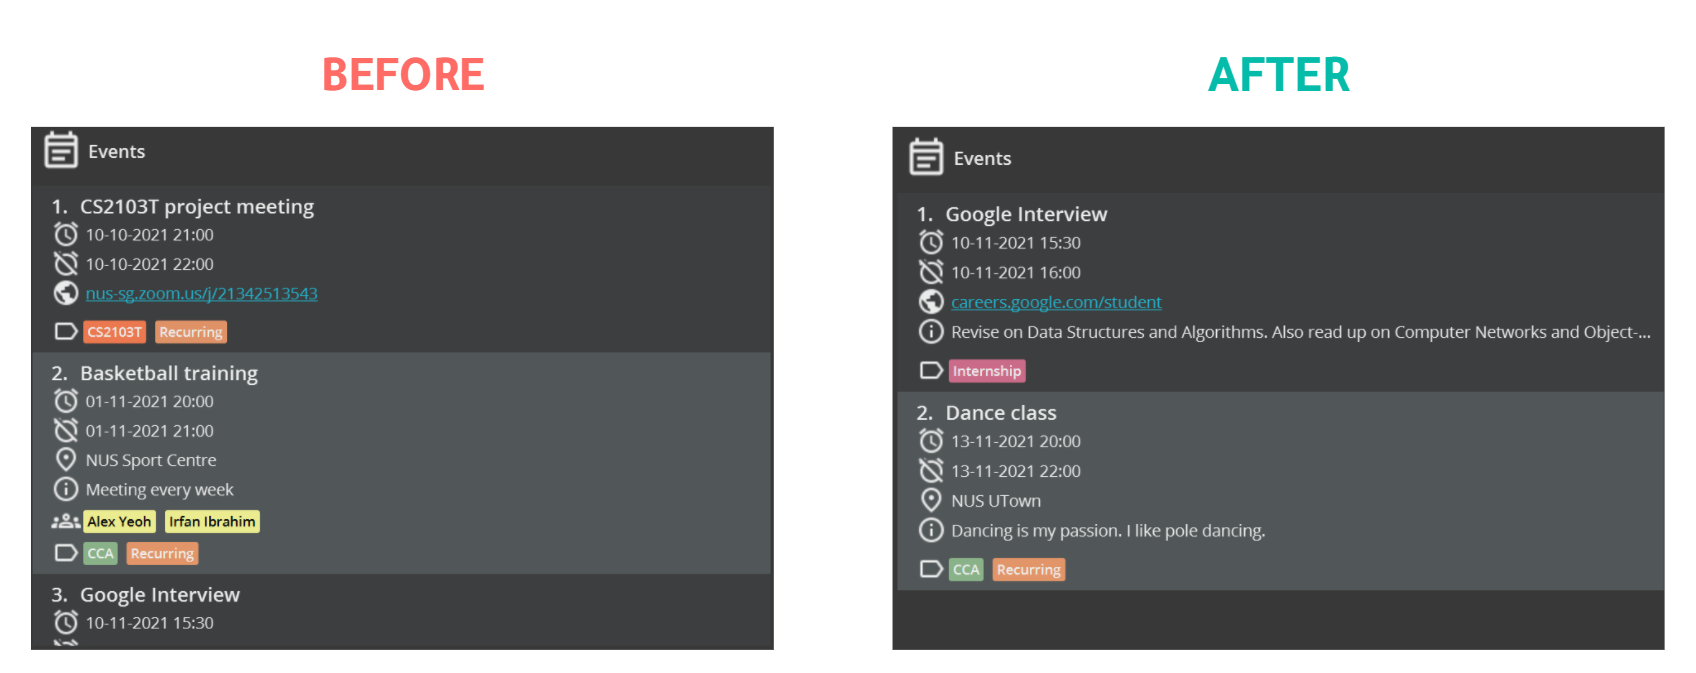
| Input | eedit 2 n/CS2103T Exam dt/CCA t/Hard |
| Expected Output | Changes the name of the second event in the currently displayed event list to CS2103T Exam, deletes the tag CCA and adds the tag Hard. You should see these changes: 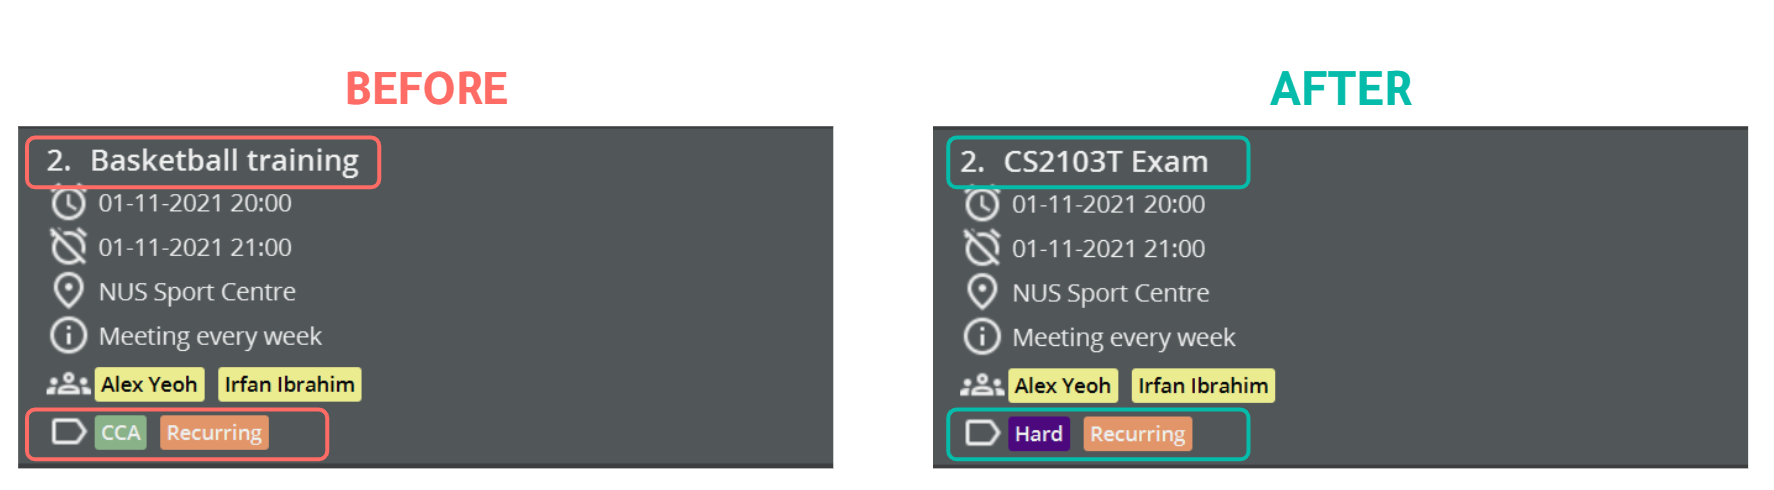
|
Finding events: efind
You can use efind to search for specific event(s) by name or other fields.
Format: efind [KEYWORD]… [at/KEYWORD…] [end/KEYWORD…] [d/KEYWORD…] [a/KEYWORD…] [z/KEYWORD…] [t/KEYWORD…]
![]() Tip:
Tip:
There are two types of event searches you can do in SoConnect:
-
If you do not specify any prefix in front of the keywords you specify, e.g.
efind KEYWORD1 KEYWORD2,SoConnect will only search the names of the events using the keywords you provide, by default.
-
If you specify any prefix before your keyword(s), e.g.
efind a/KEYWORD1 d/KEYWORD2,SoConnect will search the addresses and descriptions of the events using
KEYWORD1andKEYWORD2respectively.
- You need to provide at least one keyword.
- You can provide multiple keywords for each field e.g.
efind Test Examorefind d/study revise. - You can only specify each optional field once.
-
- You can specify the keywords in any order. e.g. Both
Test ExamandExam Testwill display the same result.
- You can specify the keywords in any order. e.g. Both
- Partial words can be matched e.g.
Exawill matchCS2103T Exam. - The events(s) matching at least one keyword provided will be displayed.
e.g.
Exam Hardwill returnHard Exam,CS1101S Exams.
efind is case-insensitive. e.g. exams will match Exams.
Examples:
| Input 1 | efind meet |
| Expected Output 1 | Displays events with names that contain meet. You should see only this one event: 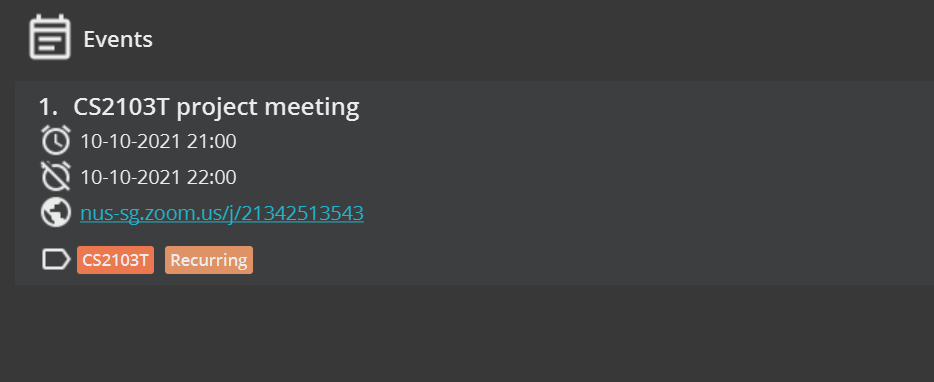
|
| Input 2 | efind t/CS2103T Intern |
| Expected Output 2 | Displays events with tags that contain CS2103T and Intern.You should see only these two events: 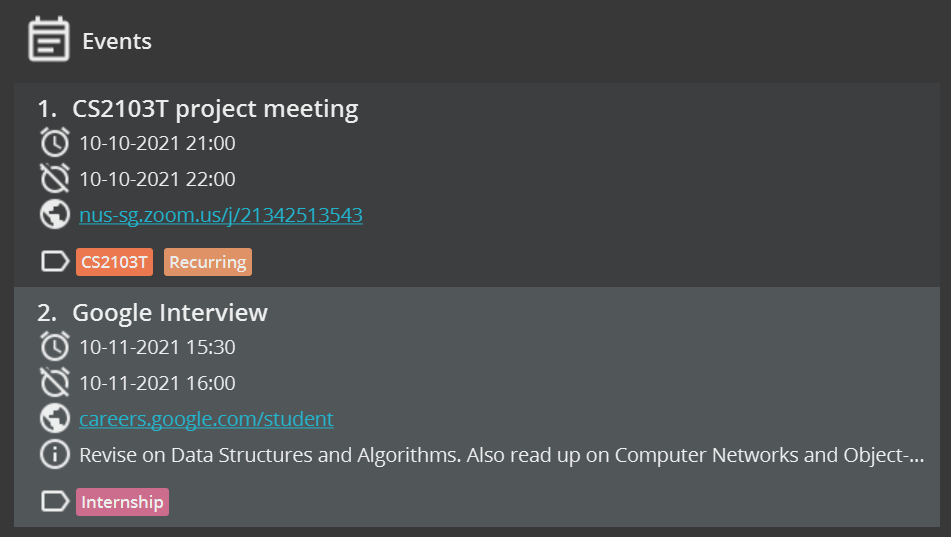
|
Listing all events: elist
You can use elist to view the list of all events, such as your lectures, tutorials and exams.
Format: elist [at/] [end/] [d/] [a/] [z/] [t/]
- Event names are always displayed.
- If you do not provide any optional prefixes, e.g.
elist, all available details of each event will be shown, by default. - If you provide optional prefixes, SoConnect will only show the names and the corresponding fields for each event.
- You can provide more than one optional prefix.
- You can specify the optional prefix in any order. e.g. both
elist d/ at/andelist at/ d/will only show the names, descriptions and starting times of each event. -
Fields of a contact that have no value will not appear e.g. if an event does not have a zoom link, typing
elist z/will not display the zoom link of this event. - You can refer to the following list of prefixes to see which prefix you can use.
Examples:
| Input 1 | elist |
| Expected Output 1 | Shows all available details of each event in SoConnect. You should see all your events in the event list. |
| Input 2 | elist d/ at/ |
| Expected Output 2 | Shows only their names, start date and time and description (if available) of each event in SoConnect. You should also see the event list displays all events with only the specified fields: 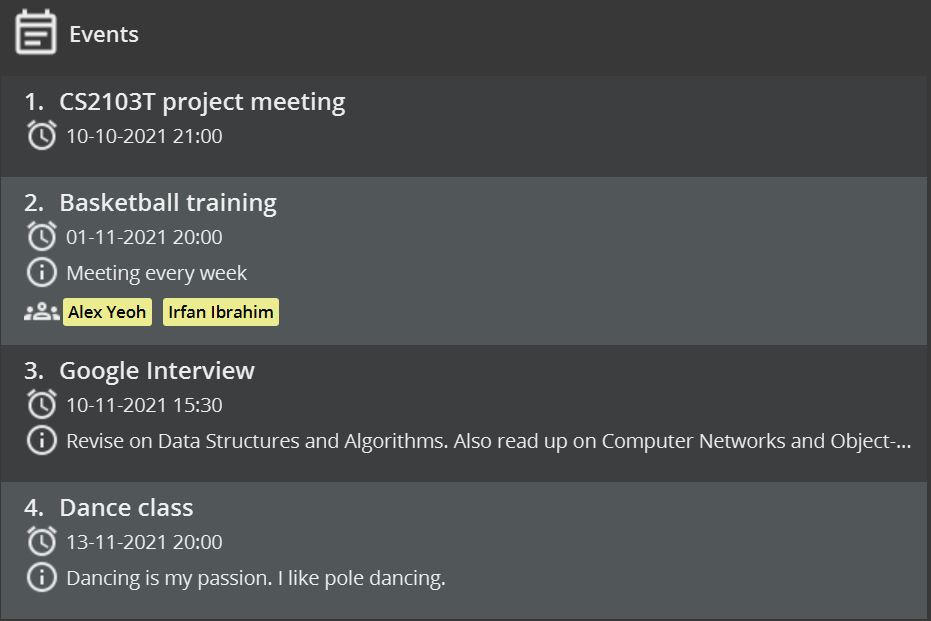
|
Clearing all events: eclear
You can use eclear to delete all events.
Format: eclear
Marking an event: emark
You can use emark to mark noteworthy events, such as recurring lectures and tutorials of the modules you are taking for the current semester.
Format: emark INDEX [INDEX]…
- Marks the event indexed at
INDEXand pins it at the top of the event list. -
INDEXrefers to the index number shown in the currently displayed event list. - You may mark more than one event by specifying multiple indexes, e.g.
emark 1 2. - Note that the marked events appear in reverse order to the order in which you specify their corresponding indexes. e.g.
emark 1 2will result in the event originally at index 2 pinned above the event originally at index 1 (for an illustration, see example 2 in Marking a contact).
![]() Tip:
Tip:
-
INDEXmust be a positive integer, e.g. 1, 2, 3,… -
INDEXmust not be greater than the number of events in the event list.
Examples:
| Input | emark 2 |
| Expected Output | Marks the second event of the currently displayed event list in SoConnect. |
The expected change is similar to Marking a contact See Also: Unmarking an event
Unmarking an event: eunmark
You can use eunmark to unmark marked events, such as events that you no longer frequently attend.
Format: eunmark INDEX [INDEX]...
- Unmarks the event at the specified
INDEX. -
INDEXrefers to the index number shown in the displayed event list. - You may unmark more than one event at a time by specifying multiple indexes, e.g.
eunmark 1 2 - If more than one
INDEXis specified, the events will appear in the same order as the specified (for an illustration see example 2 in Unmarking a contact).
![]() Tip:
Tip:
-
INDEXmust be a positive integer, e.g. 1, 2, 3,… -
INDEXmust not be greater than the number of events in the event list. - You must ensure that the event indexed at
INDEXis initially marked.
Examples:
| Input 1 |
emark 2 3 followed by eunmark 1
|
| Expected Output 1 | Unmarks the first event of the currently displayed event list in SoConnect. |
| Input 2 |
emark 1 2 3 followed by eunmark 1 2
|
| Expected Output 2 | Unmarks the first and second event of the currently displayed event list in SoConnect. |
*The expected changes are similar to Unmarking a contact
See Also: Marking an event
Viewing an event: eview
eview is particularly useful if your events have very long fields, like long addresses or long descriptions that are truncated.
Format: eview INDEX
- Displays only the event at the specified
INDEX. - All truncated details of the event you want to view will be expanded fully.
-
INDEXrefers to the index number shown in the displayed event list.
![]() Tip:
Tip:
-
INDEXmust be a positive integer. e.g. 1, 2, 3, …
-
INDEXmust not be greater than the number of events in the event list.
Examples:
| Input | eview 1 |
| Expected Output | Shows all details of the first event in the currently displayed event list fully. |
The expected change is similar to Viewing a contact
Sorting events: esort
You can use esort to arrange your upcoming events by their start times.
Format: esort
Examples:
Linking an event to contacts: elink
You can use elink to link your contacts to an event. This can be useful when you want to indicate the participants of an event, e.g. you can link your professors in the contact list to your lecture in the event list.
Format: elink EVENT_INDEX c/CONTACT_INDEX [c/CONTACT_INDEX]…
- Links the event at
EVENT_INDEXto the contact(s) atCONTACT_INDEX. -
EVENT_INDEXrefers to the index number shown in the displayed event list. -
CONTACT_INDEXrefers to the index number shown in the displayed contact list.
EVENT_INDEX and CONTACT_INDEX must be positive integers, e.g. 1, 2, 3,…
Examples:
| Input | elink 2 c/1 c/2 |
| Expected Output | Links the second event in the currently displayed event list to the contacts with index 1 and 2 in the currently displayed contact list. You should see this in your SoConnect: 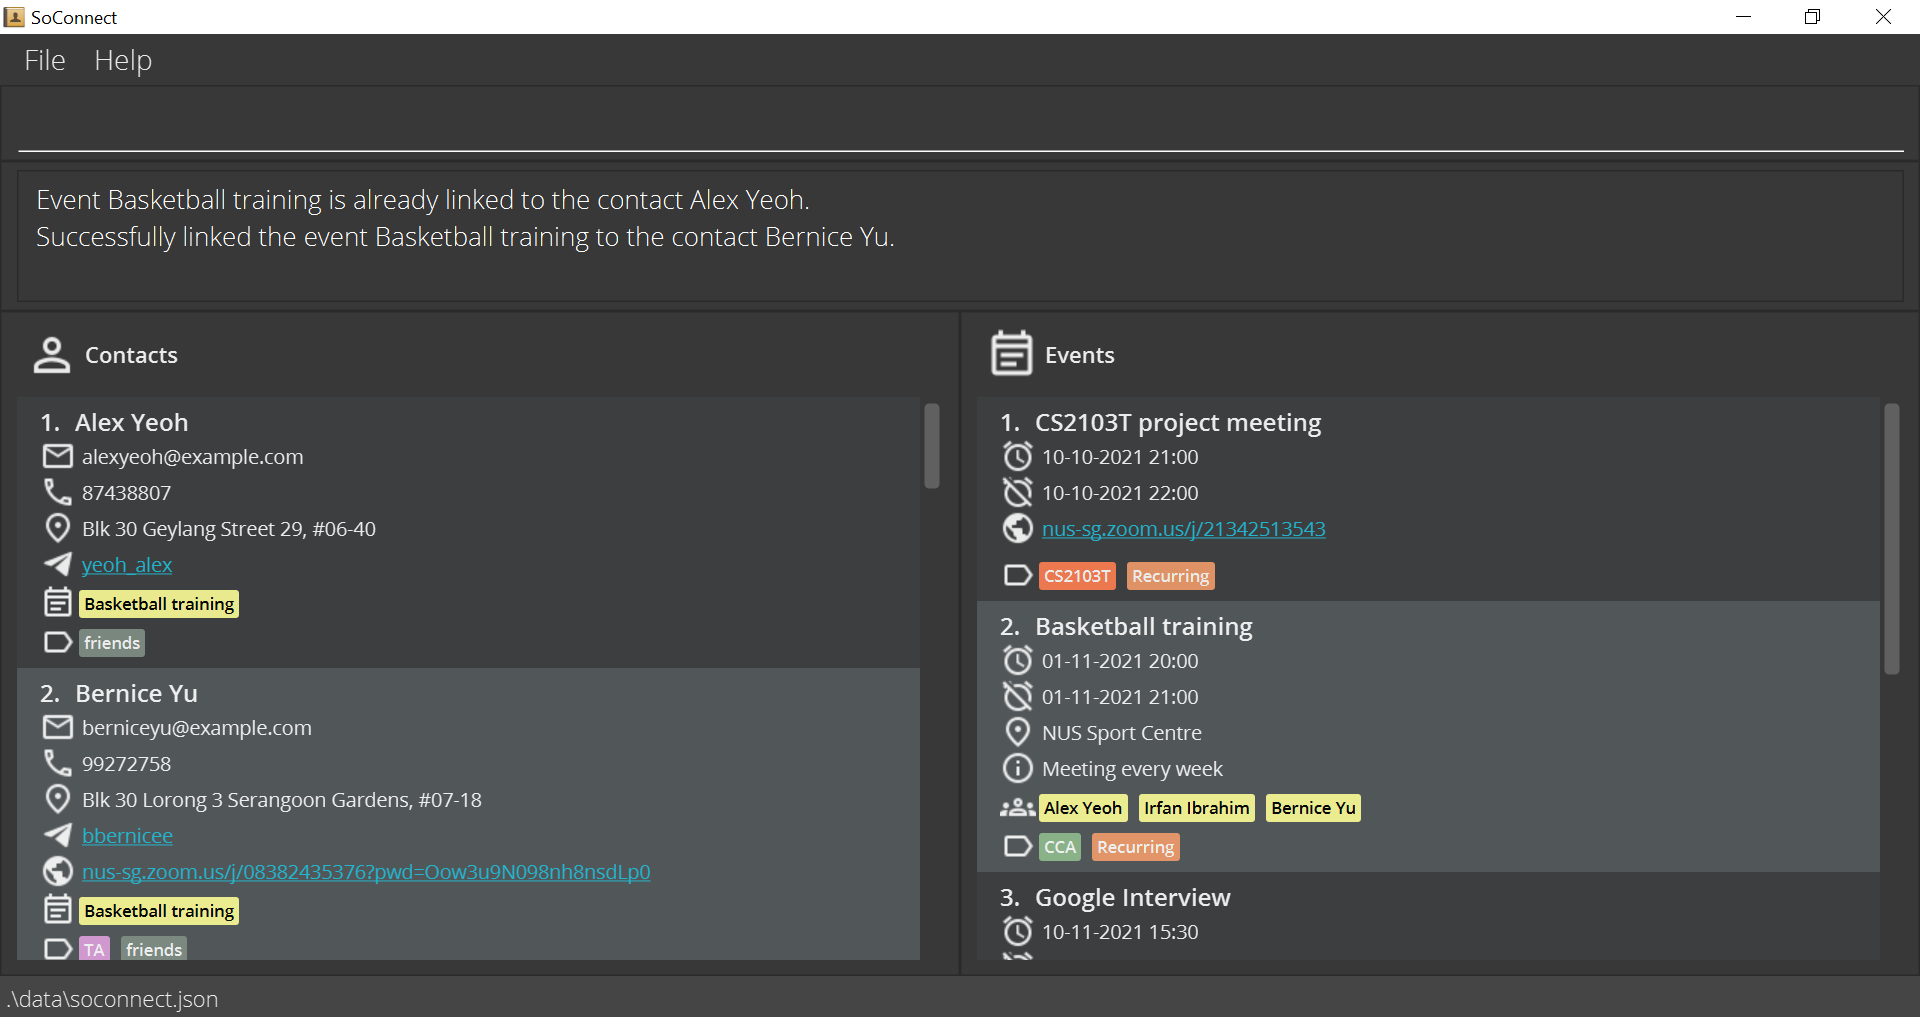
|
See Also: Unlinking an event from contacts
Unlinking an event from contacts: eunlink
Format: eunlink EVENT_INDEX c/CONTACT_INDEX [c/CONTACT_INDEX]…
You can use eunlink to remove links between your contacts from an event. This can be useful if one or more of your contacts are no longer part of the event, so you can use eunlink to remove these links.
Examples:
| Input 1 | eunlink 2 c/1 |
| Expected Output 1 | Unlinks the second event in the currently displayed event list from the first contact in the currently displayed contact list. You should see this in your SoConnect: 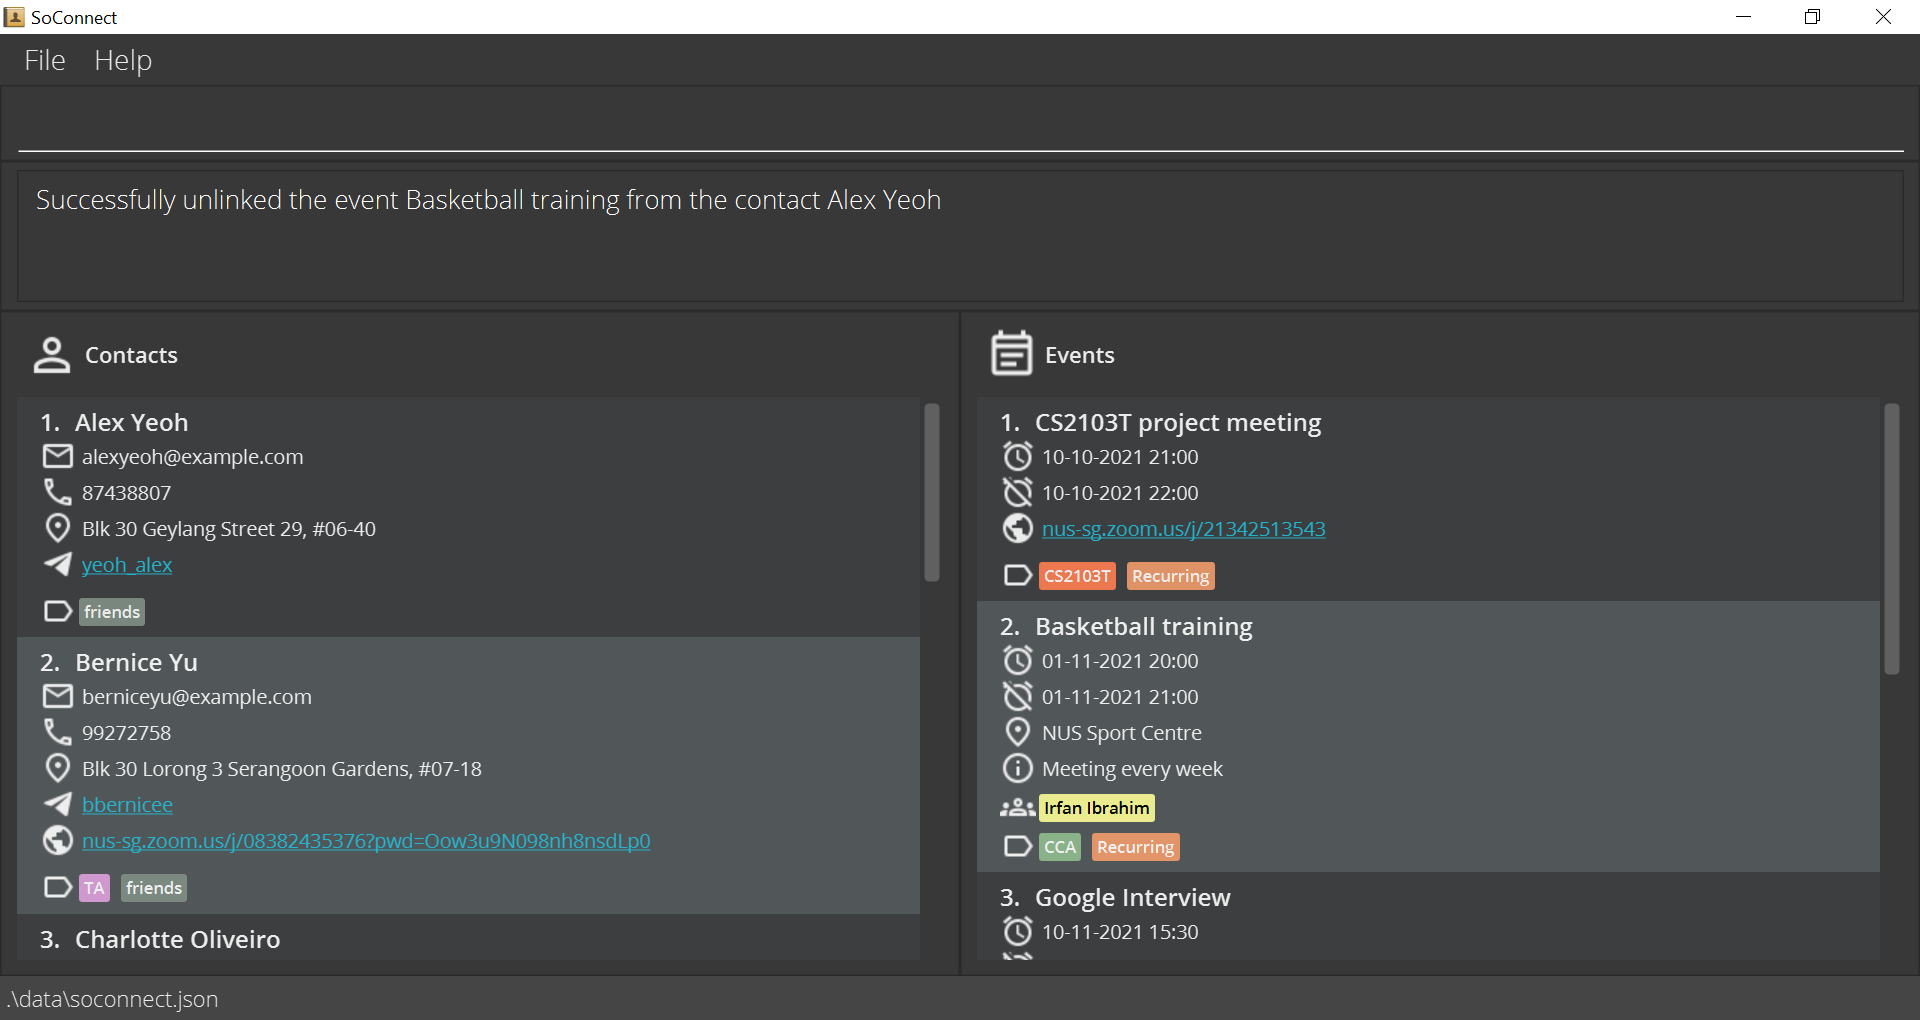
|
| Input 2 | eunlink 2 c/* |
| Expected Output 2 | Unlinks the second event in the currently displayed event list from all of its linked contacts. You should see this in your SoConnect: 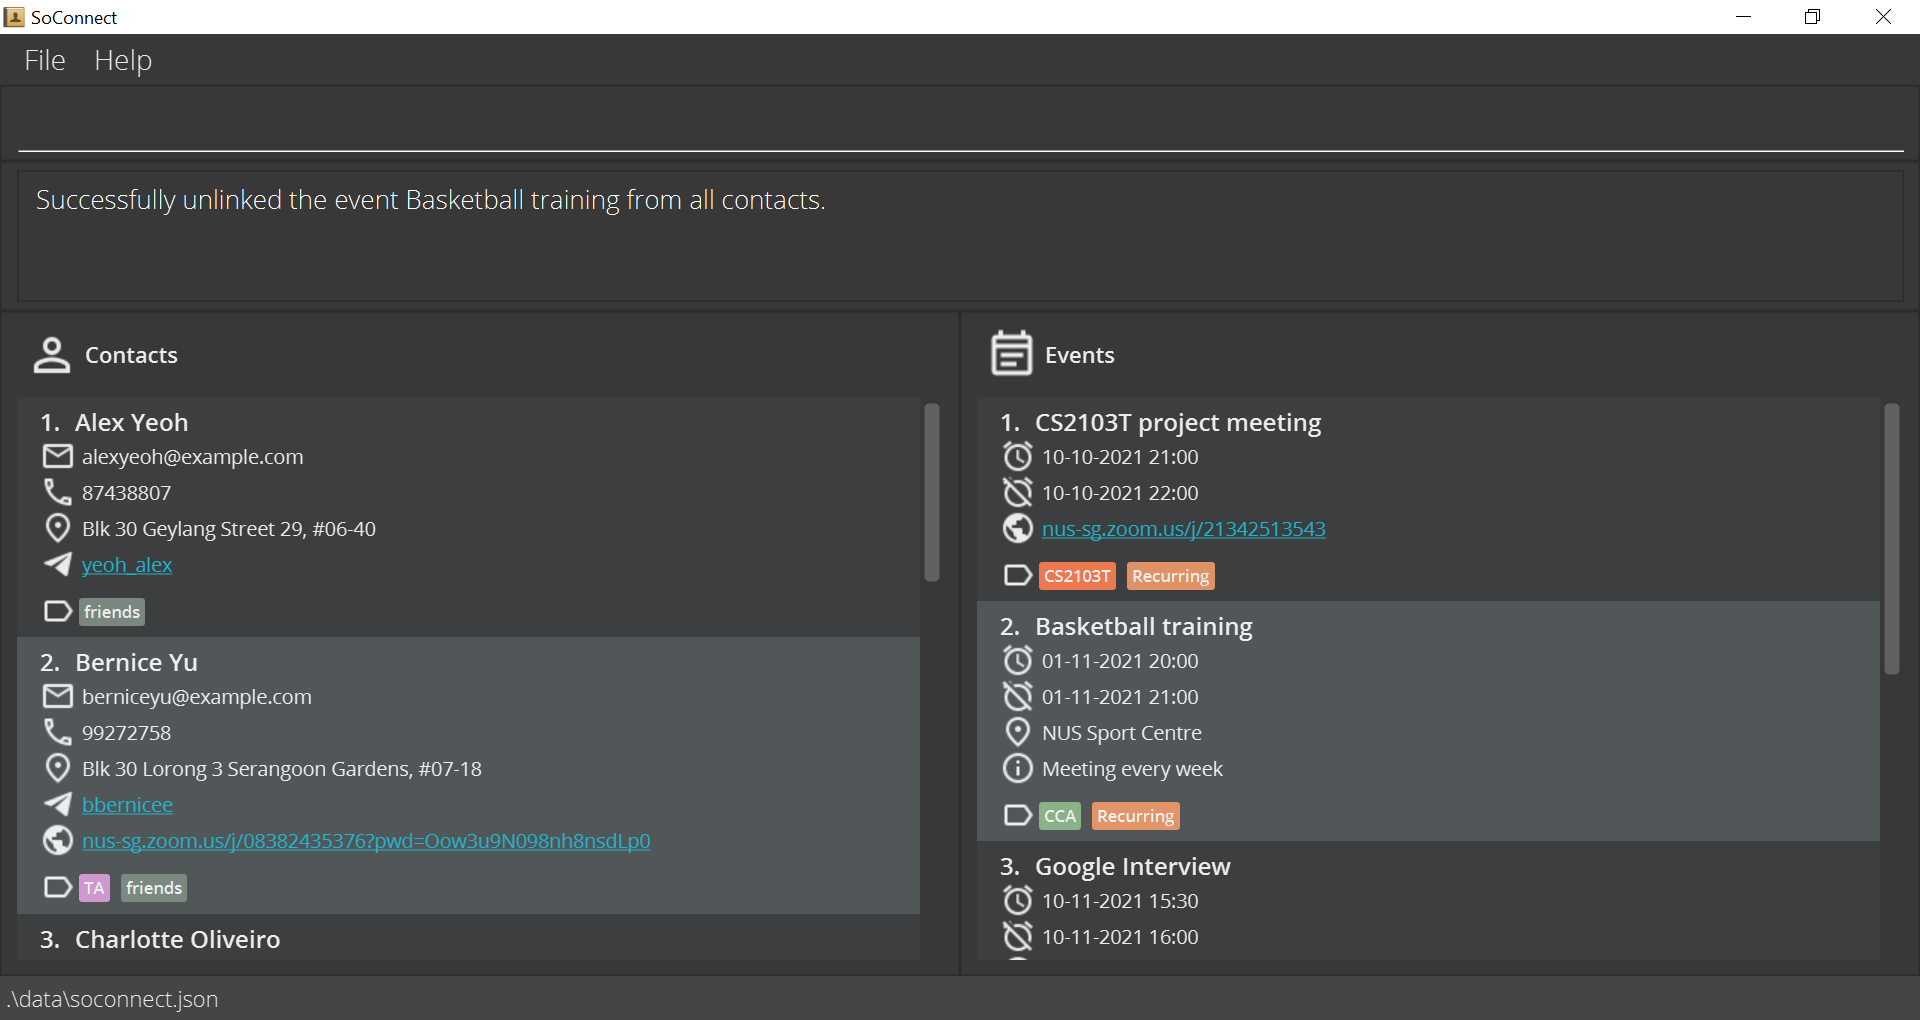
|
See Also: Linking an event to contacts
General
This section details all the other features and commands available in SoConnect that can enhance your SoConnect experience:
Basic features:
Advanced features:
Viewing help: help
You can use the help command whenever you are unsure of the command format.
Format: help
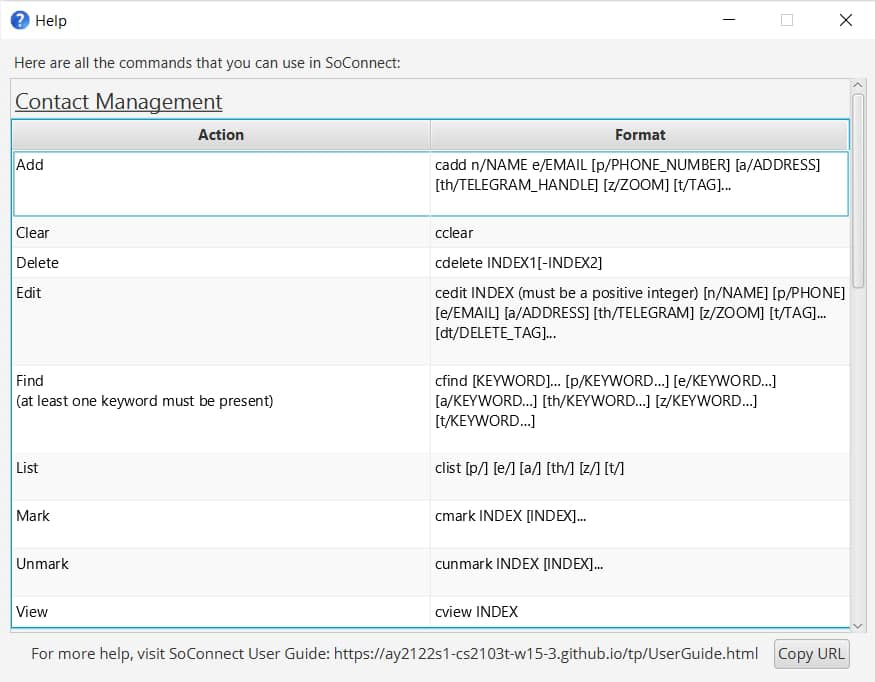
Help -> Help or press F1.
Exiting SoConnect: exit
You can use the exit command to close the SoConnect app.
Format: exit
File -> Exit.
Undoing a command: undo
You can use the undo command to remove an undesired change.
Format: undo
Examples:
| Input |
cadd n/John Doe e/john@gmail.com followed by undo
|
| Expected Output | Removes the added contact from the contact list. |
See Also: Redoing a command
Redoing a command: redo
You can use the redo command to restore a change that you accidentally undo.
Format: redo
Examples:
| Input |
edelete 1 followed by undo then redo
|
| Expected Output | First restores the deleted event in the event list. Then redo will delete the same event again. |
See Also: Undoing a command
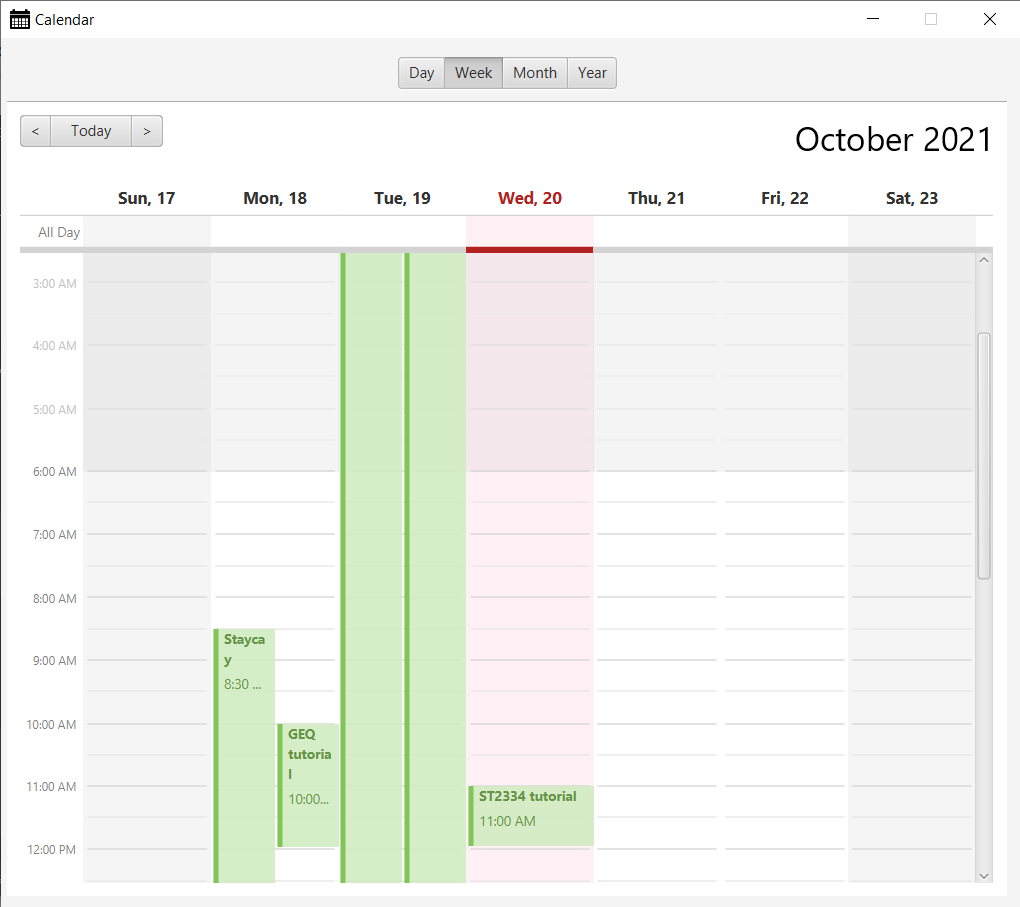
Opening the calendar: calendar
You can use the calendar command to display all your events in a calendar.
Format: calendar
- You can view the calendar in 4 different views:
- Daily
- Weekly
- Monthly
- Yearly
![]() Tip:
Tip:
- Alternatively, you can view the calendar using the top menu bar via
File -> Calendaror pressF2. - If an event does not have a specified end date and time, the calendar will treat the duration of the event as one hour.
SoConnect Saved Data
Saving the data
SoConnect data is saved in the hard disk automatically after any command that changes the data. There is no need to save manually.
Editing the data file
SoConnect data are saved as a JSON file [JAR file location]/data/soconnect.json.
Advanced users are welcome to update the data directly by editing that data file.
Others
FAQ
Q: How do I transfer my data to another Computer?
A: Install SoConnect in the other computer and copy over the contents from your previous SoConnect JSON file to the
empty data file SoConnect creates on the other Computer.
Copying Details and Opening Hyperlinks
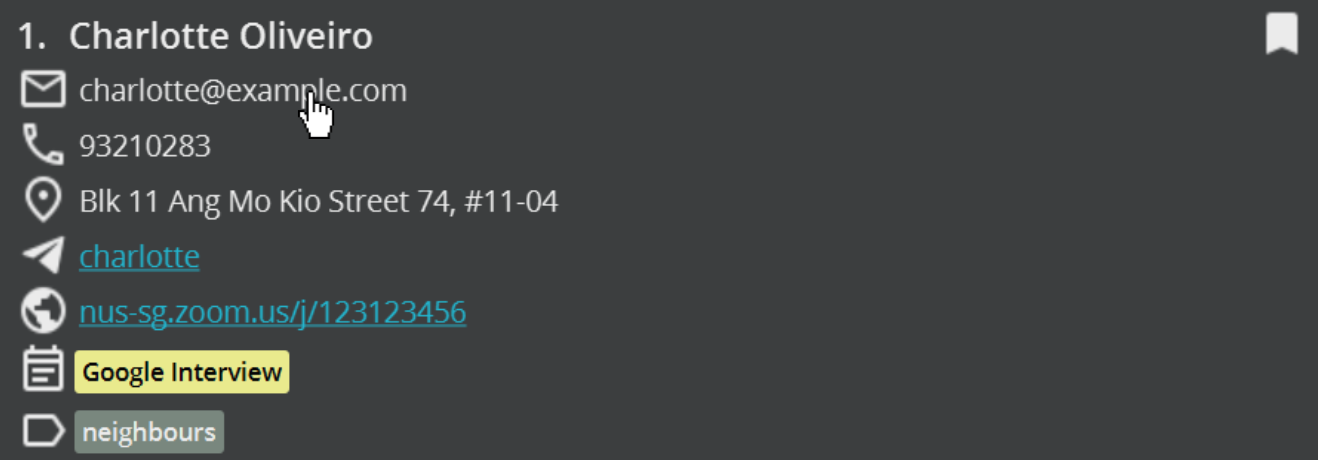
Q: How do I copy the email address of a contact?
A: You can copy any specific details of a contact or an event just by clicking on that detail.
As shown on the image above, clicking on the email of Charlotte Oliveiro will copy her Email Address.
Q: Can SoConnect automatically open a hyperlink on my browser?
A: You can open any hyperlinks that you have included in a contact or in an event. This includes telegram handles and Zoom meeting links.
Referring back to the same image, if you click on the zoom link saved under Charlotte Oliveiro,
SoConnect will open the link on your browser automatically.
Linked Contacts and Events
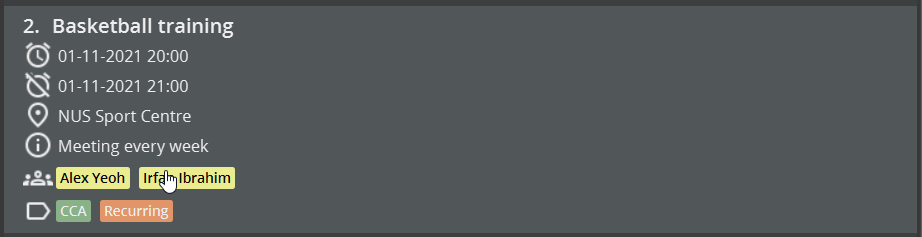
Q: How do I view the contacts linked to a particular event?
A: Click on the particular event card in the panel containing events.
Then click on the yellow boxes which are links to the contacts.
The linked contacts will be displayed on the contact panel on the left.
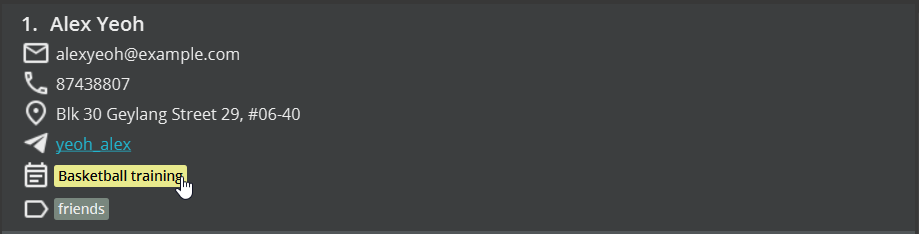
Q: How do I view the events linked to a particular contact?
A: Click on the particular contact card in the panel containing contacts.
Then click on the yellow boxes which are links to the events.
The linked events will be displayed on the event panel on the right.
Q: What is the purpose of using links?
A: Links are a form of relationship between the contacts and the events saved in SoConnect.
Typically, we link an event to a contact if the contact of a participant of the event.
For instance, you can link your professor to the lecture.
How to start SoConnect using Terminal
Proceed only if you cannot start SoConnect using this method.
-
Open the terminal (For MacOS or Linux) or Command Prompt (For Windows).
-
Navigate to the folder containing
soconnect.jar. See the tutorial for Windows, MacOS or Linux (Linux uses the same command for navigating folders). -
Enter the following command:
java -jar soconnect.jar. The SoConnect window should open.
![]() Tip:
Tip:
- If you are still unable to open the file, check your Java version again and make sure it is version 11.
- Download Java 11 if you have not done so.
- Still not working? You may contact the development team and report the issue.
List of Prefixes
Contact Management
| Prefix | Parameter Type |
|---|---|
a/ |
Address |
dt/ |
Tag to be deleted |
e/ |
Email Address |
n/ |
Name |
p/ |
Phone Number |
t/ |
Tag |
th/ |
Telegram Handle |
z/ |
Links/ Websites |
Event Management
| Prefix | Parameter Type |
|---|---|
a/ |
Address |
at/ |
Start Date and Time |
c/ |
Contact index (for linking) |
d/ |
Description |
dt/ |
Tag to be deleted |
end/ |
End Date and Time |
n/ |
Name |
t/ |
Tag |
z/ |
Links/ Websites |
Command Summary
Contact Management
| Action | Format, Examples |
|---|---|
| Add |
cadd n/NAME e/EMAIL [p/PHONE_NUMBER] [a/ADDRESS] [th/TELEGRAM_HANDLE] [z/ZOOM] [t/TAG]… e.g. cadd n/Alex Doe e/e0123456@u.nus.edu a/COM1 #99-99 th/johnDoe99 t/Professor
|
| Clear | cclear |
| Delete |
cdelete INDEX1[-INDEX2]e.g. cdelete 3 e.g. cdelete 1-5
|
| Edit |
cedit INDEX [n/NAME] [e/EMAIL] [p/PHONE] [a/ADDRESS] [th/TELEGRAM_HANDLE] [z/ZOOM] [dt/TAG_DELETED]… [t/TAG_ADDED]…e.g. cedit 2 p/91234567 e/agentX@thehightable.com e.g. cedit 1 n/Betsy Crower dt/*
|
| Find |
cfind [KEYWORD]… [e/KEYWORD…] [p/KEYWORD…] [a/KEYWORD…] [th/KEYWORD…] [z/KEYWORD…] [t/KEYWORD…]e.g. cfind alex david
|
| List |
clist [e/] [p/] [a/] [th/] [z/] [t/] e.g. clist e.g. clist e/ p/
|
| Mark |
cmark INDEXe.g. cmark 2
|
| Unmark |
cunmark INDEX [INDEX]…e.g. cunmark 2 e.g. cunmark 2 3
|
| View |
cview INDEXe.g. cview 2
|
Event Management
| Action | Format, Examples |
|---|---|
| Add |
eadd n/NAME at/START_TIME [end/END_TIME] [d/DESCRIPTION] [a/ADDRESS] [z/ZOOM] [t/TAG]… e.g. eadd n/Summer Party at/12-12-2021 15:12 a/123, Clementi Rd, 1234665 t/fun
|
| Clear | eclear |
| Delete |
edelete INDEX1[-INDEX2]e.g. edelete 3 e.g. edelete 1-5
|
| Edit |
eedit INDEX [n/NAME] [at/START_TIME] [end/END_TIME] [d/DESCRIPTION] [a/ADDRESS] [z/ZOOM] [dt/TAG_DELETED]… [t/TAG_ADDED]…e.g. eedit 2 n/CS2103T Exam dt/CCA t/Hard e.g. eedit 3 dt/*
|
| Find |
efind [KEYWORDS]… [at/KEYWORD…] [end/KEYWORD…] [d/KEYWORD…] [a/KEYWORD…] [z/KEYWORD…] [t/KEYWORD…] e.g. efind meet e.g. efind t/CS2103T Intern
|
| Link |
elink EVENT_INDEX c/CONTACT_INDEX [c/CONTACT_INDEX]...elink 2 c/1 c/2
|
| List |
elist [at/] [end/] [d/] [a/] [z/] [t/] e.g. elist e.g. elist d/ at/
|
| Mark |
emark INDEXe.g. emark 2
|
| Sort | esort |
| Unlink |
eunlink EVENT_INDEX c/CONTACT_INDEX [c/CONTACT_INDEX]...e.g. eunlink 2 c/1 e.g. eunlink 3 c/*
|
| Unmark |
eunmark INDEX [INDEX]…e.g. eunmark 2 e.g. eunmark 2 4
|
| View |
eview INDEXe.g. eview 1
|
General
| Action | Format, Examples |
|---|---|
| Calendar | calendar |
| Exit | exit |
| Help | help |
| Redo | redo |
| Undo | undo |
Glossary
| Word | Explanation |
|---|---|
| Command Line Interface (CLI) | Text-based application where users interact with the application by typing in texts/ commands. |
| Command | A sequence of words and characters you type to perform an action, each command has its own command format. |
| Command Format | The structure that a command must abide by for it to be executed. |
| Parameter(s) | Information supplied by the user to the application when executing certain commands. |
| Prefix | A tag, consisting of a slash - “/” following one or a few characters to denote information about a certain field. |
| Field(s) | The information type within each contact or event For example, Name and Address of a contact are fields of a contact. |
| Graphical User Interface (GUI) | How the application appears to the user on his/her screen. |
| Hard Disk | Device in a computer that is specialized in storing data permanently. |
| Home Folder | Folder in which the application file and data from running the application is stored. |
| JavaScript Object Notation (JSON) File | The file that is used by the application to load and save data of the application in a human-readable format. |